Printing on Windows
Before setting up your printers, please review the overview of Printing at ICERM.
The following instructions assume you are connected to the Brown University network via wireless (Brown, Brown-Guest, or eduroam).
Setup Instructions
1. First, download the correct driver. Click on the link below for the printer you are trying to set up.
-
11th Floor Copier: icerm-copier.devices.brown.edu
-
10th Floor LaserJet A: icerm-ljem610a.devices.brown.edu
-
10th Floor LaserJet B: icerm-ljem610b.devices.brown.edu
2. A new tab will open with a download button, click that.

3. When the download is complete, locate the file (usually in the 'downloads' folder, double-click to run.
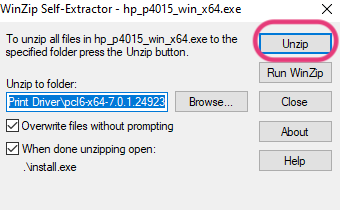
4. A screen similar to the photo below will pop up, click Unzip.
5. When that finishes, another screen will pop up reading "Do you want to allow this app to make changes to your device?" Click Yes.
6. Printing Setup Wizard should appear. If you agree to the 'End User License', click Yes to continue. Then click Traditional Mode and Next.
7. Once that's done, an 'Add Printer' screen should appear. Choose Add a printer using a TCP/IP address or hostname and click Next.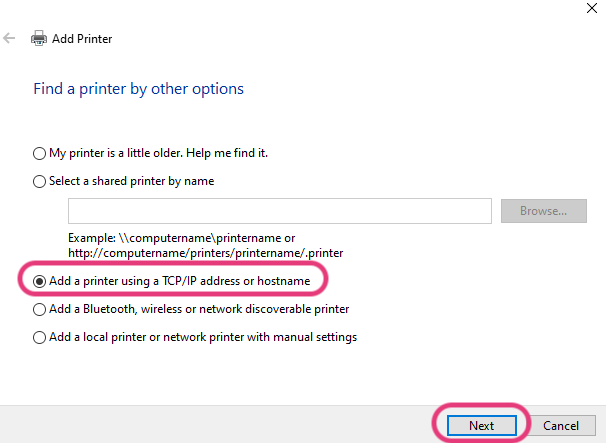
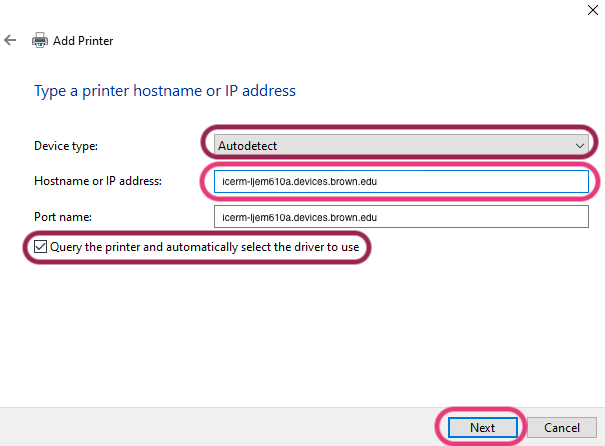
8. Next, input:
- Device Type: Autodetect
- Hostname or IP address: Write in the hostname of the printer you are adding -
- 11th Floor copier: icerm-im3500.devices.brown.edu
- 10th Floor LaserJet A: icerm-ljem610a.devices.brown.edu
- 10th Floor LaserJet B: icerm-ljem610b.devices.brown.ed
- Port name will autofill from the Hostname
-
Click the ☑︎ for 'Query the printer and automatically select the driver to use'
Click Next.
9 . Choose HP Universal Printing PCL 6 or Ricoh IM3500 depending on which printer you are adding.

10. It will ask 'Which version of the driver do you want to use', choose Use the driver that is currently installed. Click Next.
11. Name the printer whatever you'd like, we suggest ICERM 11th Copier, ICERM 10th Printer A, or ICERM 10th Printer B. Click Next.
12. Choose Do not share this printer, click Next.
13. Try a test page then hit Finish. The Wizard window should pop up, wait for the Finish button to be clickable, then click it.
Enabling Duplexing (Two-Sided Printing)
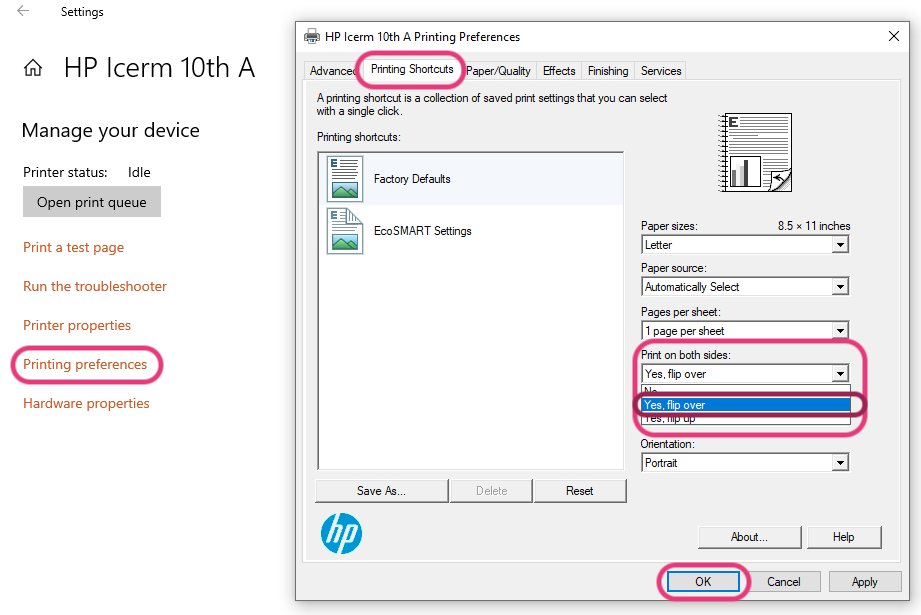
1. Click Start- > Settings -> Devices -> Printers & scanners -> Click the printer you just added -> Manage

2. Click Printing preferences, and within Printing Shortcuts find Print on both sides, click Yes, flip over. Then hit OK.
You did it!! 🥳
If you have questions about these instructions or require further assistance, please contact the ICERM IT staff by dropping by the administrative offices or emailing support@icerm.brown.edu.