IT Resources
General instructions for ICERM IT resources, including Brown IDs, wireless internet, and printing.
- Welcome to ICERM's Documentation Website!
- Wireless Access at ICERM
- Activate and Manage your Brown ID
- Loaner Tech Equipment
- Office Phones
- Printing at ICERM
- Step-by-Step Printing Setup Instructions
- Virtual/Hybrid Events
- ICERM's Best Practices for Virtual Events
- Virtual Collaboration Tools
- Zoom Video Conferencing
- Virtual Workshop Session Formats
- AV Systems
- Hybrid Event Tech Options
- AV Systems
- Zoom Video Conferencing
Welcome to ICERM's Documentation Website!
This site is our centralized repository of documentation and user guides for all of ICERM's technical systems, including internet access, printing, and computing resources.
If you are just arriving to ICERM, please take a moment to read through the rest of this page for a brief overview of the technical resources available.
|
Wireless Access, Printing, Brown ID Cards, and Office Technology |
Usage of Brown's High-Performance Computing Cluster |
Resources for running successful virtual and hybrid events at ICERM. |
|
Audio-visual Systems User Guides |
The Cube User Guide |
ICERM and Brown IT Policies |
Internet Access
Short-term/Workshop Visitors
For attendees of ICERM workshops and other short-term visits of less than two weeks, the Brown-Guest wireless network is available for use without a password. Please be aware that Brown’s guest wireless network is unencrypted and bandwidth is limited. You cannot access library resources and some other Brown resources using Brown-Guest, and some types of traffic are restricted.
The eduroam network is also available here at ICERM. Participants must set up eduroam first through their home institutions in order to use it at ICERM and other Brown facilities.
Long-term/Semester Visitors
All long-term visitors who will be at ICERM for at least two weeks are provided with a Brown account and ID card. Along with access to various Brown University services, this Brown user account will provide you with access to Brown's secure wireless network Brown. See the Wireless Access page for step-by-step setup instructions.
Printing & Scanning
Public Printing Terminals
Printing is available for visitors from the Chromeboxes by the reception desk on the 11th floor. These devices will allow you to print from any website or from a USB drive.
Printing from your Laptop
ICERM's three public printers are also enabled for wireless printing and are accessible from the Brown, Brown-Guest, and eduroam wireless networks. Detailed information about our printers and their locations and capabilities are available on the Printing at ICERM page. In addition, operating system specific instructions are available for macOS, Windows, and Linux.
Scanning
The ICERM copy machine (located behind the reception desk) is a multi-function copier that's able to scan papers to PDF and email them directly to you. Feel free to ask any staff for assistance with using the scanner.
Computing Resources
High-Performance Computing
Long-term visitors to ICERM are provided with an exploratory account on the Oscar high performance computing cluster maintained by Brown's Center for Computation and Visualization. Oscar access may also be provided to short-term visitors on a case-by-case basis with justification and advance notice. See the Oscar High-Performance Computing Cluster (HPC) section of this site for details on how to use Oscar.
Wireless Access at ICERM
Brown has three wireless internet networks available on campus: Brown, Brown-Guest, and eduroam.
- The Brown-Guest network is the network available for all short-term and workshop visitors. No password is required, but you must accept the terms of use when connecting. See the Brown-Guest section below for details.
- Eduroam is available for all guests from participating Eduroam institutions. Please note that you will need to have eduroam set up from your home institution before arriving at ICERM in order to use eduroam here at Brown.
- The Brown secure wireless network is available to all long-term participants and visitors who are issued a Brown ID card. See the Brown section below for details.
Brown-Guest
If you are a short-term visitor or have not yet set up Brown on your device, you must connect using Brown-Guest.
- Using the device you’d like to connect, open the wireless settings.
- Choose the wireless network Brown-Guest from the list of available wireless networks.
- When you open a web browser, you will be prompted to accept the guest network terms of use to start using the Internet. On some devices, this terms of use window may open automatically after connecting.
- Your connection will last for 7 days, after which you will be prompted to agree to the terms again.
Please be aware that Brown’s guest wireless network is unencrypted and bandwidth is limited. You cannot access library resources and some other Brown resources using Brown-Guest, and some types of traffic are blocked. For these reasons, we recommend using eduroam or Brown if you have the option.
Brown
The Brown secure wireless network is available to all long-term visitors who are issued a Brown Sponsored ID. In order to connect to Brown, you must first activate your Brown ID and user account. Once your Brown ID and user account are active, follow these steps to install the certificates and connect to Brown.
- First, connect to Brown-Guest and visit https://wifi.brown.edu.
- Accept the terms of the user agreement.
- Follow the XpressConnect wizard steps to select and download the network profile and certificates for your specific device.
- Install the network profile and enter your Brown username and password.
- In most cases, your device should now automatically connect to Brown. If not, you should now be able to manually select and connect to Brown from your list of available wireless networks.
- In your device wireless settings, either remove Brown-Guest or set Brown as the highest priority so your device connects to the secure network by default.
Brown on Linux Laptops
Brown's XpressConnect client does not always work properly when configuring the secure Brown network on Linux. If you are unable to connect on Linux using the XpressConnect instructions above, then the Brown network must be manually configured in NetworkManager using the following settings:
-
Wireless Network Name (SSID): Brown
-
Security Type: WPA2-Enterprise
-
Encryption Type: AES (CCMP)
-
EAP Method: PEAP
-
Phase 2 (Inner Method): EAP-MSCHAPV2
-
Root CA Certificate(s): AddTrust_External_Root.crt
-
User Certificate: N/A
-
Anonymous Identity (Outer Identity): [Leave blank]
-
Username (Identity): [Your Brown Username]
-
Password: [Your Password]
Using the AddTrust_External_root.crt is the necessary change from the XpressConnect configuration to overcome the SSL verification problem. It should be located in one of the following directories:
/usr/share/ca-certificates/mozilla/AddTrust_External_Root.crt /etc/ssl/certs/AddTrust_External_Root.crt
If you have questions about these instructions or require further assistance, please contact the ICERM IT staff by dropping by the administrative offices or emailing support@icerm.brown.edu.
Activate and Manage your Brown ID
Long-term visitors who are at ICERM for at least two weeks will be issued a Brown Sponsored ID card. This ID provides elevator access to the ICERM facility. In addition, your card will allow you to activate your Brown User Account which provides access to Brown's secure wireless network and other university resources.
The following instructions assume you are connected to the Brown University network via wireless (Brown-Guest, or eduroam).
Activating Your Brown User Account
Visit https://myaccount.brown.edu/activate and follow the instructions to activate your Brown ID card. The basic steps are as follows:
- Enter your Last Name, Date of Birth, and Brown ID number. Your Brown ID number is the nine-digit number above your photo on the Brown ID card.
- Accept Brown's Acceptable Use Policy.
- The system will assign you a username. Make note of this username as you will use it to connect to wireless and login to Brown services like Workday and online library resources.
- Finally, create your Brown user account password.
Notes
- You only need to activate your Brown ID card once.
- Postdocs who receive a Brown email address will have to create a second login for Google to access their email. These credentials are different than your Brown directory username and password.
For Brown Wifi
|
Managing Your Brown Account
Brown's MyAccount portal is available to manage your Brown account. This portal provides a function such as changing your password and modifying two-factor authentication configuration for users who have Duo 2FA enabled.
If you have questions about these instructions or require further assistance, please contact the ICERM IT staff by dropping by the administrative offices or emailing support@icerm.brown.edu.
Loaner Tech Equipment
The ICERM IT department has a Loaner Program which offers a variety of equipment available to participants at ICERM. There is no cost associated with loaning out any equipment, except in the case that the equipment is damaged or lost.
Before hardware is loaned out, all participants must agree to the following statements:
- Hardware is available on a first come – first served basis
- Hardware may be borrowed for the duration of a participant’s visit to ICERM
- All equipment and related accessories must be returned to the IT group prior to a participant checking out with the events team
- Failure to return borrowed equipment may result in withholding of reimbursement funds and/or other action as deemed necessary in consultation with the participant’s home institution.
- Participants are responsible for managing their own data. Machines will be reimaged immediately upon return and no files, images or backups will be retained.
- The IT team must be notified immediately of any loss, theft, or damage.
Some of the equipment we offer:
- An Assortment of MacBook Pros
- USB-c/MagSafe Mac Power Cables
- USB-c Adapter
- USB-c Cables
- USB-a Adapter
- HDMI Adapter
- VGA Adapter
- Power Strips
- Extension Cords
- Monitors
- Keyboards
- Mice
To borrow equipment, please contact the ICERM IT staff by dropping by the administrative offices or emailing support@icerm.brown.edu.
Office Phones
To determine your office phone number
-
Each phone displays its extension on its screen
Outbound Calls
-
Dial “8” for an outside line
-
Access limited to local calls only (however you can receive calls from a long distance number)
Internal Calls (ICERM and Brown University)
-
Dial the last 5 digits of any ICERM phone number (as in: “3-1234”)
Transfer a Call
-
Press “Transfer” button on left of display, listen for dial tone
-
Dial 5-digit extension
-
Announce call
-
Press “Xfr” button at bottom of display
-
Hang up
Messages
-
If no one answers your office phone, the call will bounce to ICERM’s front desk where a message will be taken and placed in the appropriate mailbox.
Printing at ICERM
We have three public printers here at ICERM. All printers are available via wireless on Brown, Brown-Guest, and Eduroam. All printers support duplexing (double-sided printing).
Wipes are located at all printing stations. Please wipe down printers before and after using to maintain proper cleanliness standards.
ICERM Printers
| Printer | Hostname | Location |
| 11th Floor Copier | icerm-im3500.devices.brown.edu | 11th floor behind the reception desk |
| 10th Floor LaserJet A | icerm-ljem610a.devices.brown.edu | 10th floor printing hallway |
| 10th Floor LaserJet B | icerm-ljem610b.devices.brown.edu | 10th floor printing hallway |
Step-by-Step Printing Setup Instructions
Public Printing
The Chromeboxes on the 11th floor provides open access to ICERM's printers.
Faxing(11th Floor Copier Only)
- Select FAX (on main screen), Select the Dial Pad, Press 8 (For an outside line) and Enter the number you want to Fax.
Notes about Printing
-
The ICERM printers use US LETTER/LTR 8.5×11 sized paper. Please choose this paper size when installing a printer or printing a document.
-
If you use a VPN, you must disconnect from your VPN to access the printers.
Step-by-Step Printing Setup Instructions
This section provides detailed OS-specific setup instructions for installing ICERM printers on your laptop.
Printing on macOS
Before setting up your printers, please review the overview of Printing at ICERM.
The following instructions assume you are connected to the Brown University network via wireless (Brown, Brown-Guest, or eduroam).
Setup Instructions
These photos are for macOS Ventura and newer. If your computer runs an older version of macOS, System Settings will look a bit different. For steps 1 & 2, Look for "Printers & Scanners" in the System Preferences, then click "Add Printer, Scanner, of Fax..." Steps 3 - 6 will be the same.
1. Open System Settings (Apple Menu > System Settings) and click on the “Printers & Scanners” tab in the left sidebar.
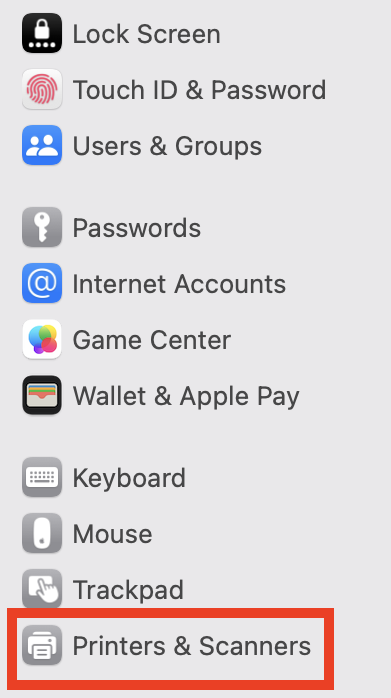
2. Below the list of printers on the left, click the Add Printer, Scanner, or Fax... button to add a printer.

3. In the add printer dialog that opens, click the “IP” tab and enter the printer’s hostname for the printer you wish to add, and select Line Printer Daemon – LPD in the protocol dropdown.
-
11th Floor Copier: icerm-im3500.devices.brown.edu
-
10th Floor LaserJet A: icerm-ljem610a.devices.brown.edu
-
10th Floor LaserJet B: icerm-ljem610b.devices.brown.edu

4. The system should then detect the printer and automatically fill the Name and Use fields at the bottom of the add printer window. If it does not, name the printer, select Generic PostScript Printer in the Use dropdown, then click Add.
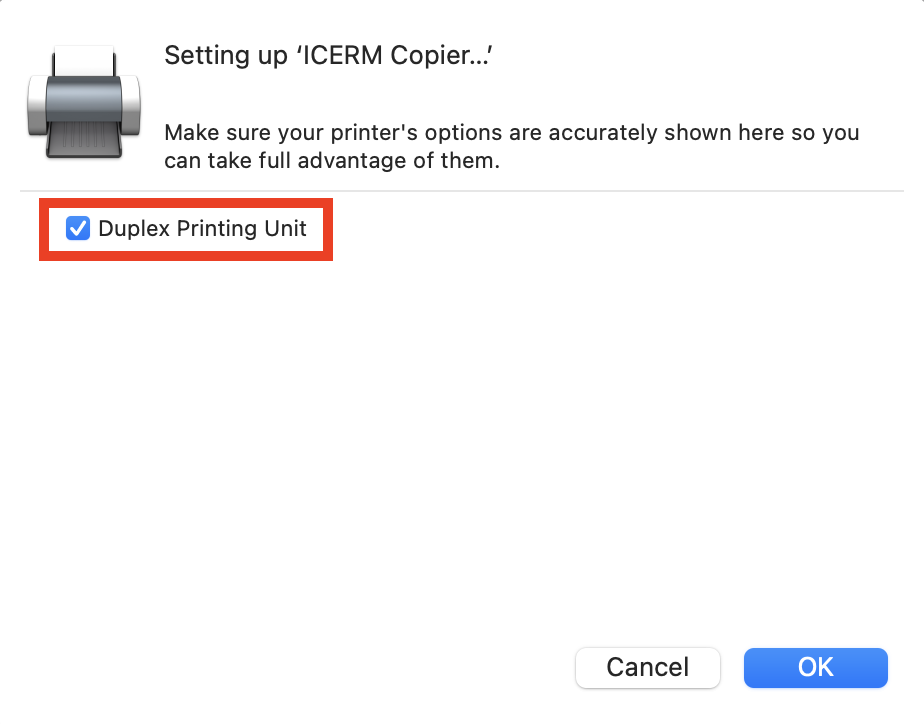
5. A settings options window may appear. Select “duplex printing” and save.
6. The printer should be configured and ready to use. Print a test page to verify.
If you have questions about these instructions or require further assistance, please contact the ICERM IT staff by dropping by the administrative offices or emailing support@icerm.brown.edu.
Printing on Windows
IMPORTANT NOTE FOR Printing:
ICERM uses North American Paper sizes for printing. Before sending a print job to a printer, please ensure that Letter (8.5x11) is selected. (A3 paper sizes will not work and cause the job to fail.)
Before setting up your printers, please review the overview of Printing at ICERM. The following instructions assume you are connected to the Brown University network via wireless (Brown, Brown-Guest, or eduroam)
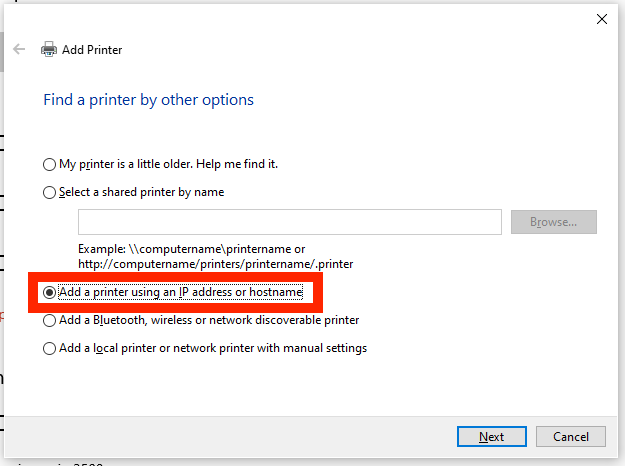
Windows 11 instructions:
2) Click the "Add Device" button (This will cause a brief delay while your device searches for printers)

3) Click the link "Add a new device manually", when the next pane appears, click the option "Add a printer using an IP address or Hostname" and click Next

4) In the Hostname or IP address field, Enter in the following information for the 10th floor LaserJet A Printer:
icerm-ljem610a.devices.brown.edu and Press Enter, the click Finish

5) Repeat steps 2 thru 4 and also add the following printers:
10th floor LaserJet B Printer: icerm.ljem610b.devices.brown.edu
11th floor copier: icerm-im3500.devices.brown.edu
Windows 10 instructions:
Setup Instructions
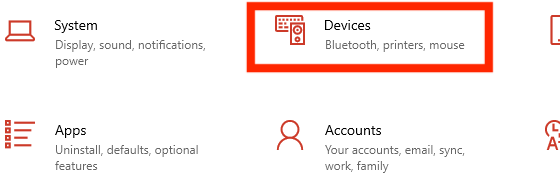
- Open Settings and choose Devices:

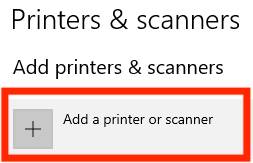
- Choose Printers & scanners:

- Choose Add a printer or scanner:

- Choose The printer that I want isn't listed
- Select Add a printer using an IP address or hostname:

- On the next screen, enter:
-
- Device Type: Autodetect
- Hostname or IP address: Write in the hostname of the printer you are adding -
- 11th Floor copier: icerm-im3500.devices.brown.edu
- 10th Floor LaserJet A: icerm-ljem610a.devices.brown.edu
- 10th Floor LaserJet B: icerm-ljem610b.devices.brown.edu
-
- (For the ICERM Copier only): Choose the Microsoft PS Class Driver and click Next
- Enter a printer name and click Next. Recommended names are:
- 11th Floor copier: ICERM Copier
- 10th Floor LaserJet A: HP LaserJet M610A
- 10th Floor LaserJet B: HP LaserJet M610B
- Select Do not share this printer
- Click Next
- Click Print a test page to verify the new printer works
- Click Finish

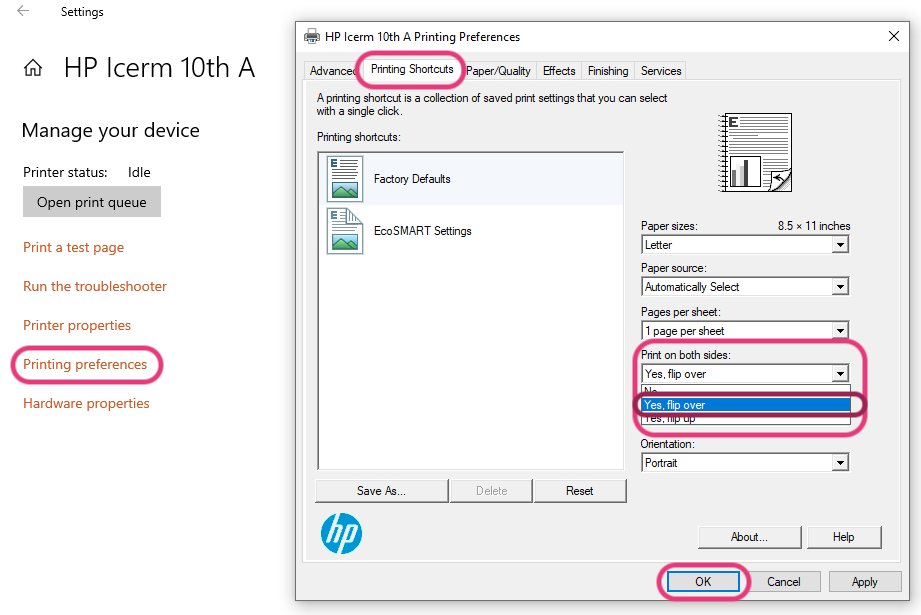
Enabling Duplexing (Two-Sided Printing)
1. Click Start- > Settings -> Devices -> Printers & scanners -> Click the printer you just added -> Manage

2. Click Printing preferences, and within Printing Shortcuts find Print on both sides, click Yes, flip over. Then hit OK.
You did it!! 🥳
If you have questions about these instructions or require further assistance, please contact the ICERM IT staff by dropping by the administrative offices or emailing support@icerm.brown.edu.
Printing on Linux
Before setting up your printers, please review the overview of Printing at ICERM.
The following instructions assume you are connected to the Brown University network via wireless (Brown, Brown-Guest, or eduroam).
Setup Instructions
1. Open the New Printer dialog, and select Network Printer → LPD/LPR.
2. Enter the hostname of the printer you wish to add, then click “Forward”.
-
11th Floor Copier: icerm-im3500.devices.brown.edu
-
10th Floor LaserJet A: icerm-ljem610a.devices.brown.edu
-
10th Floor LaserJet B: icerm-ljem610b.devices.brown.edu
3. The OS may detect the printer software. If not, search for HP LaserJet Enterprise M610 for the 10th floor printers or Ricoh IM3500 for the 11th Floor Copier. If your system does not have these drivers installed, you may use the Generic PostScript Printer drivers.
4. All printers support duplexing (two-sided printing).
If you have questions about these instructions or require further assistance, please contact the ICERM IT staff by dropping by the administrative offices or emailing support@icerm.brown.edu.
Virtual/Hybrid Events
ICERM's Best Practices for Virtual Events
What follows is a list of best practices for hosting virtual events based on lessons ICERM has learned from our experiences. These points may seem obvious to some, and indeed, they follow ICERM’s general operating philosophy. However, we list them here in the interest of furthering the broader discussion of facilitating continued research in a virtual environment.
Keep It Simple
This is perhaps the most important principle, and it overlaps a lot of areas. Remember that not everyone has the same level of technical knowledge and confidence. When choosing a conferencing application, make sure the interfaces, at least for the basic options, are intuitive and user friendly. Application client downloads should be easy to access. Installs and configurations should require minimal effort on the part of the user.
We also strongly recommend, where possible, choosing tools that are platform agnostic, widely accessible, and require minimal hardware. Any one of these could hinder a user’s ability to participate.
The logistics of participation should be simple as well. For example When hosting multiple sessions within a single event, a shared link for all sessions is recommended if possible to reduce confusion.
Where security is concerned, consider carefully how much you really need, and don’t secure beyond that. Registrations and passwords add complexity to the user experience and may make more hassle than some are willing to endure to participate. We realize this won’t be a popular idea among security minded IT people. The balance between security and usability needs to be adjusted carefully, especially when the goal is broad accessibility for a large set of users with unknown or poorly defined operating parameters.
Practice
Ideally, the support staff should be experts with the tools being used. Anyone with an active role, such as session chairs, panelists, speakers, should be given an opportunity to familiarize themselves with additional functions they may need to use before the actual event. For example, our team provides speakers with an opportunity to schedule practice time in order to try out screen sharing functions and the like the week before an event. Unusual transitions or special functionality should be mapped out and tested ahead of time.
Organization
Session chairs have proven to be a vital part of the logistics of our virtual events, particularly when running events that have multiple talks in a session. Chair duties are similar to in-person workshops, including speaker introductions, moderating the audience for questions, and keeping the session generally on schedule. Ideal chairs will have some knowledge of the scientific topics being discussed.
Support
ICERM has a team member actively monitoring, but not participating in all virtual events. This person is primarily there to help if there are technical issues, but also serves as another check on chat logs to make sure there isn’t an overly large backlog of unanswered questions, and to assist with things like speaker transitions and breakout rooms. Generally this person serves as “meeting host” from a technical standpoint, and has full control of the application used for the event.
Communicate
This is perhaps as important as simplicity. Communicating early and often allows clear expectations to be set for everyone involved. Open dialogs as early as possible with anyone in an active role. Make sure they understand what it is they’re expected to do and when. Ensure that everyone understands what your tools will and won’t do. Provide links to documentation and how-to guides as well as any necessary software downloads.
Be Flexible
Virtual events introduce a wide variety of factors that are outside the control of the host. Internet connections drop or are bogged down. Pets and people make surprise appearances. Hardware breaks or is suddenly inaccessible. Have a contingency plan, such as a stand in speaker, or a backup QA session. We also recommend having multiple means of contact for speakers and panelists (i.e. email and phone) in case they are unexpectedly absent.
Virtual Collaboration Tools
ICERM's IT staff supports a wide variety of virtual collaboration tools, software, and platforms. We encourage organizers to contact IT staff before your workshop in order to assure we are ready to support your virtual events. An ICERM IT staff member will be on all official ICERM Zoom events to provide assistance and technical support.
Zoom Video Conferencing
ICERM uses Zoom as our primary video conferencing service. Workshop events normally use Zoom Meetings, but we occasionally use Zoom's add-on Zoom Webinars feature for more formal virtual events like public lectures. A short comparison of Meetings and Webinars is below. See the Zoom Introduction for more details and a full technical comparison.
Zoom Virtual Meetings
Zoom Meetings provides meetings with video, audio and screen sharing for up to 300 real time participants.
-
ICERM uses Zoom Meetings for most workshop talks, discussion sessions, working group meetings, and virtual social events such as coffee break sessions and workshop receptions.
-
Zoom Meetings allow all participants to control their own microphones, cameras, and screen sharing so they can see, chat, and collaborate with each other.
-
For officially scheduled workshop events, ICERM's IT staff creates the Zoom sessions and shares the links with all participants.
-
During long-term programs, ICERM can support a limited number of recurring working group meetings on Zoom.
-
All attendees, speakers, and session chairs are encouraged to review our Zoom Meetings Guide.
Zoom Webinar
Zoom Webinar is an add-on to the Zoom Meetings service that allows more formal webinar broadcasting and live-streaming outside of Zoom.
-
ICERM sometimes uses Webinar for more formal events such as virtual public lectures.
-
Webinar attendees will be in view-only mode but can still raise their hand to request microphone access or use chat to ask questions.
-
Most ICERM Webinars are live-streamed on the icerm.brown.edu website via Panopto.
Email/Text Chat Platforms
Slack
Slack is an app and web based communication platform designed loosely around the classic Internet Relay Chat (IRC) model.
-
Slack divides chat up into “channels” for topic-based discussion.
-
Slack's app is available for all major platforms. A browser-based client is also available.
-
Free Slack workspaces retain the last 10,000 messages for a searchable history and also provide 1-to-1 video calling.
-
Paid Slack workspaces can support group video calling up to 15 people.
Technical Needs/Constraints
-
Program organizers who wish to use a Slack workspace for their program should request Slack setup from ICERM IT staff at least two weeks before the start of an event.
-
For group-based events, ICERM staff can pre-create and populate channels on Slack if we are provided a list of groups and participants one week before the start of the program.
Listserv
Long-term programs (Semester Programs and Summer@ICERM) are provided with a program mailing list via Brown's central listserv. All participants are members of the list and can use it to send email announcements to the other members of their program. Listserv is not available for short-term programs.
Web-based Collaboration
Overleaf
Overleaf is an online collaborative LaTeX editor.
-
Overleaf provides an online collaborative Google Docs-style editor for creating LaTeX documents. Several collaborators can work together on the same document making edits and suggestions/comments.
-
Overleaf is available to all postdocs and Brown university students via Shibboleth login.
-
ICERM can also support premium Overleaf projects for other workshop groups on a case-by-case basis. Organizers should contact IT staff to discuss this option.
Technical Needs/Constraints
-
Organizers who wish to use Overleaf for their workshop should discuss this with ICERM IT staff at least two weeks before the workshop.
JupyterHub
JupyterHub is a collaborative, online, multi-user version of the popular Jupyter Notebook software.
-
Brown CCV hosts a JupyterHub server that can be made available on request to specific working groups.
Technical Needs/Constraints
-
Advance notice is required for this service. Organizers should contact IT staff to discuss this option at least two weeks before the start of the workshop.
Zoom Video Conferencing
Zoom is the official video conferencing service of ICERM and Brown University. ICERM uses both Zoom Meetings and Zoom Webinar for our events.
Overview of Zoom at ICERM
Zoom Meetings Guide
Zoom Webinars Guide
Virtual Workshop Session Formats
Standard Lecture Talk
A standard lecture talk by a presenter delivered via Zoom. Usually scheduled for 45 minutes plus 15 minutes Q&A.
Technical Needs/Constraints
-
Software: Zoom Meeting.
-
Sessions can be recorded and posted afterwards to our video archive via Panopto.
-
One IT staff will be the Zoom host and provide technical support.
-
A session chair should be named to introduce the speaker and moderate questions. The session chair will also be made co-host of the Zoom meeting.
-
All sessions should have at least one Zoom host and two co-hosts in case of connectivity issues. An organizer normally will serve as this backup co-host and session chair.
Lightning Talks
A series of short 5 to 10 minute “lightning” talks hosted back-to-back, usually presented by early-career researchers and graduate students. Each presenter is typically limited to two slides.
Technical Needs/Constraints
-
Software: Zoom Meeting.
-
Sessions are not normally recorded or archived.
-
Slides must be sent to ICERM program staff no later than 24 hours before the lightning session.
-
ICERM staff stacks all slides together into a single file to ease transitions between the lightning speakers. The ICERM staff member functioning as Zoom host will screen share the slides and advance them on cue from each presenter.
-
One IT staff will be the Zoom host and provide technical support.
-
A session chair should be named to introduce each lightning presenter, moderate questions, and keep the session on time. The session chair will also be made co-host of the Zoom meeting.
-
All sessions should have at least one Zoom host and two co-hosts in case of connectivity issues. An organizer normally will serve as this backup co-host and session chair.
Panel Discussion
A discussion and question/answer session led by several panelists. Panel discussions sometimes have one or two moderators as well.
Technical Needs/Constraints
-
Software: Zoom Meeting.
-
Sessions can be recorded and posted afterwards to our video archive via Panopto.
-
One IT staff will be the Zoom host and provide technical support.
-
A session chair should be named to introduce the speaker and moderate questions. The session chair will also be made co-host of the Zoom meeting. In a panel discussion, this role is usually filled by the moderator(s).
-
All sessions should have at least one Zoom host and two co-hosts in case of connectivity issues. In a panel discussion session, this could be the second moderator or one of the panelists.
Poster Gallery
A virtual poster gallery on the event web page.
Technical Needs/Constraints
-
ICERM staff needs all posters by 9am three business days before the workshop.
-
Posters should be submitted as a PDF.
“Make Your Own Coffee” Hour
Technical Needs/Constraints
-
Zoom Meeting or spatial.chat
-
When using Zoom meetings, breakout rooms can be used to facilitate smaller social groups.
-
When using Zoom, one ICERM staff member will be the Zoom host to provide technical support and facilitate breakout rooms.
-
These can be scheduled as a stand-alone session or between other sessions, but we find stand-alone sessions have better attendance.
Problem Sessions and Discussion Sessions
Session for attendees to gather either in the full group or smaller breakout groups and discuss topics or problems related to the research area of the workshop.
Technical Needs/Constraints
-
Software: Zoom Meeting.
-
Zoom breakout rooms can be used to split the large group into smaller groups to better accommodate participation from all attendees.
-
Sessions are not normally recorded or archived.
-
One IT staff will be the Zoom host and provide technical support.
-
A session chair or discussion leader should be named moderate the session. The session chair will also be made co-host of the Zoom meeting.
-
All sessions should have at least one Zoom host and two co-hosts in case of connectivity issues. An organizer normally will serve as this backup co-host and session chair.
Project/Group Work Sessions
Small working group sessions during project-based or group-based workshops. These sessions are usually ongoing throughout the week of the workshop.
Technical Needs/Constraints
-
These sessions are typically organized and hosted by group leaders.
-
Due to constraints with ICERM’s Zoom licensing, group leaders are normally asked to host the video conferencing rooms for their individual groups if possible.
-
ICERM can support Zoom rooms for a small number of groups if nobody in a group has access to video conferencing software.
AV Systems
Various rooms/systems available:
10th Floor Classroom
11th Floor Conference Room
11th Floor Lecture Hall
Hybrid Event Tech Options
ICERM is able to support three distinct levels of hybrid events in the lecture hall:
Fully In Person |
| All speakers and registered participants attend in person and are present in the room. Talks are live-streamed for remote viewing via ICERM’s website in accordance with the Live Streaming Policy. Remote viewers have no direct means of interaction with those in the lecture hall. |
Hybrid using Zoom Webinar |
| Some speakers and participants are remote. All registered participants will be given a link to the webinar. Only the speaker and session chair, will have the ability to control their video and microphone. Other Participants may interact by text in Zoom’s chat function or by requesting permission to turn on their microphone from the session chair. Live streaming will also be active, as in option 1. Note that this option requires a high level of moderation on the part of the session chair. |
Hybrid using Zoom Meetings |
| Some speakers and participants are remote. All registered participants will be given a link to the meeting. By default, all participants have the ability to be visible via video and can use their microphones to interact with the speaker and those in the lecture hall. Remote participants who have their cameras enabled are visible to the speaker on a monitor at the back of the room. Live streaming will also be active as in option 1. This option still requires some active moderation on the part of the session chair. |
AV Systems
Various rooms/systems available
11th Floor Lecture Hall
The 11th Floor Conference Room is a fully-equipped Zoom Room to support hybrid lectures. It has two HDMI inputs for connecting laptops and tablets and an in-room iMac for presentations. The touch control pad is located on the podium next to the iMac.
The touchpad has two main screens, the Crestron panel & Zoom Rooms.
To start choose Basic Mode. Here you will have 4 options.
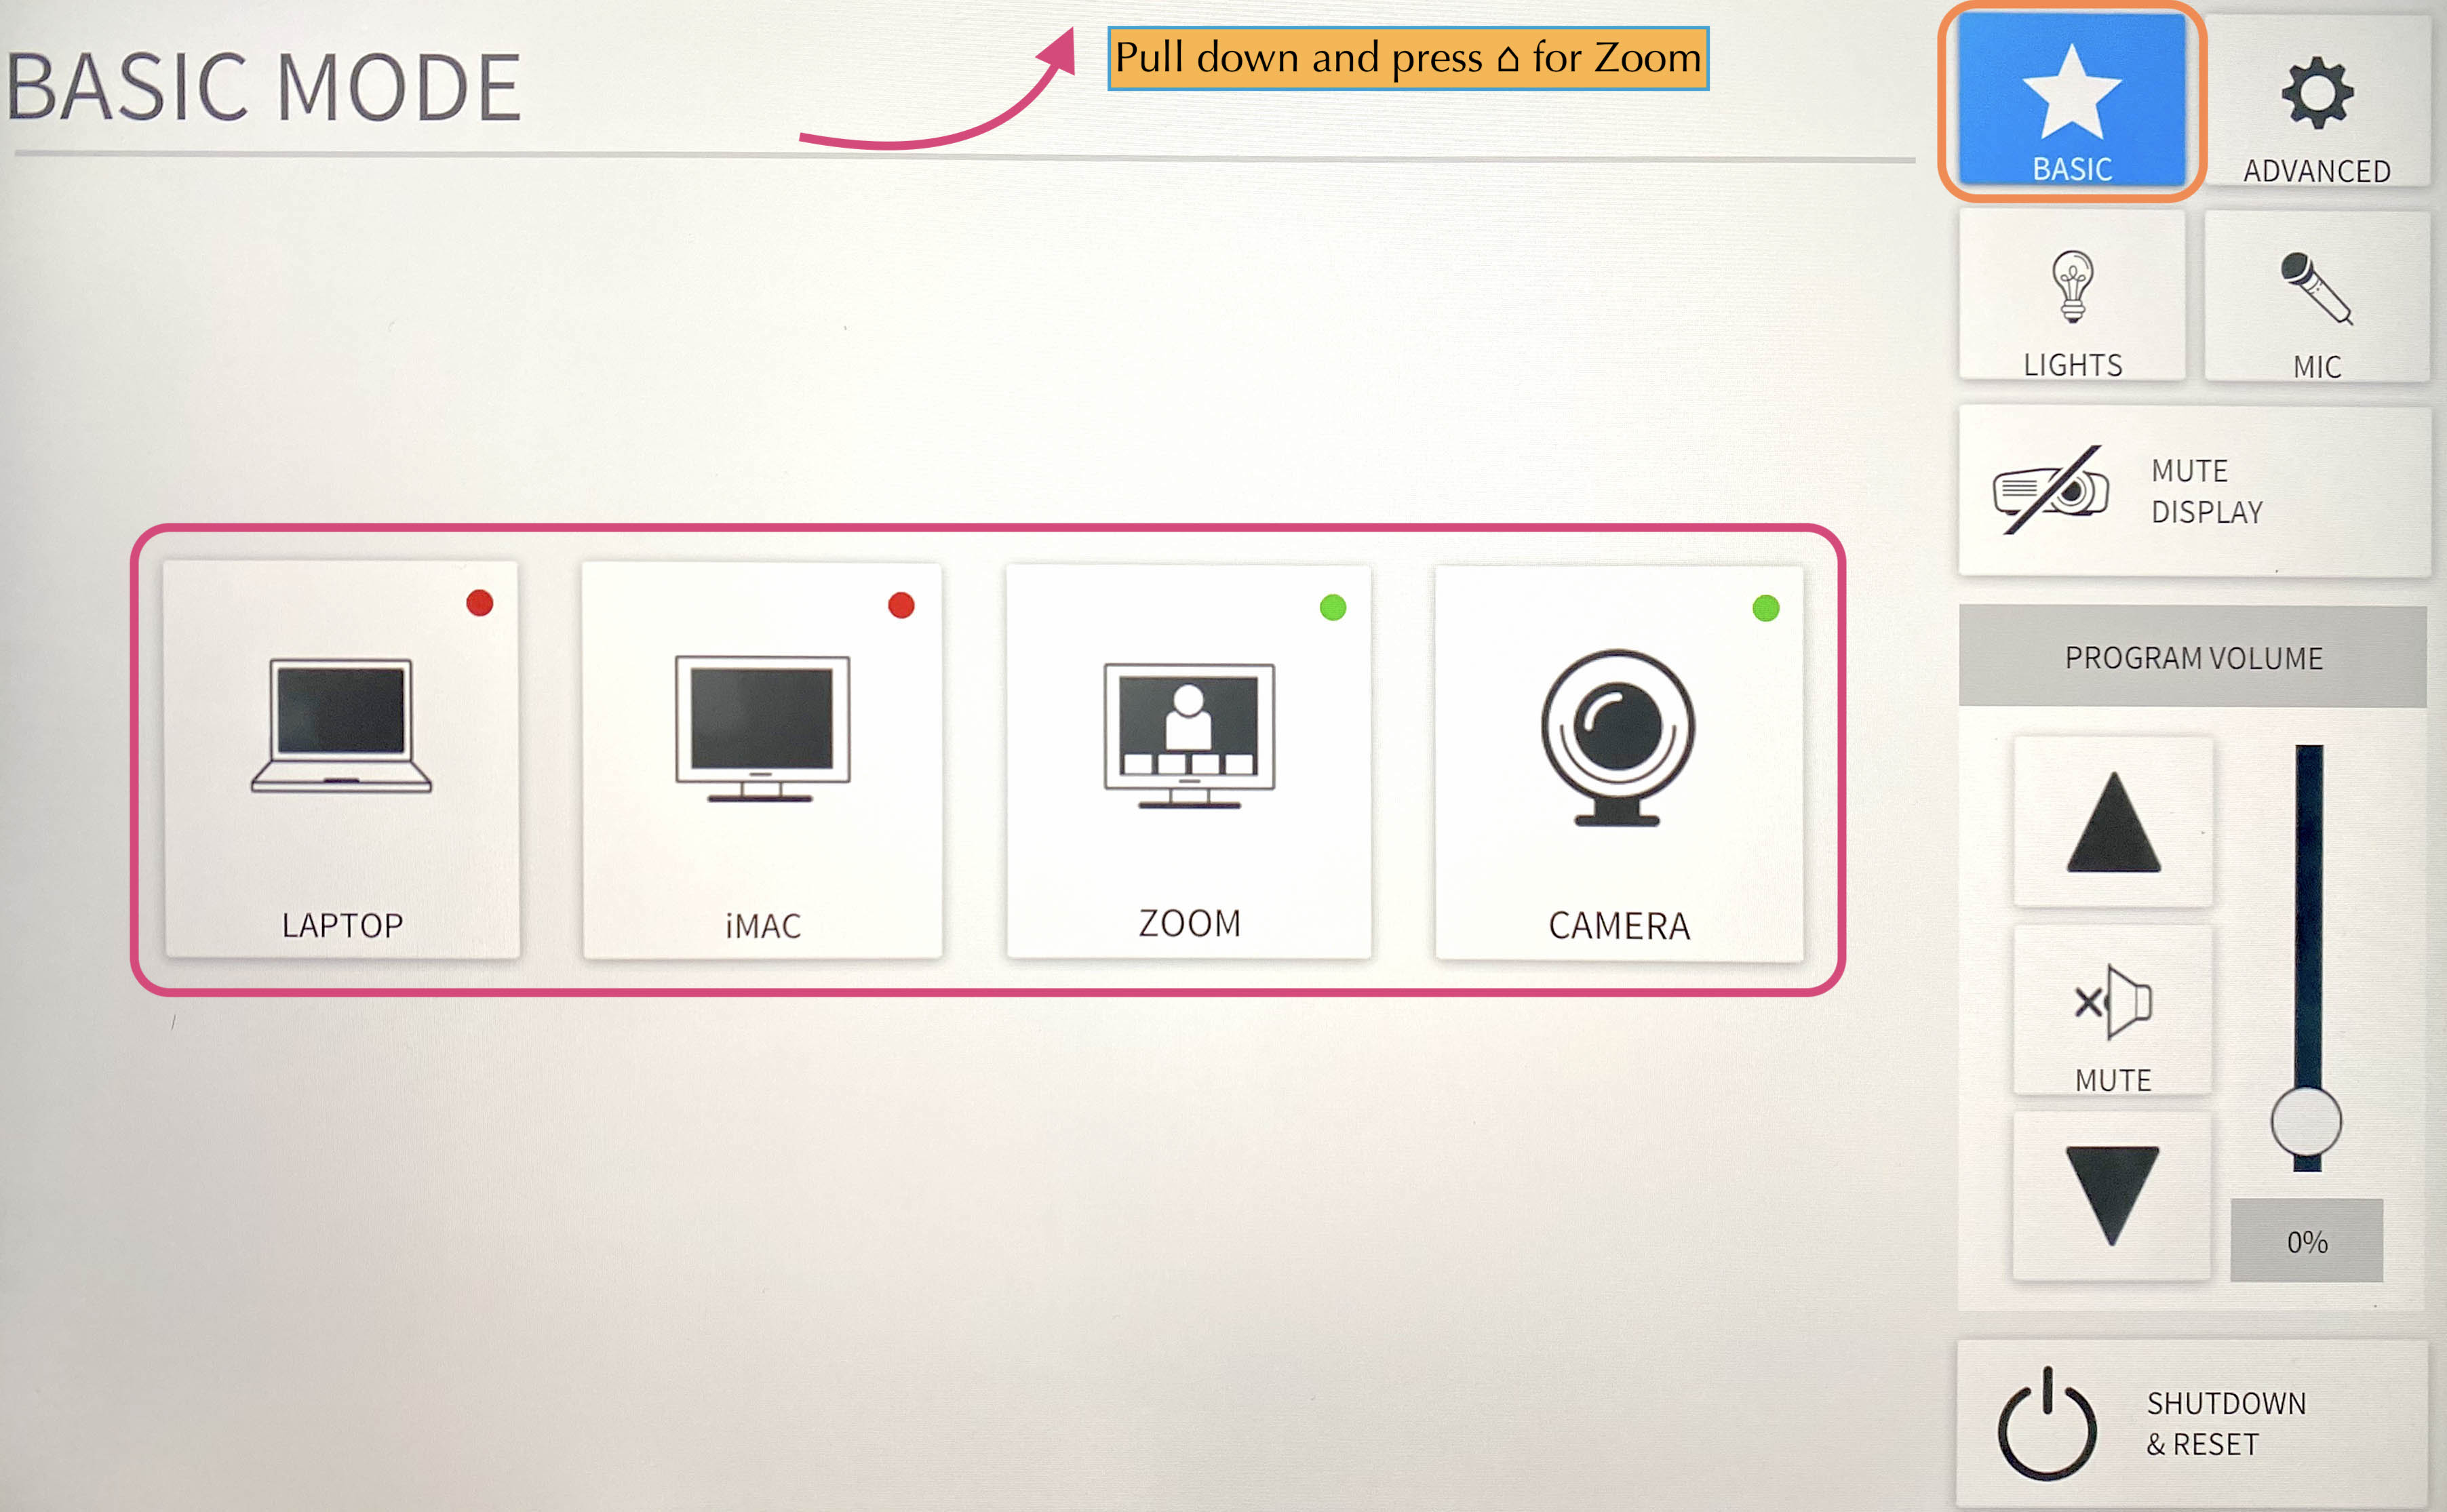
Laptop
- Connect the laptop using the HDMI/USB-c cable on the podium.
- The projector should detect input and turn on, if not, press the LAPTOP button on the Creston control panel.
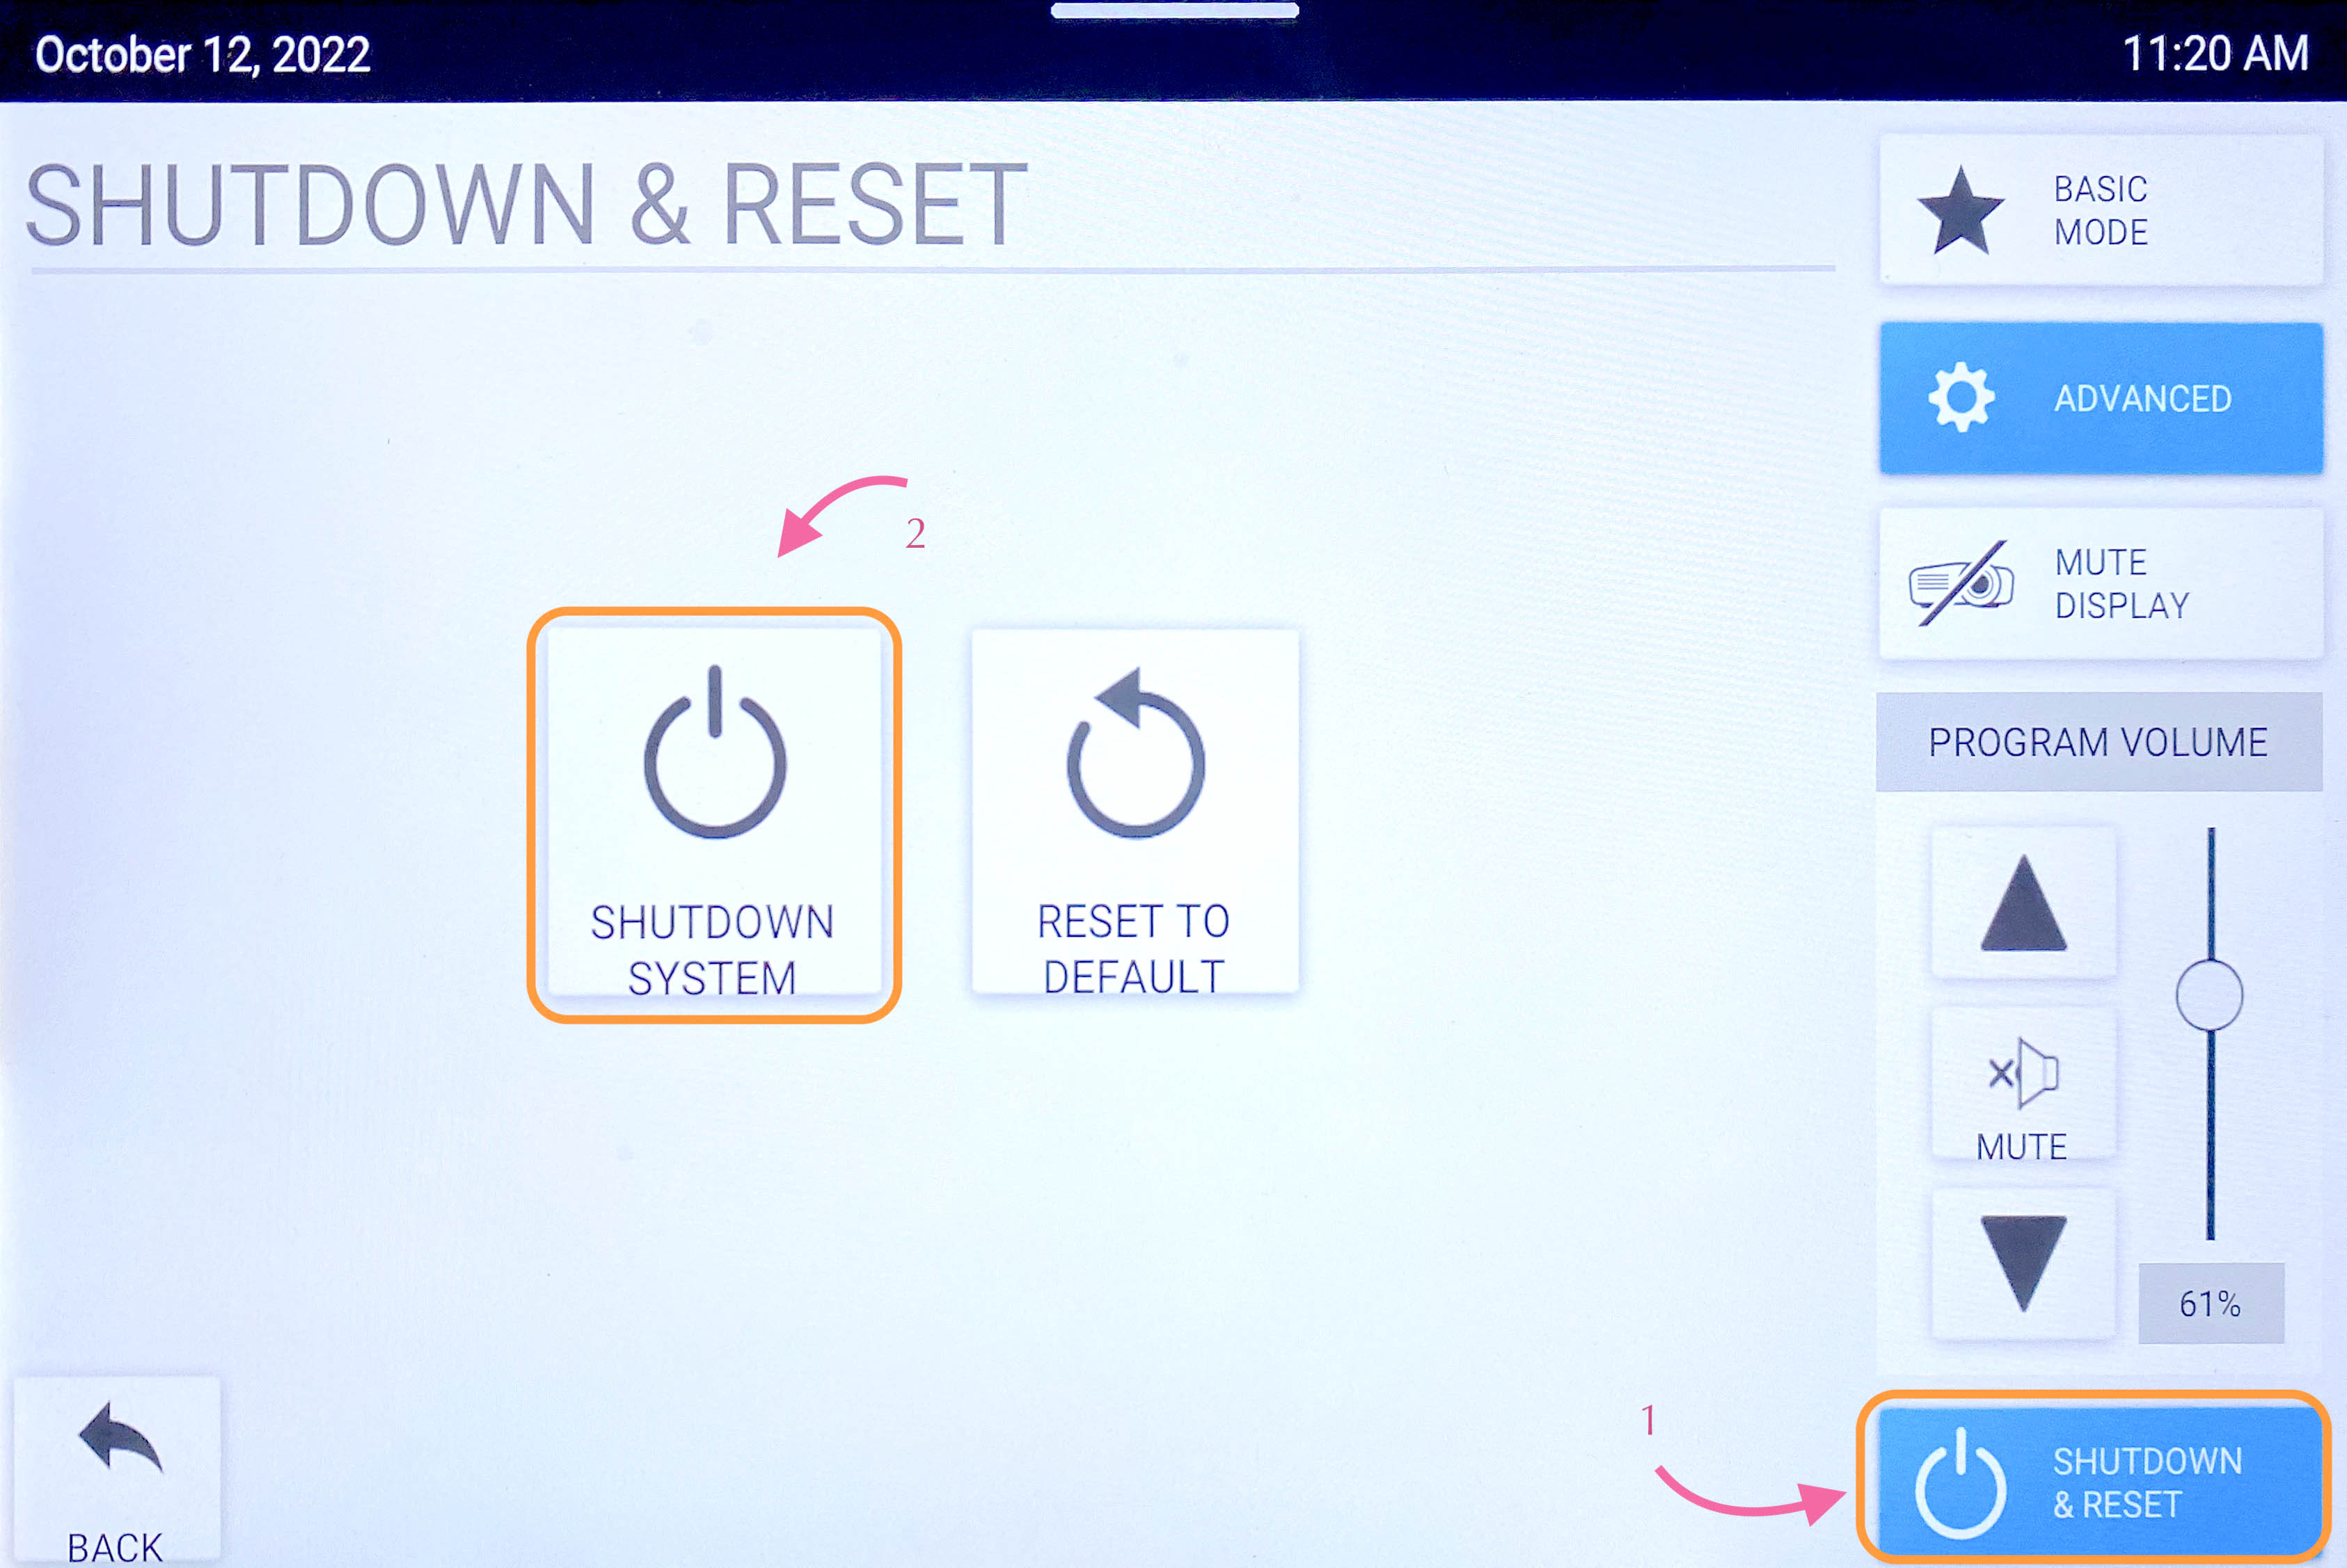
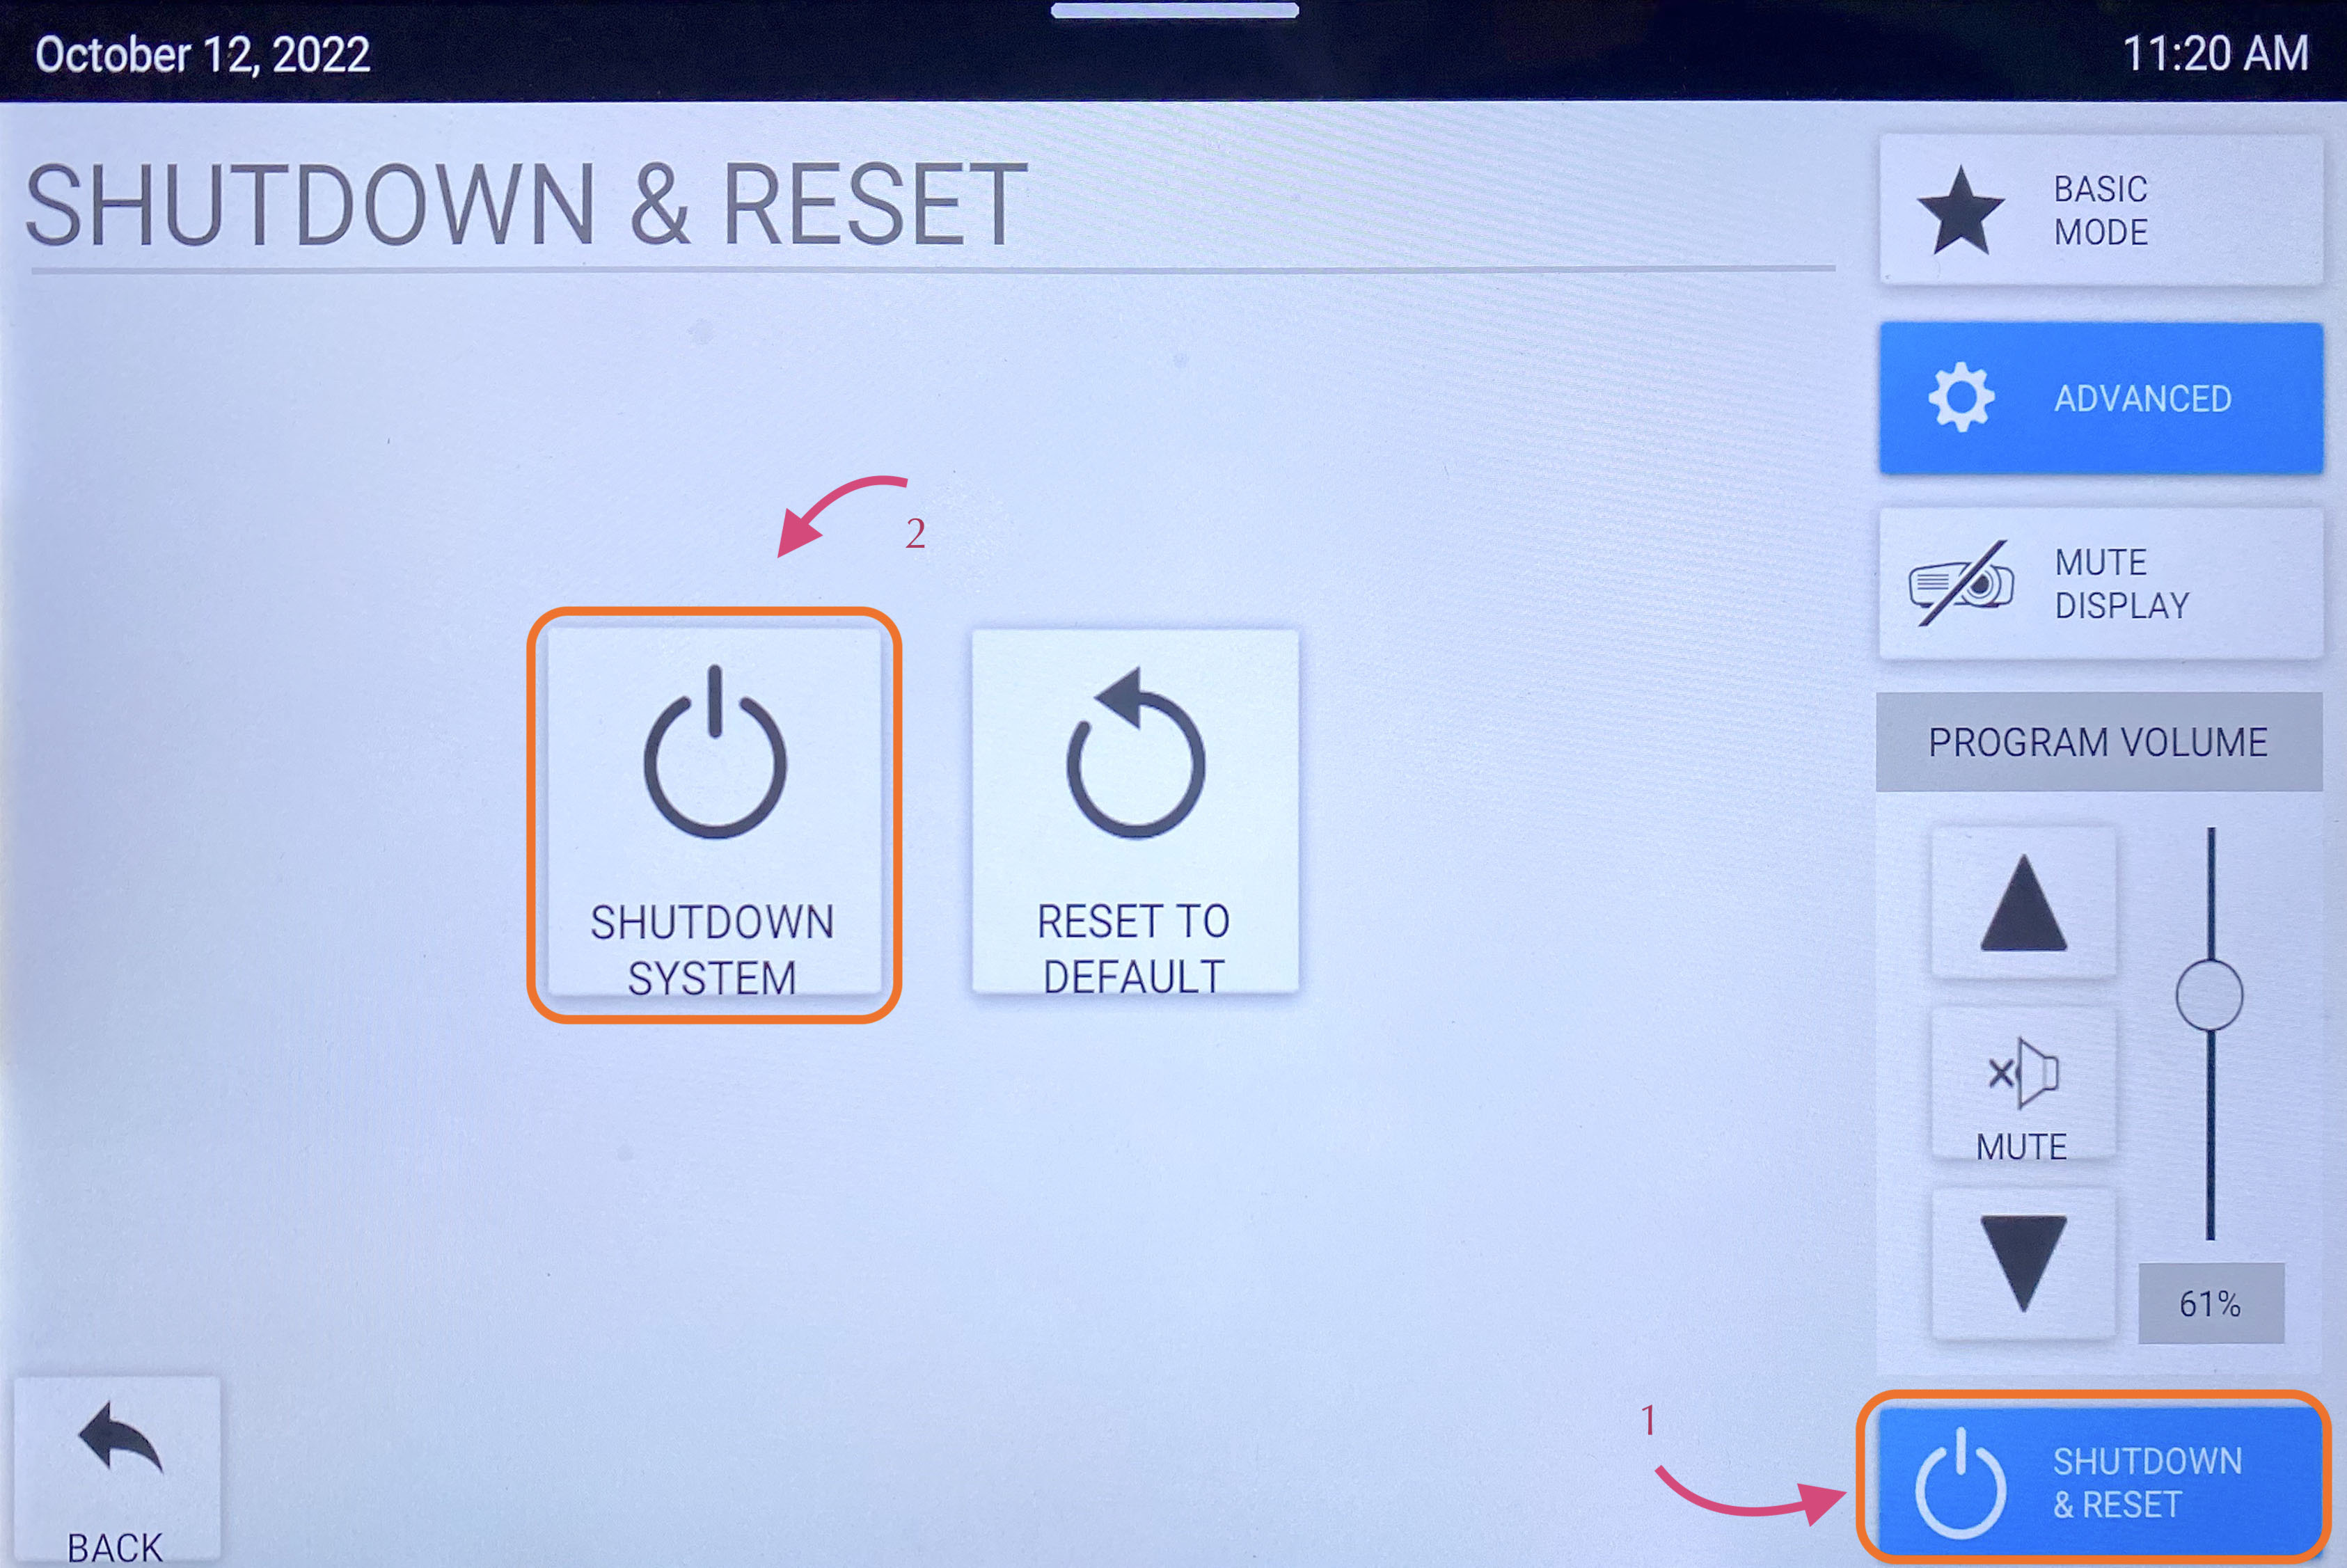
- When you are all done with the room, please make sure to shut down the system. Go to the control panel, click SHUTDOWN & RESET in the bottom right corner, then hit SHUTDOWN SYSTEM.
Note:
There is a dot in the right top-hand corner of the LAPTOP button. If the dot is red, the laptop is not being detected/plugged in correctly. Make sure all cables are securely plugged in. The dot will be in green when an input is detected.
iMac
The iMac can be used to download your presentation or present from a USB drive
- Wake up the iMac on the podium with the wireless mouse/keyboard.
- Press the iMAC button on the Creston control panel. The system will power on and project the iMac.
- When you are all done with the room, please make sure to shut down the system. Go to the control panel, click SHUTDOWN & RESET in the bottom right corner, then hit SHUTDOWN SYSTEM.
Note:
- If the mouse or keyboard is not responding, first check if they are turned on, then plug them in via lightning cable to charge.
- There is a USB slide remote in the drawer below the iMac. It can be used with either the iMac or a laptop by connecting the included USB receiver. The slide remote uses AAA batteries; if they are dead see an ICERM staff member for replacements.
Zoom
- Click Zoom on Creston panel
- Pull down the tab at the top of the touchpad and click the ⌂ button to get to the Zoom panel.
- Click the Join button and enter the code for an existing Zoom Meeting or click New Meeting to start a new Zoom Meeting.
- Once joined you will have many options, start by clicking the Start Video button to share video from the room.
Then most all details can be adjusted in the Crestron panel. Toggle back to adjust the camera and volume levels.

Note:
Switching camera from front to rear - After you join a zoom, you will see a button called Switch Camera. Press is if you want zoom to use the camera in the front of the room rather than the back or vice versa. This is the only place you can do that.
Camera
Click CAMERA if the talk is going to be in-person and entirely done on the whiteboards.
Lecture Recording and Live Streaming
The lecture hall is equipped with the Panopto system for lecture recording and live streaming. Lecture capture and live streaming require support from the IT staff to operate. By default, ICERM records and streams all lectures during scheduled workshops. Lectures scheduled outside a workshop may sometimes be recorded and streamed with an advanced request by program organizers. See our Recording and Live Streaming Policy for more details.
Microphones
The lecture hall is equipped with six wireless microphone channels, labeled WX1 through WX6. Six lavalier and six handheld microphones are located in the podium drawer, also labeled WX1 through WX6. Any combination of six microphones can be used during a presentation as long as only one microphone per channel is used.
*** Meaning only 6 mics can be used at any given time.
The room is also equipped with a ceiling-mounted microphone which will capture the sound of members of the audience. The ceiling mic is quite good and can be sufficient for teleconference events that are not being recorded or live-streamed.
To change the volume of the mics:
Click MIC on the right side, this will show you the common mics we use. Click SHOW ALL MICS to see more.
*** Best Practice before a lecture/talk is to MUTE ALL MICS then unmute the ones you want to use.

Camera Controls
The lecture hall has two cameras, one in the rear of the room and one in the front. By default, the system will use the rear camera with preset 1.
To use the camera controls, select ADVANCED then CAMERA CONTROLS.
Here you'll be able to control the camera with PAN & TILT and ZOOM functions. You'll also be able to switch between cameras by toggling between CAMERA REAR and CAMERA FRONT.

Audio/Video Routing
The Lecture hall has preset video/audio routing for the Laptop, iMac, Zoom, and Camera modes. These can all be changed manually to display whatever is desired.
Hit ADVANCED, then hit AUDIO/VIDEO ROUTING. Here you'll see two sections, STEP 1: SELECT YOUR SOURCE and STEP 2: ASSIGN YOUR DESTINATION.
This will allow you to change what's being projected on the displays, what is being captured for recordings/live streams, and where the sound output is coming from.
*** There are many unique options one can choose from, remember to click MORE in both sections 1 & 2 for more options.
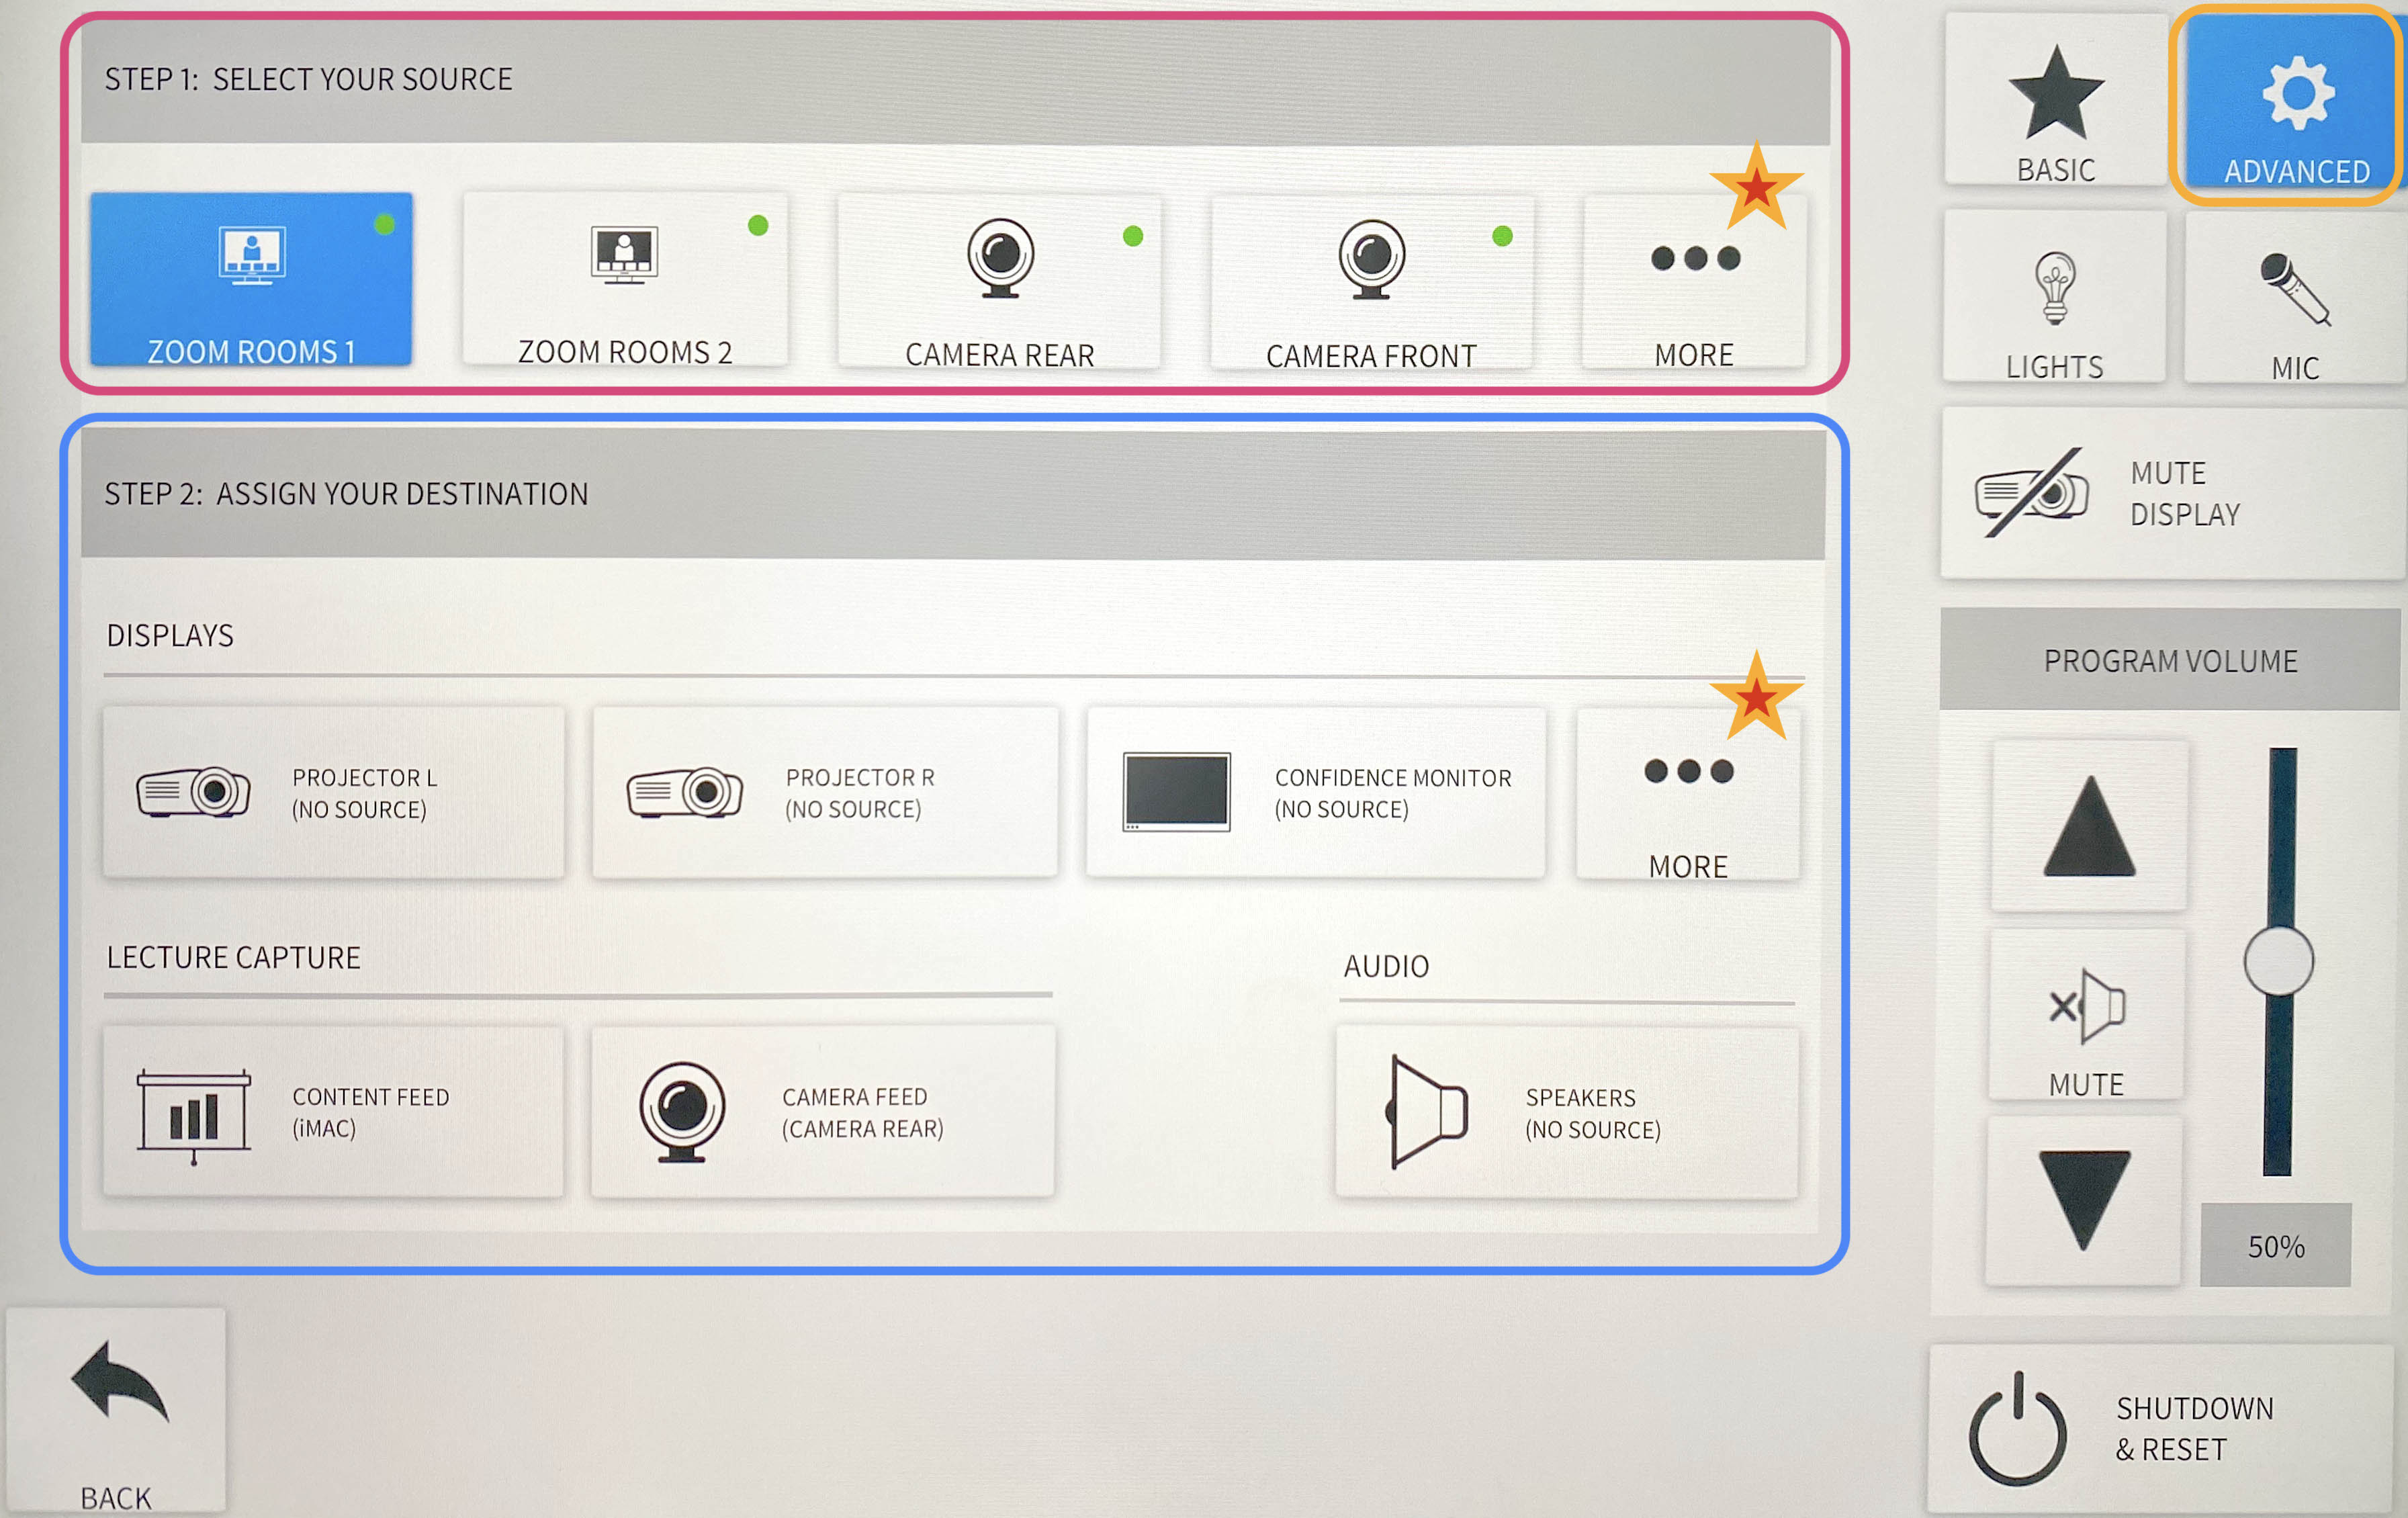
Note:
Zoom rooms 1 - Presenter's shared screen/ Zoom participants sound
Zoom room 2 - Participant's camera feed/ No Zoom participant sound
Screen Display
The Lecture Hall Crestron controls 5 displays. The left & right lobby monitors, the left & right projectors inside the room, and the confidence monitor located in the rear of the room.
To manually turn all of these off and on hit ADVANCED, then DISPLAY CONTROLS. Here you can toggle all 5 displays independently of each other. Hit MORE to see the two lobby displays.
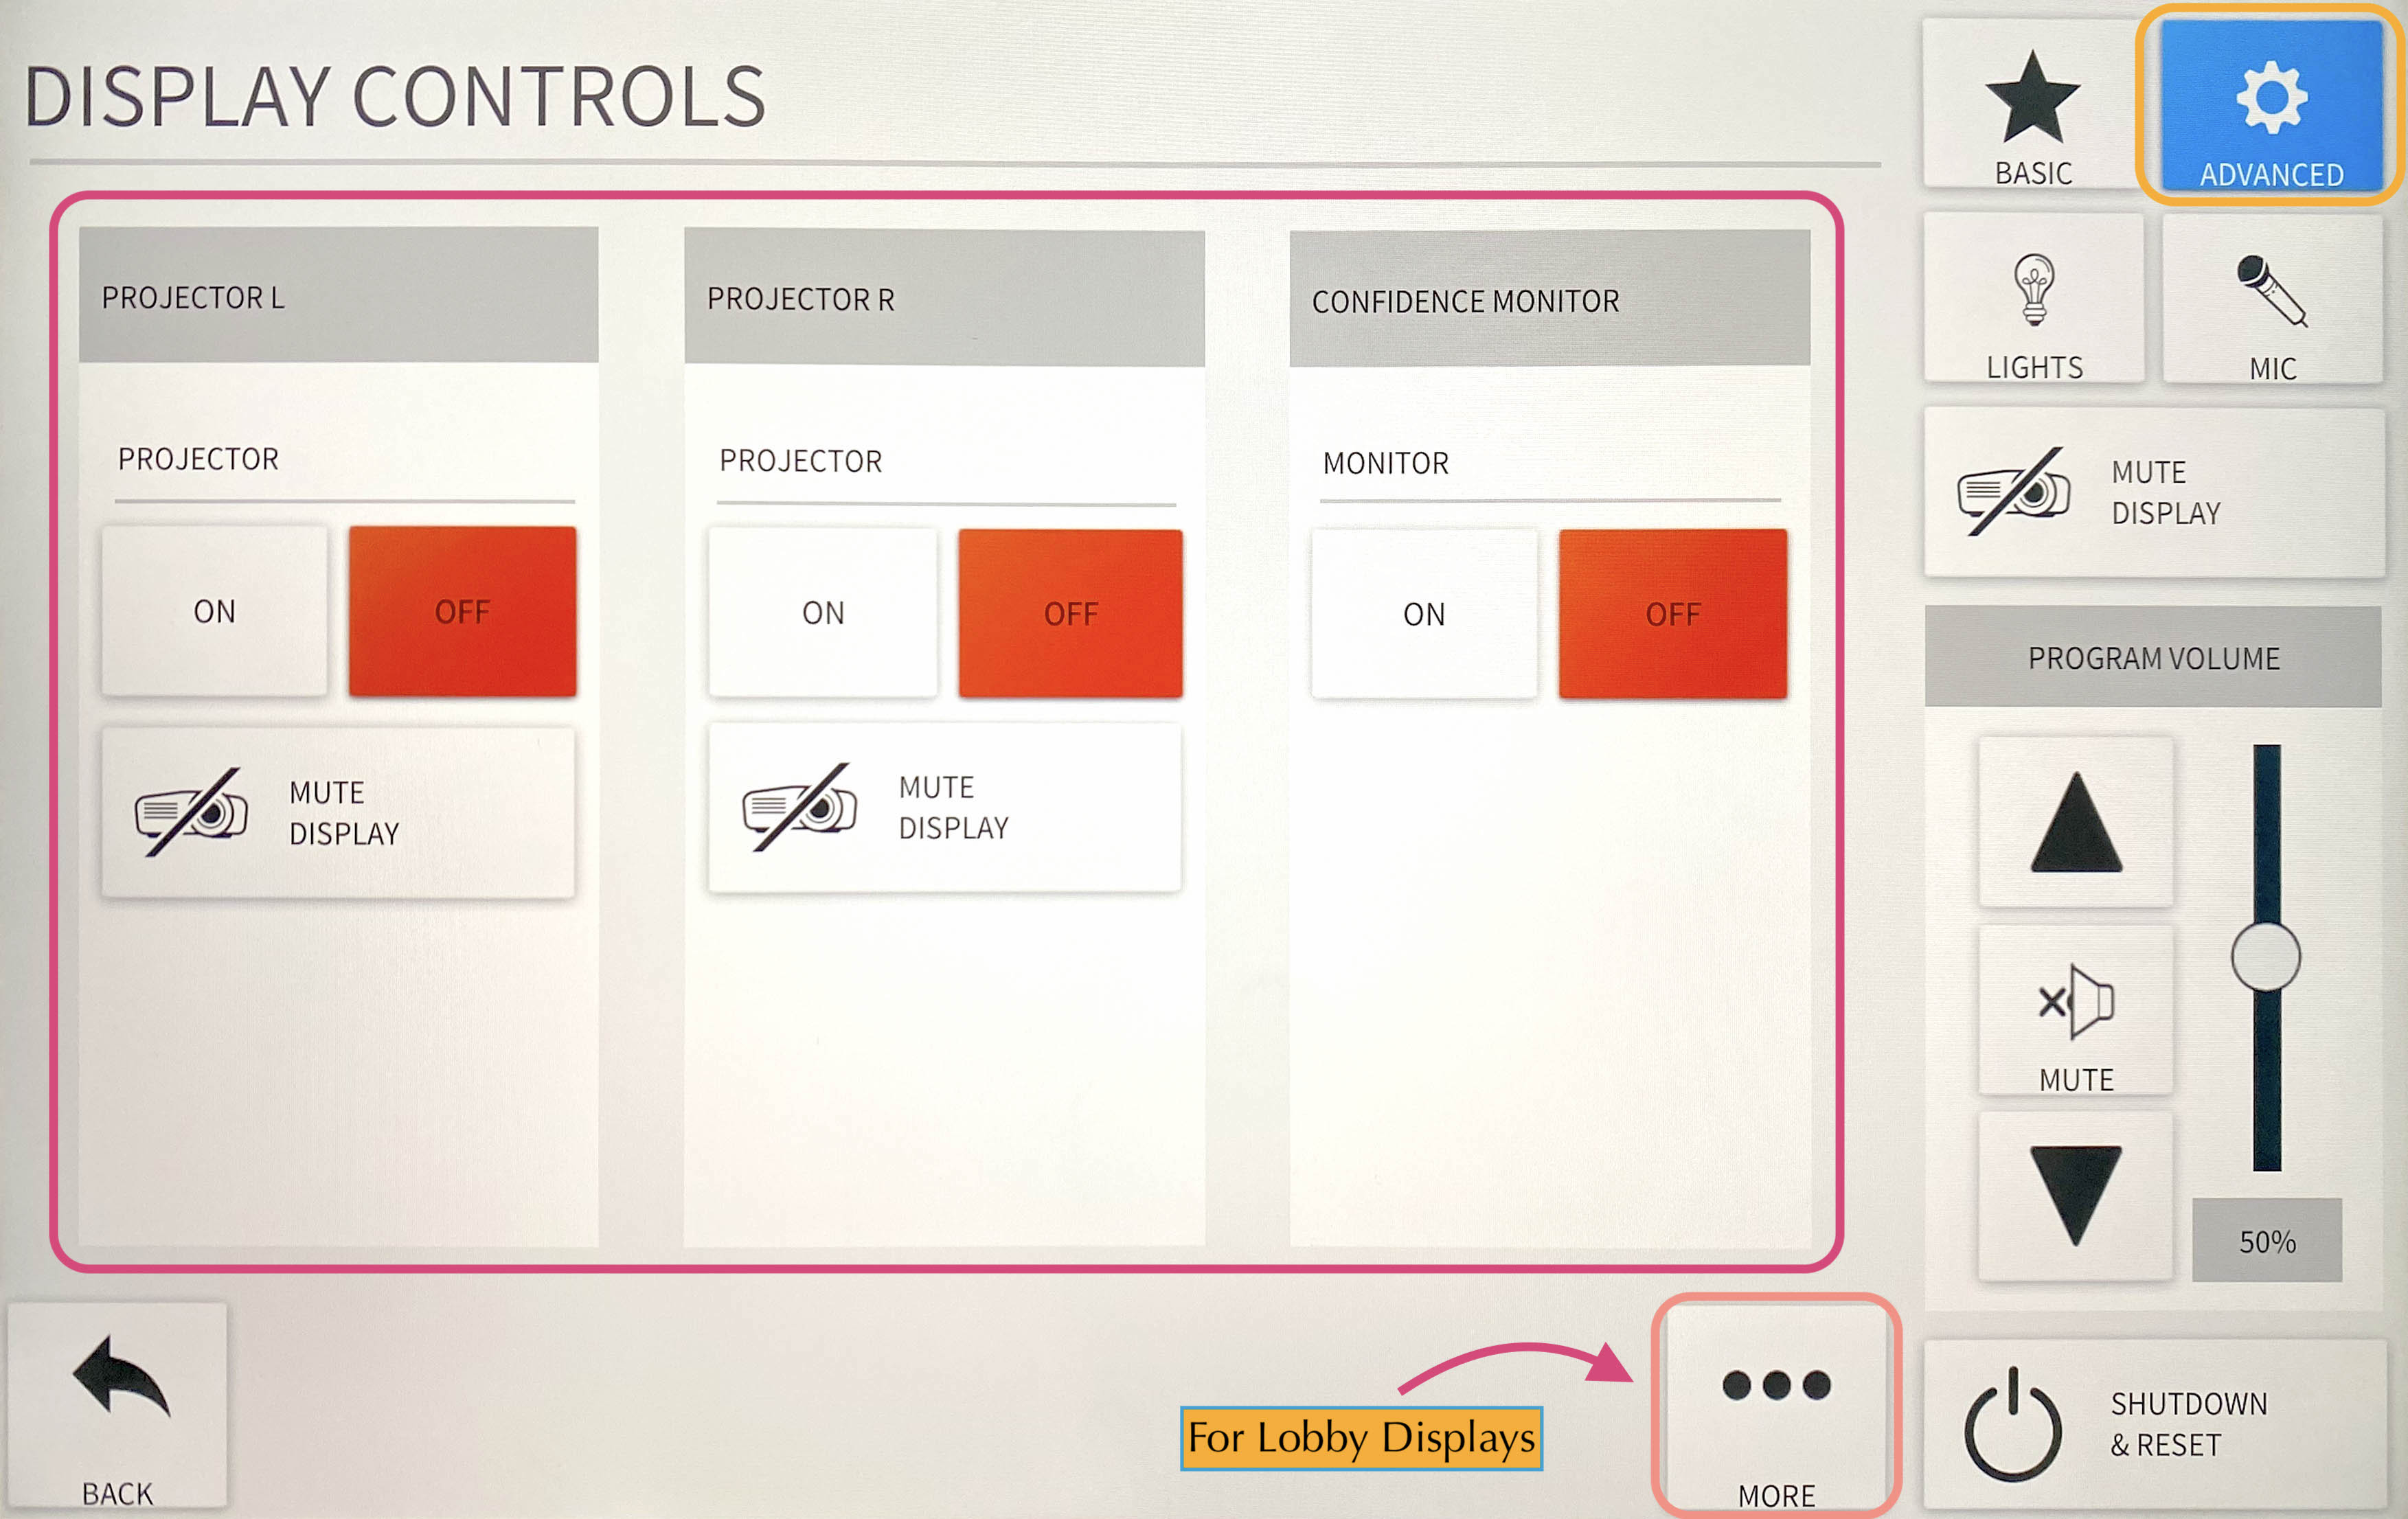
Lobby Monitors
The lecture hall system is set up to stream the events to the two large monitors in the lobby area outside the lecture hall. By default, the monitors will automatically switch over when the lecture hall AV system is started and switch back to the signage when the AV system is shut down.
To manually turn the monitors from video -> signage or vice versa hit ADVANCED. Here you can toggle between VIDEO and SIGNAGE for both the left and right monitors.

Note:
You can change the volume settings for the monitors under the MIC tab and adjust the LOBBY MONITORS volume slider.
Shades & Lights
Glass Wall Light
The glass wall light is controlled with a dimmer switch located in the front right of the room between the glass wall and the exit door.
Room Lights
There are two ways to control the room lights. The first is with the physical control panel located in the front right of the room between the glass wall and the exit door. The second is on the Crestron panel, in the top right corner under LIGHTS. For presentations/lectures make sure to turn the lights on as bright as they go.
Sun Shades and Room Darkening Shades
The room has two sets of shades: sun shades and room darkening shades. Both are controlled with switches located in the front right of the room between the glass wall and the exit door.
- The sun shades are the primary option to block out glare from the sun but still allow some light into the room. This is what ICERM normally uses during lectures.
- The room darkening shades are a much darker option that blocks out all of the light coming through the windows. These are used occasionally when watching video presentations in the room.
System Reset
When you are all done with the room, please make sure to shut down the system. Go to the control panel, click SHUTDOWN & RESET in the bottom right corner, then hit SHUTDOWN SYSTEM.
11th Floor Conference Room
The 11th Floor Conference Room is a fully-equipped Zoom Room to support teleconferencing and hybrid meetings. It has an HDMI input for connecting a laptop, in-room iMac for presentations, and a Blu-Ray player. The touch control pad is located to the right of the chalkboard near the rear exit door.
The touchpad has two main screens, the Crestron panel & Zoom Rooms.
To start choose Basic Mode. Here you will have 4 options.

Laptop
- Connect the laptop using the HDMI/USB-c cable in the middle of the conference table.
- The projector should turn on, if not, press the LAPTOP button on the Creston control panel.
- When you are all done with the room, please make sure to shut down the system. Go to the control panel, click SHUTDOWN & RESET in the bottom right corner, then hit SHUTDOWN SYSTEM.
iMac
- Wake up the iMac in the back of the room using the wireless mouse/keyboard.
- Press iMAC button on the Creston control panel
- When you are all done with the room, please make sure to shut down the system. Go to the control panel, click SHUTDOWN & RESET in the bottom right corner, then hit SHUTDOWN SYSTEM.
Note:
If the mouse or keyboard is not responding, first check if they are turned on, then plug them in via lightning cable to charge.
Zoom
- Click Zoom on Creston panel
- Pull down the tab at the top of the touchpad and click the ⌂ button to get to the Zoom panel.
- Click the Join button and enter the code for an existing Zoom Meeting or click New Meeting to start a new Zoom Meeting.

Once in a Zoom meeting, to Share Content:
- From Laptop: plug the laptop in with the HDMI/USB-c cable in the center of the conference table. This should trigger content to start sharing from a laptop. If it doesn't - Press the Share Content button on the Zoom panel, then toggle back to the Crestron panel and chose LAPTOP (TABLE) for Zoom Content Feed.
- From IMac: Press Share Content on the Zoom panel. Toggle over to the Crestron panel and press iMac for Zoom Content Feed.
**To stop sharing either unplug the laptop, press OFF for Zoom Content Feed, or press Stop Share on the Zoom panel.

Note:
To change the camera angle, toggle to the Creston panel, press ADVANCED, then CAMERA CONTROLS. Use the PAN & TILT and ZOOM buttons to get the camera angle just right.
When finished with the Zoom meeting press End, then toggle back to the Crestron control panel click SHUTDOWN & RESET in the bottom right corner, then hit SHUTDOWN SYSTEM.
Blu-Ray
- Locate the Blu-Ray player in the AV rack in the cabinet in the back of the room on the window side. Power on the Blu-Ray player and insert your Blu-Ray into the disc drive.
- On the touchpad, within the Creston panel, click ADVANCED.
- Click AUDIO & VIDEO ROUTING, tap BLU-RAY then hit the Projector button and Audio button so they both read (BLU-RAY). Then hit BACK or ADVANCED
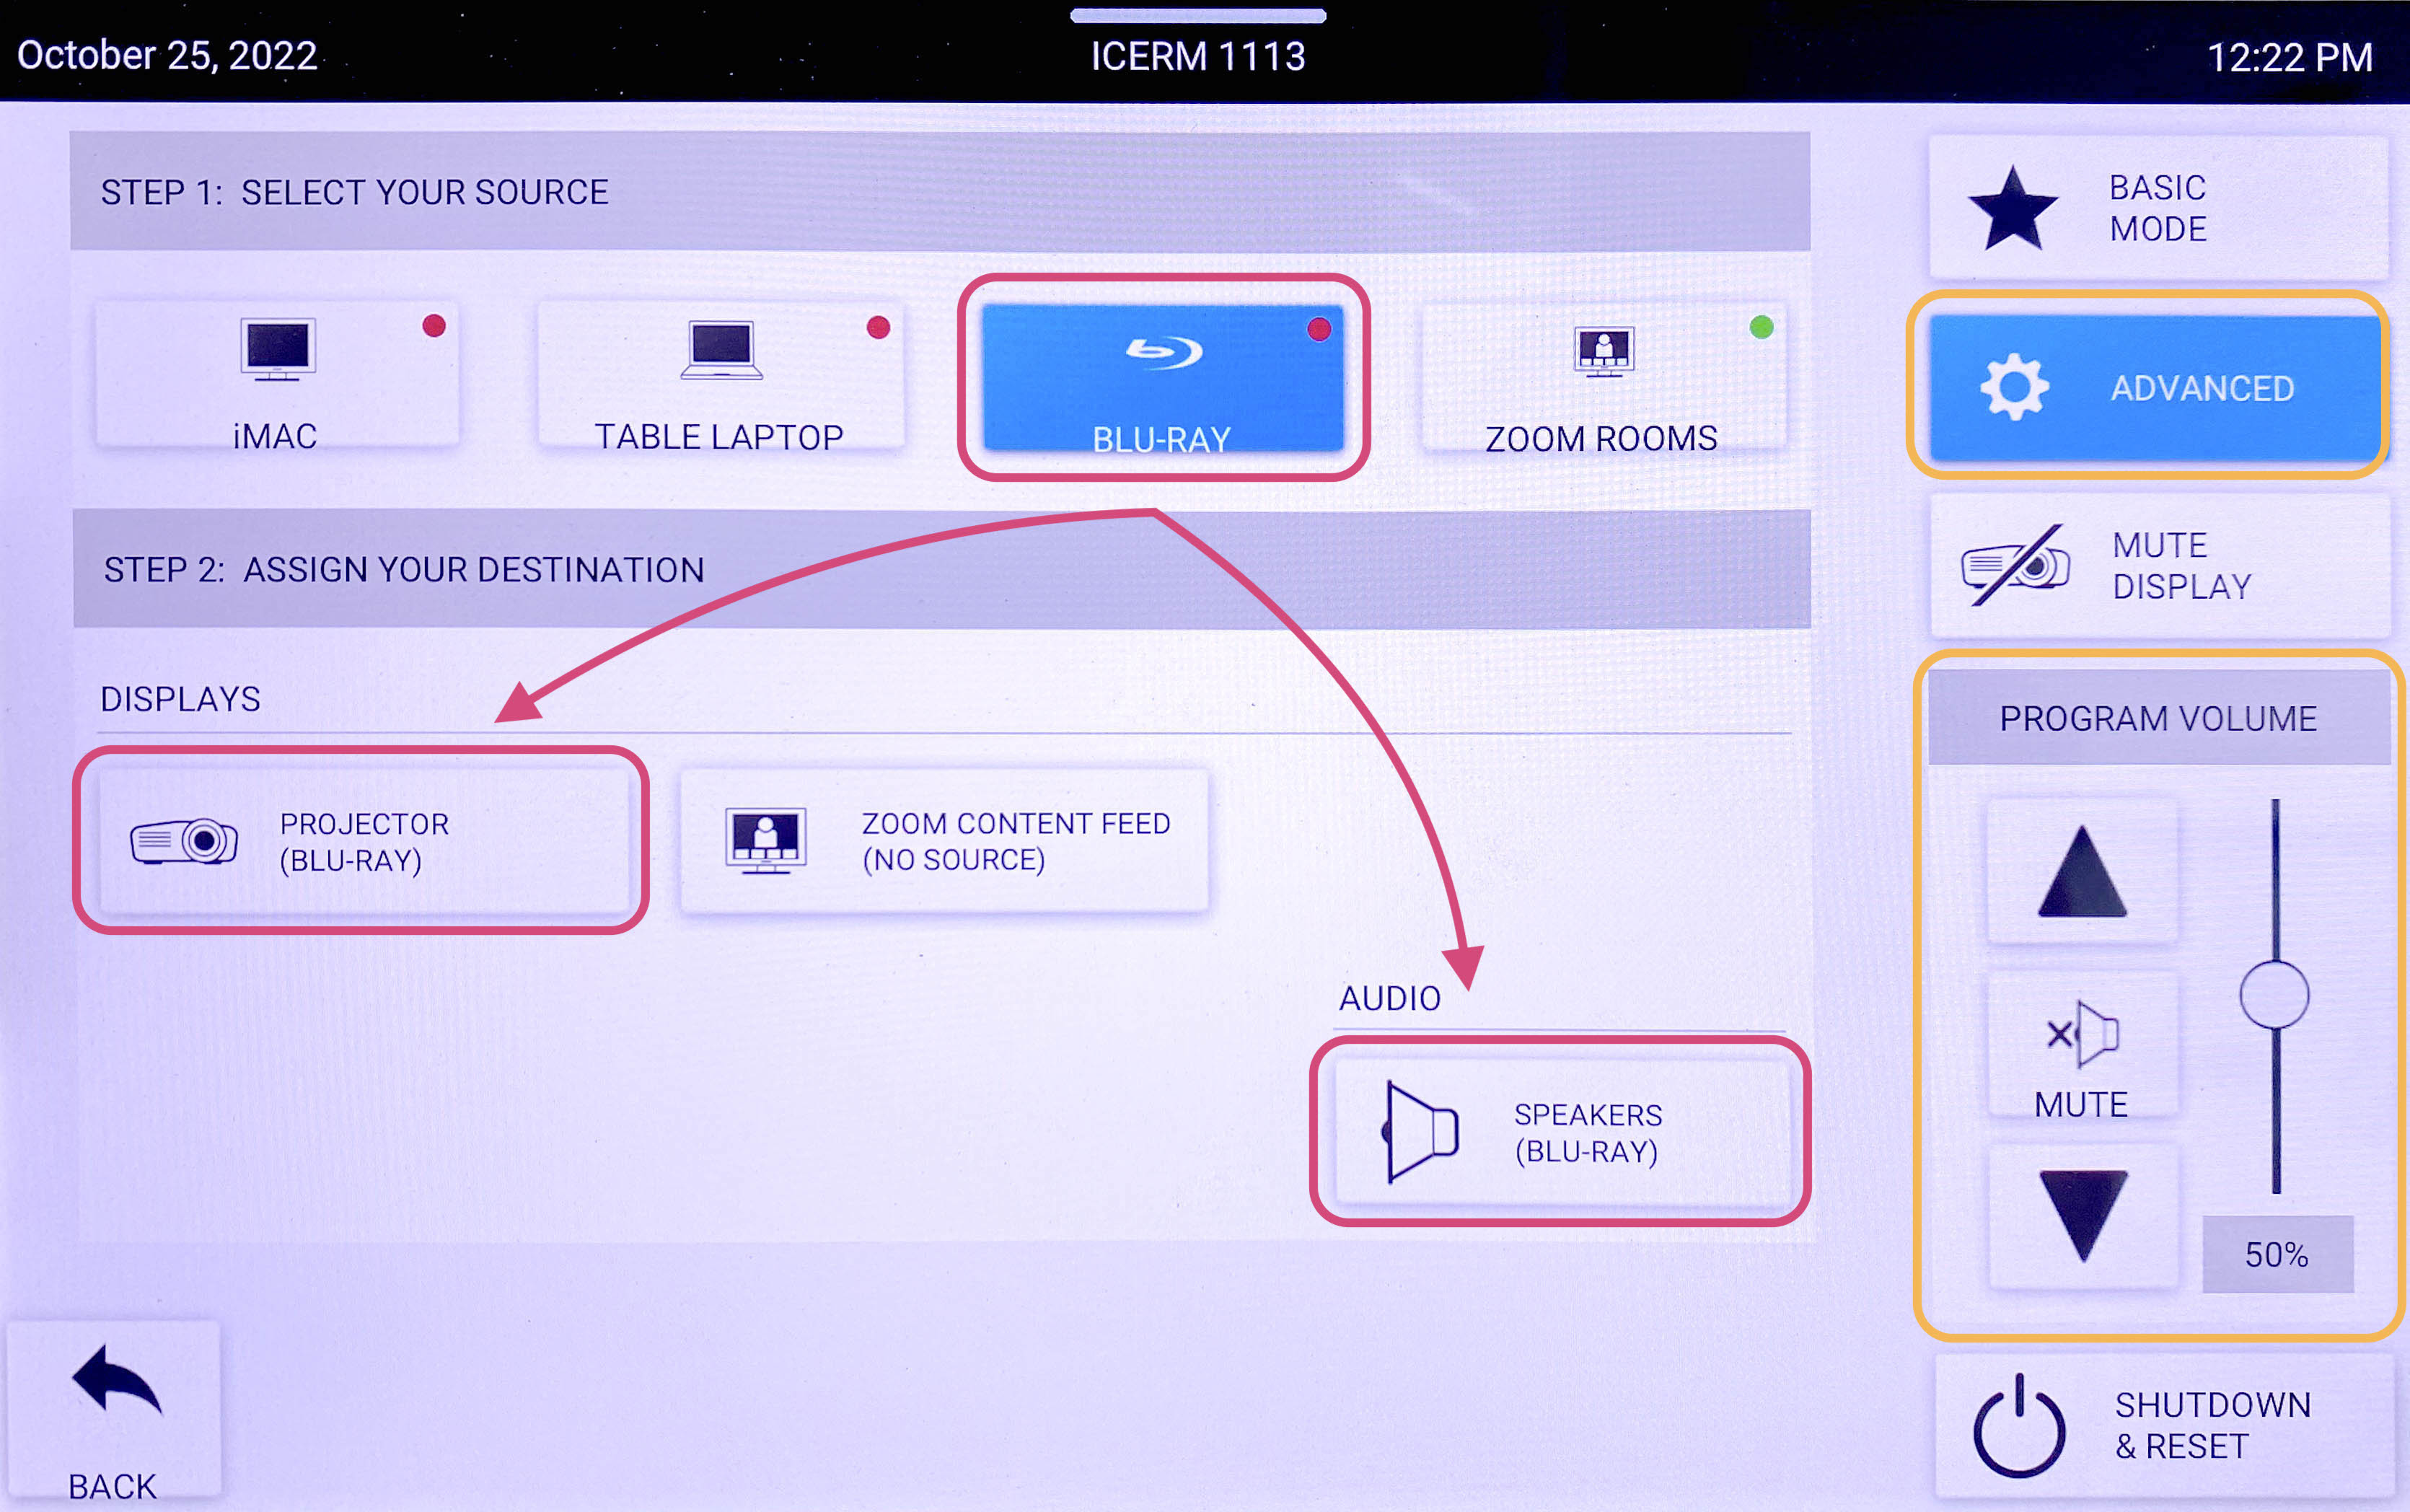
4. Click BLU-RAY CONTROLS, this will bring up a control panel that will allow you to navigate the player menu and control playback. Use the PROGRAM VOLUME to change to volume.
5. When you are all done with the room, please make sure to shut down the system. Go to the control panel, click SHUTDOWN & RESET in the bottom right corner, then hit SHUTDOWN SYSTEM.
**Don't forget to eject your Blu-Ray disc from the player before leaving
When you are all done with the room, please make sure to shut down the system. Go to the control panel, click SHUTDOWN & RESET in the bottom right corner, then hit SHUTDOWN SYSTEM.

10th Floor Classroom
The 10th Floor Classroom is a fully-equipped Zoom Room to support teleconferencing and hybrid meetings. It has an HDMI input for connecting a laptop as well as an in-room iMac for presentations. The control panel is located on the far right back wall, behind the podium.
The touchpad has two main screens, the Crestron panel & Zoom Rooms.
To start choose Basic Mode. Here you will have 3 options.
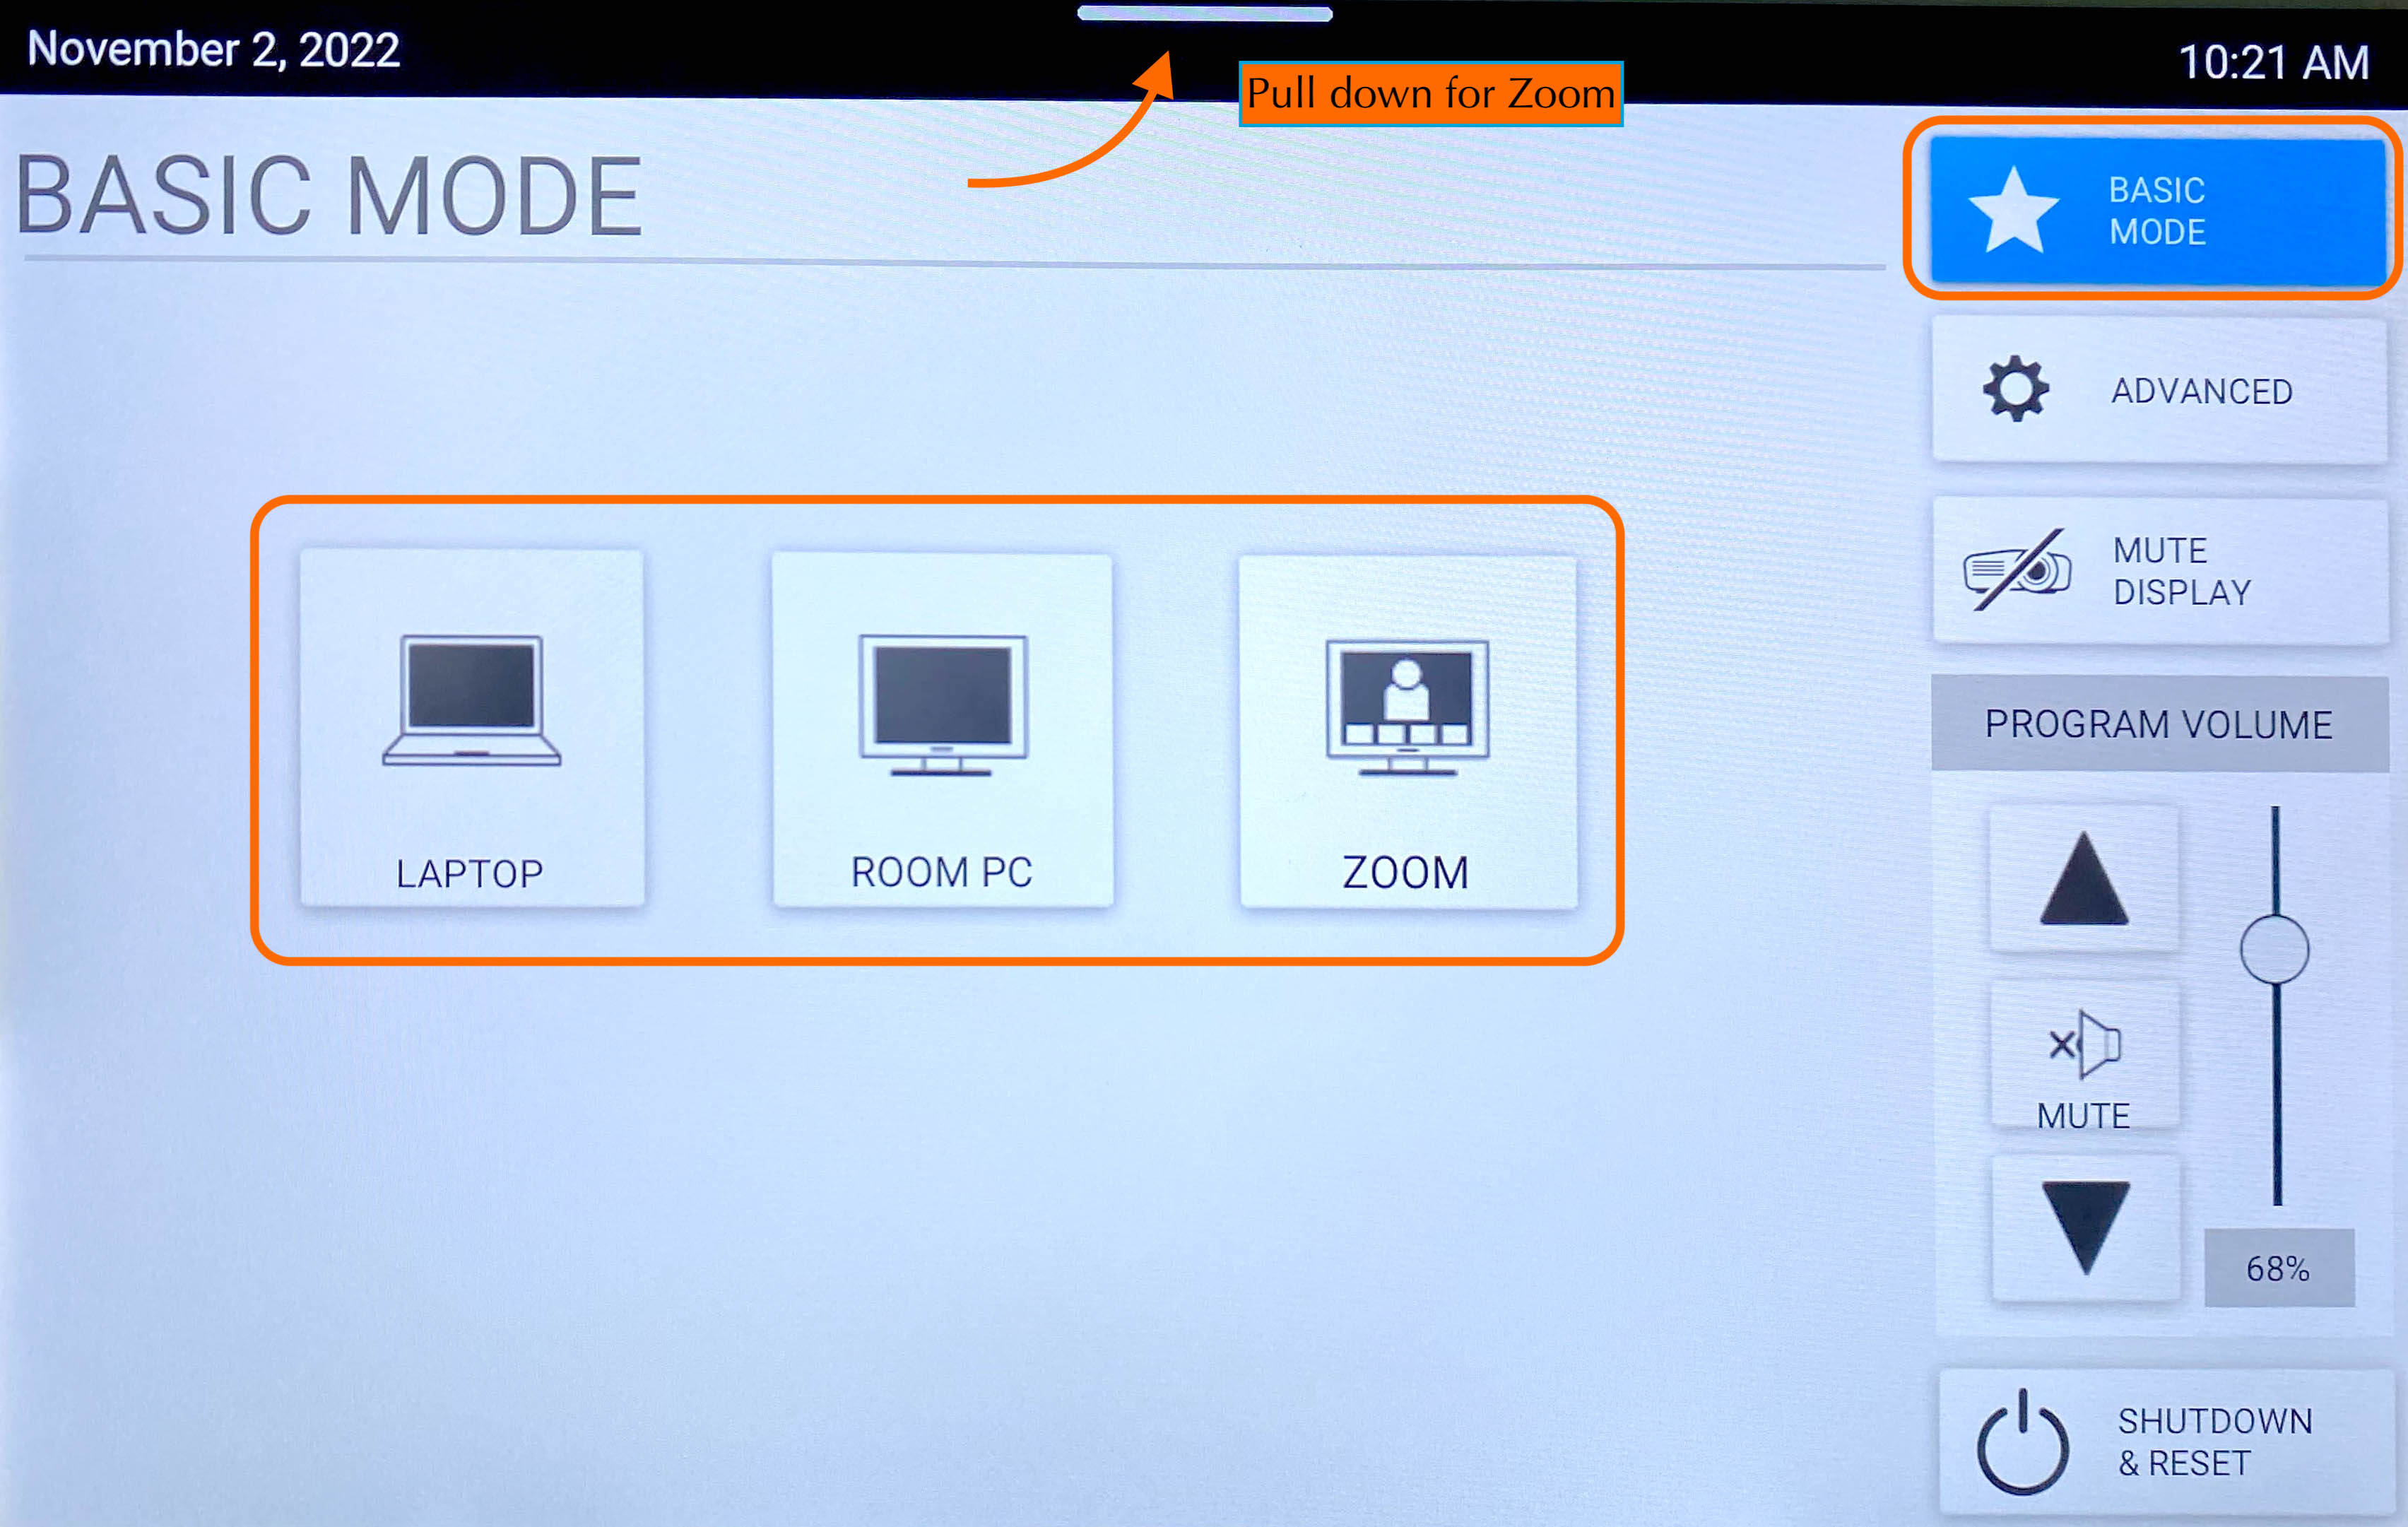
Room PC
Click Room PC to turn the projector on. This will display a mac mini located in the back of the classroom. Use the wireless mouse and keyboard on the podium to wake up the computer (if asleep). This will act like a normal computer.
Note:
Make sure to turn the mouse/keyboard on, more batteries for the keyboard are located on the bottom shelf of the podium.
Remember to click Shutdown & Reset in the bottom right corner, then hit Shutdown System when you are all finished with the room.
Zoom
When Zoom is clicked the projector will turn on and display a 'Zoom Screen Saver', pull down the tab at the top of the panel and click the ⌂ button to get to the Zoom home page. Here you will be able to join a Zoom meeting.
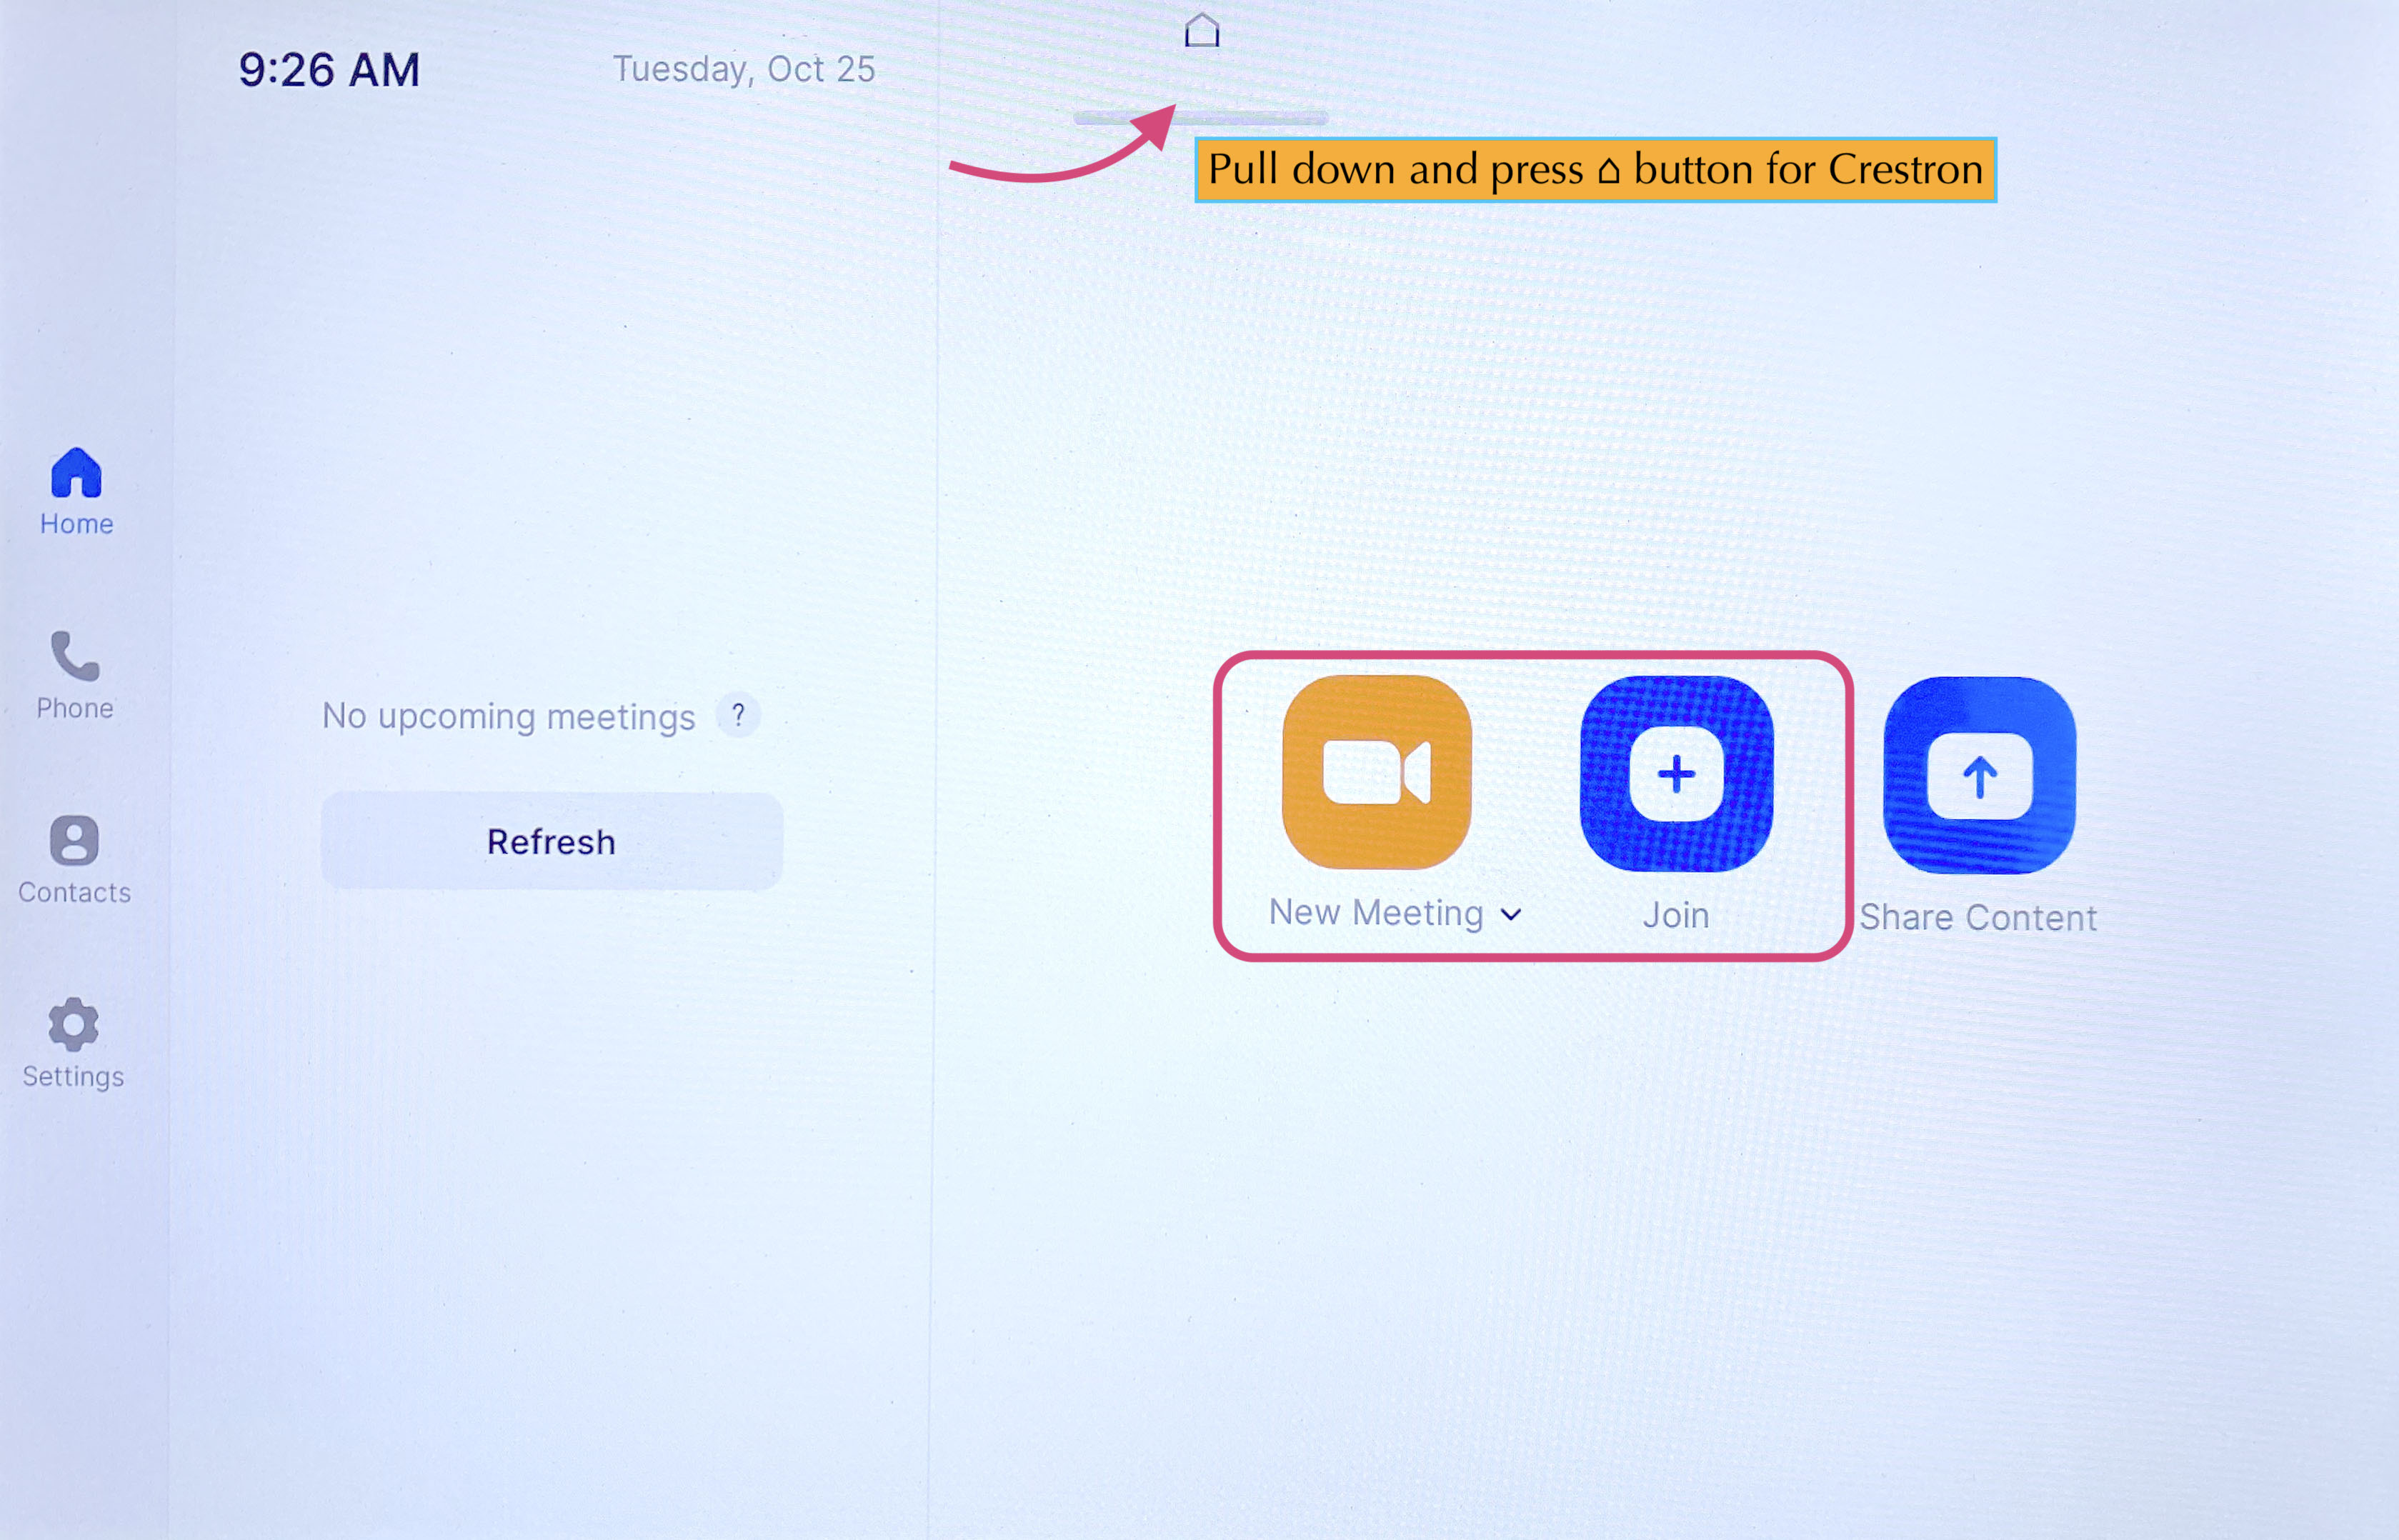
Click the Join button and enter the code for the Zoom Meeting. Once joined you will have many options, start by clicking the Start Video button to share video from the room.

Some options you might use are:
- Share Content (from a laptop)- Once clicked a 'Share Content' pop-up will appear, make sure your laptop is plugged in via the HDMI cable, then click Use HDMI to share.
- View - This option will allow you to toggle between speaker, thumbnails, and gallery modes.
- Switch Camera - This button is to change the view of the room, once clicked a pop-up will appear. There you can toggle between the two 'AVer CAM520 Pro2' choices to see a view of the front or back of the room.
- Camera Control - Once clicked a pop-up will appear, use the arrow keys to position the camera however you'd like.
- Participants - Click this to see who/how many participants there are in the current Zoom meeting.
- More - Chat, Reactions, Breakout Rooms
- Volume - Controls the Output sound
When finished with the Zoom meeting press End, then toggle back to the main control panel to shut down the system.
** Remember to toggle back to the Crestron panel and click Shutdown & Reset in the bottom right corner, then hit Shutdown System when you are all finished with the room.
When you are all done with the room, please make sure to shut down the system. Go to the control panel, click Shutdown & Reset in the bottom right corner, then hit Shutdown System.
Zoom Video Conferencing
Zoom is the official video conferencing service of ICERM and Brown University. ICERM uses both Zoom Meetings and Zoom Webinar for our events.
Overview of Zoom at ICERM
Zoom is the official video conferencing service of ICERM and Brown University. ICERM uses both Zoom Meetings and Zoom Webinar for our events.
Downloading Zoom
-
The Zoom Meetings client is available for macOS, Windows, and Linux from the Zoom website.
-
Zoom is available for iOS on the App Store and Android on the Google Play Store.
General Zoom Info & Tips
-
Zoom has apps for macOS, Windows, and Linux available for download on the Zoom.us website (https://zoom.us/download/). iOS and Android apps are also available on the App Store/Google Play Store. Zoom will work best if you keep it up to date to the latest version, available through the download link.
-
Please join the Zoom sessions with your full name.
-
We recommend using headphones to reduce the chance of echo, feedback, or other audio issues.
-
Zoom can be bandwidth and resource-intensive for your computer. For best performance, we recommend a wired connection, if possible, and running as few other concurrent applications as possible while participating.
-
We encourage users to add a profile photo to their Zoom account so that it will show up when you are speaking without a camera on.
- Zoom AI will be disabled for all presentations. Any requests to enable it must be made to the Director in consultation with the IT Director.
-
Zoom has a great user guide and knowledge base available at https://support.zoom.us/.
FAQs & Zoom Support Pages
Zoom's full user guide and knowledgebase available at https://support.zoom.us/. Some commonly used Zoom features at ICERM along with direct links to their support pages on Zoom's website are below.
-
How do I raise my hand? - Meeting controls for attendees
-
Managing Participants in a Webinar - for organizers and session chairs
-
Sharing a Whiteboard - Using Zoom's shared whiteboard feature, which can be useful for collaborative work in groups.
Meetings vs. Webinars
Zoom Virtual Meetings
Zoom Meetings provides meetings with video, audio and screen sharing for up to 300 real time participants.
-
ICERM uses Zoom Meetings for most workshop talks, discussion sessions, working group meetings, and virtual social events such as coffee break sessions and workshop receptions.
-
Zoom Meetings allow all participants to control their own microphones, cameras, and screen sharing so they can see, chat, and collaborate with each other.
-
For officially scheduled workshop events, ICERM's IT staff creates the Zoom sessions and shares the links with all participants. A member of ICERM's IT staff also monitors the Zoom session to provide any technical support should the need arise.
-
During long-term programs, ICERM can support a limited number of recurring working group meetings on Zoom.
-
All attendees, speakers, and session chairs are encouraged to review our Zoom Meetings Guide.
Zoom Webinar
Zoom Webinar is an add-on to the Zoom Meetings service that allows more formal webinar broadcasting and live-streaming outside of Zoom.
-
ICERM sometimes uses Webinar for more formal events such as virtual public lectures.
-
Webinar attendees will be in view-only mode but can still raise their hand to request microphone access or use chat to ask questions.
-
Most ICERM Webinars are live-streamed on the icerm.brown.edu website via Panopto.
Technical Comparison for Organizers
Meetings
-
Zoom Meetings allow all participants to see, chat, and collaborate with each other.
-
All participants can control their own microphones, cameras, and screen sharing by default.
-
These sessions can be recorded but not live streamed.
Webinars
-
During a webinar, participants are put into two categories: “panelists” and “attendees”.
-
Panelists can use video, audio, and screen sharing just like in a normal Zoom meeting.
-
Attendees have a “view-only” experience of the panel, but can also use audio with permission from the Webinar hosts for asking questions during talks.
-
Attendees in Webinars can not see the participant list during sessions.
-
Webinar also includes Q&A and Polls features.
-
Q&A is a specific chat area for attendees to ask questions to panelists.
-
Polls allow panelists and webinar hosts to poll the attendees to vote on questions/topics during the webinar.
Zoom Meetings Guide
This guide contains ICERM's general guidelines and tips for workshop talks, classes, working groups, and meetings via Zoom Meetings. We recommend all Zoom participants read and follow these guidelines to ensure the best experience for all participants.
General Zoom Info & Tips
-
Zoom has apps for macOS, Windows, and Linux available for download on the Zoom.us website (https://zoom.us/download/). iOS and Android apps are also available on the App Store/Google Play Store. Zoom will work best if you keep it up to date to the latest version, available through the download link.
-
Please join the Zoom sessions with your full name.
-
We recommend using headphones to reduce the chance of echo, feedback, or other audio issues.
-
Zoom can be bandwidth and resource-intensive for your computer. For best performance, we recommend a wired connection, if possible, and running as few other concurrent applications as possible while participating.
-
We encourage users to add a profile photo to their Zoom account so that it will show up when you are speaking without a camera on.
-
Zoom has a great user guide and knowledge base available at https://support.zoom.us/.
Zoom Workshops at ICERM
-
Workshop talks presented via Zoom are generally recorded and posted after the talk on ICERM's video archive.
-
Each workshop session will have a session chair. Session chairs introduce the speaker and moderate questions from the audience.
-
Zoom Meetings with many participants can be very bandwidth intensive. We ask all attendees other than the presenters turn off their camera during talks to help conserve bandwidth.
-
All attendees should keep their microphones muted when not talking to avoid any potential issues.
Info for Speakers
-
We strongly recommend using headphones to reduce the chance of echo, feedback, or other audio issues.
-
You can use Zoom's Screen Sharing to share slides or other materials during your presentation. See the Screen Sharing section below for more information.
-
We need your permission in order to publish your talk on our video archive. Please contact ICERM’s program staff for any questions with speaker release forms.
-
If you’d like to do a trial run before your talk, please email support@icerm.brown.edu and we can schedule a test session.
-
To change your Zoom background: (on the browser) Click your profile picture, then click on Settings. (on the desktop app) Go to zoom, Preferences. In the left menu bar, click on the Virtual Background tab (if you don't see this tab, log in to the Zoom website, go to Settings and toggle on Virtual Background). In the Virtual Background tab, select one of Zoom's defaults or upload an image by clicking the + icon to upload from your computer.
Info for Organizers and Session Chairs
-
Session chairs for the virtual talks will introduce the speaker at the beginning of their talk and assist with moderating questions from the audience.
-
Chairs will be made a co-host upon joining the Zoom meeting. This will allow you to control the microphones of the audience.
-
At the beginning of each recorded session, please wait for ICERM IT staff to give the go-ahead before introducing the speaker to start their talk. This will ensure we have started recording.
-
Controls for managing Zoom participants are available from the Participants tab in Zoom.
-
Participants can use Zoom’s “raise hand” feature or the chat window to ask a question or indicate they would like to speak. Session chairs should monitor for questions and notify the speaker when applicable.
Screen Sharing
-
Presenters can use Zoom's Screen Sharing to share slides or other materials during your presentation. To start screen sharing, click the green “Share Screen” button in the bottom toolbar of the meeting room, then follow the prompts to get it started.
-
Zoom's guide on Screen Sharing is available here for more info. We encourage you to review this document before your presentation. https://support.zoom.us/hc/en-us/articles/201362153-How-Do-I-Share-My-Screen-
-
When sharing full-screen slides, make sure to select your entire desktop in Zoom’s screen sharing window. If you select just the slides window, Zoom will not display properly when you go to full screen.
-
Some operating systems require specifically allowing Screen Sharing in System Preferences.
Lightning Talks
-
During Lighting Talk sessions, ICERM staff concatenates all presenters' slides into a single slide deck.
-
ICERM staff will screen share the slides to streamline transitions between each lighting talk presenter.
-
Staff will advance to the next slide on cue from the presenter.
Zoom Webinars Guide
This guide contains ICERM's general guidelines and tips for formal ICERM virtual talks delivered via Zoom Webinar. We ask that all participants, speakers, and session chairs read and follow these guidelines to ensure the best experience for all participants.
Zoom has apps for macOS, Windows, and Linux available for download on the Zoom.us website (https://zoom.us/download/). iOS and Android apps are also available on the App Store/Google Play Store. Once you have the app installed on your device, you can join the virtual talk session by clicking the Zoom link in the email you received from ICERM staff.
For All Participants
-
Please join the Zoom sessions with your full name. (Reimbursements and payments for workshop participants/speakers are limited to funded individuals that participate/speak in this virtual event.)
-
Please keep your microphone muted. If you have a question, please use the “raise hand” feature or chat to notify the presenter. The presenter or co-host will un-mute your mic when they are ready for your question.
-
Zoom can be bandwidth and resource-intensive for your computer. For best performance, we recommend a wired connection, if possible, and running as few other concurrent applications as possible while participating.
-
We encourage users to add a profile photo to their Zoom account so that it will show up when you are speaking.
-
Zoom has a great user guide and knowledgebase available at https://support.zoom.us/.
-
Most Zoom sessions will be published after the end of the conference on our video archive.
For Speakers
-
Speakers will be made a panelist after joining the Zoom webinar. This will allow video and screen sharing.
-
We strongly recommend using headphones to reduce the chance of echo, feedback, or other audio issues.
-
You can use Zoom's Screen Sharing to share slides or other materials during your presentation. To start screen sharing, click the green “Share Screen” button in the bottom toolbar of the meeting room, then follow the prompts to get it started.
-
Zoom's guide on Screen Sharing is available here for more info. We encourage you to review this document before your presentation. https://support.zoom.us/hc/en-us/articles/201362153-How-Do-I-Share-My-Screen-
-
When sharing full-screen slides, make sure to select your entire desktop in Zoom’s screen sharing window. If you select just the slides window, Zoom will get confused when you go to full screen.
-
Some operating systems require specifically allowing Screen Sharing in System Preferences.
-
We need your permission in order to publish your talk on our video archive. Please contact ICERM’s program staff for any questions with speaker release forms.
-
If you’d like to do a trial run before your talk, please email support@icerm.brown.edu and we can schedule a test session.
For Session Chairs
-
Session chairs for the virtual talks will introduce the speaker at the beginning of their talk and assist with moderating questions from the audience.
-
Chairs will be made a panelist and co-host upon joining the Zoom webinar. This will allow you to control the microphones of the audience.
-
At the beginning of each session, please wait for ICERM IT staff to give the go-ahead before introducing the speaker to start their talk. This will ensure we have started recording and live-streaming.
-
Participants will use Zoom’s “raise hand” feature to signal when they have a question or would like to speak. When the speaker is ready for the question, the chair can enable the “Allow Talking” for the participant, allowing them to un-mute their microphone to ask their question. When the discussion has finished, please re-mute the participant’s microphone. These controls are available from the Participants tab in Zoom.
-
We encourage session chairs to review Zoom's user guide on managing participants in a webinar before your session. https://support.zoom.us/hc/en-us/articles/115004834466-Managing-Participants-in-Webinar