# AV Systems
Various rooms/systems available
# 11th Floor Lecture Hall
The 11th Floor Conference Room is a fully-equipped Zoom Room to support hybrid lectures. It has two HDMI inputs for connecting laptops and tablets and an in-room iMac for presentations. The touch control pad is located on the lectern next to the iMac.
The touchpad has two main screens, the Crestron panel & Zoom Rooms.
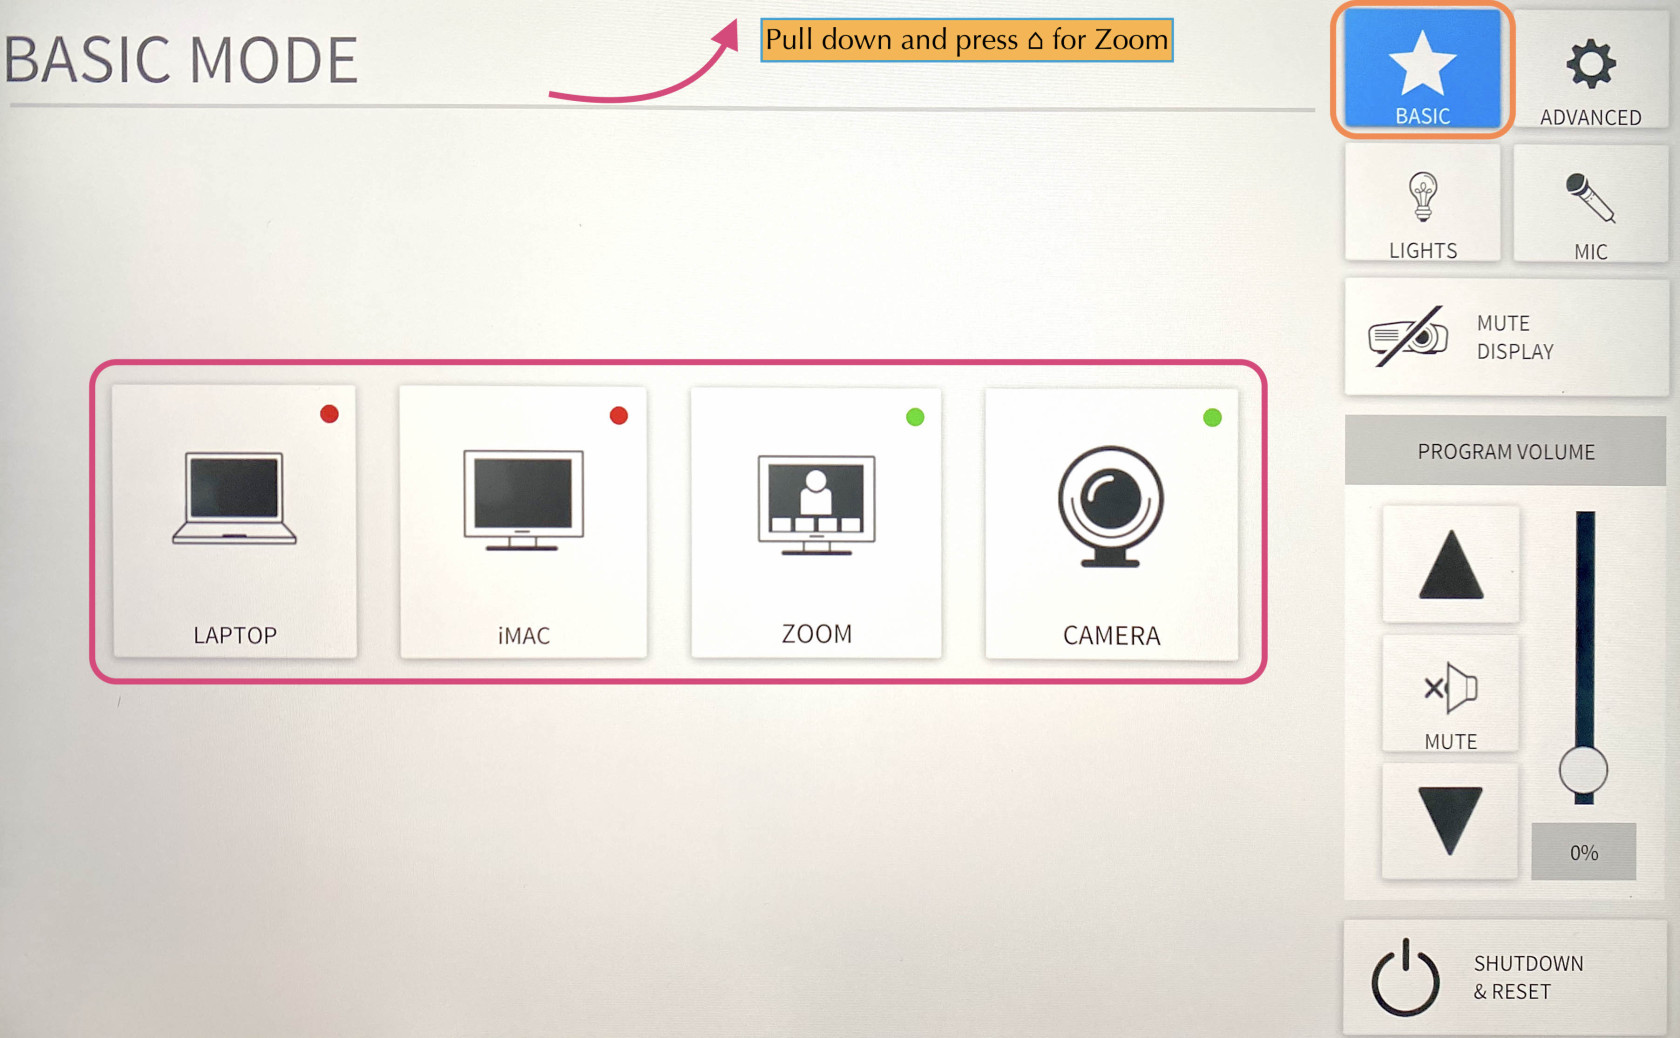
To start choose **Basic Mode**. Here you will have 4 options.
[](https://docs.icerm.brown.edu/uploads/images/gallery/2022-10/sbI1.jpg)
Laptop
1. Connect the laptop using the **HDMI/USB-c** cable on the lectern.
2. The projector should detect input and turn on, if not, press the **LAPTOP** button on the Creston control panel.
3. When you are all done with the room, please make sure to shut down the system. Go to the control panel, click **SHUTDOWN & RESET** in the bottom right corner, then hit **SHUTDOWN SYSTEM.**
**Note:**
There is a dot in the right top-hand corner of the LAPTOP button. If the dot is red, the laptop is not being detected/plugged in correctly. Make sure all cables are securely plugged in. The dot will be in green when an input is detected.
iMac
The iMac can be used to download your presentation or present from a USB drive
1. Wake up the iMac on the lectern with the wireless mouse/keyboard.
2. Press the **iMAC** button on the Creston control panel. The system will power on and project the iMac.
3. When you are all done with the room, please make sure to shut down the system. Go to the control panel, click **SHUTDOWN & RESET** in the bottom right corner, then hit **SHUTDOWN SYSTEM.**
**Note:**
- If the mouse or keyboard is not responding, first check if they are turned on, then plug them in via lightning cable to charge.
- There is a USB slide remote in the drawer below the iMac. It can be used with either the iMac or a laptop by connecting the included USB receiver. The slide remote uses AAA batteries; if they are dead see an ICERM staff member for replacements.
Zoom
1. Click **Zoom** on Creston panel
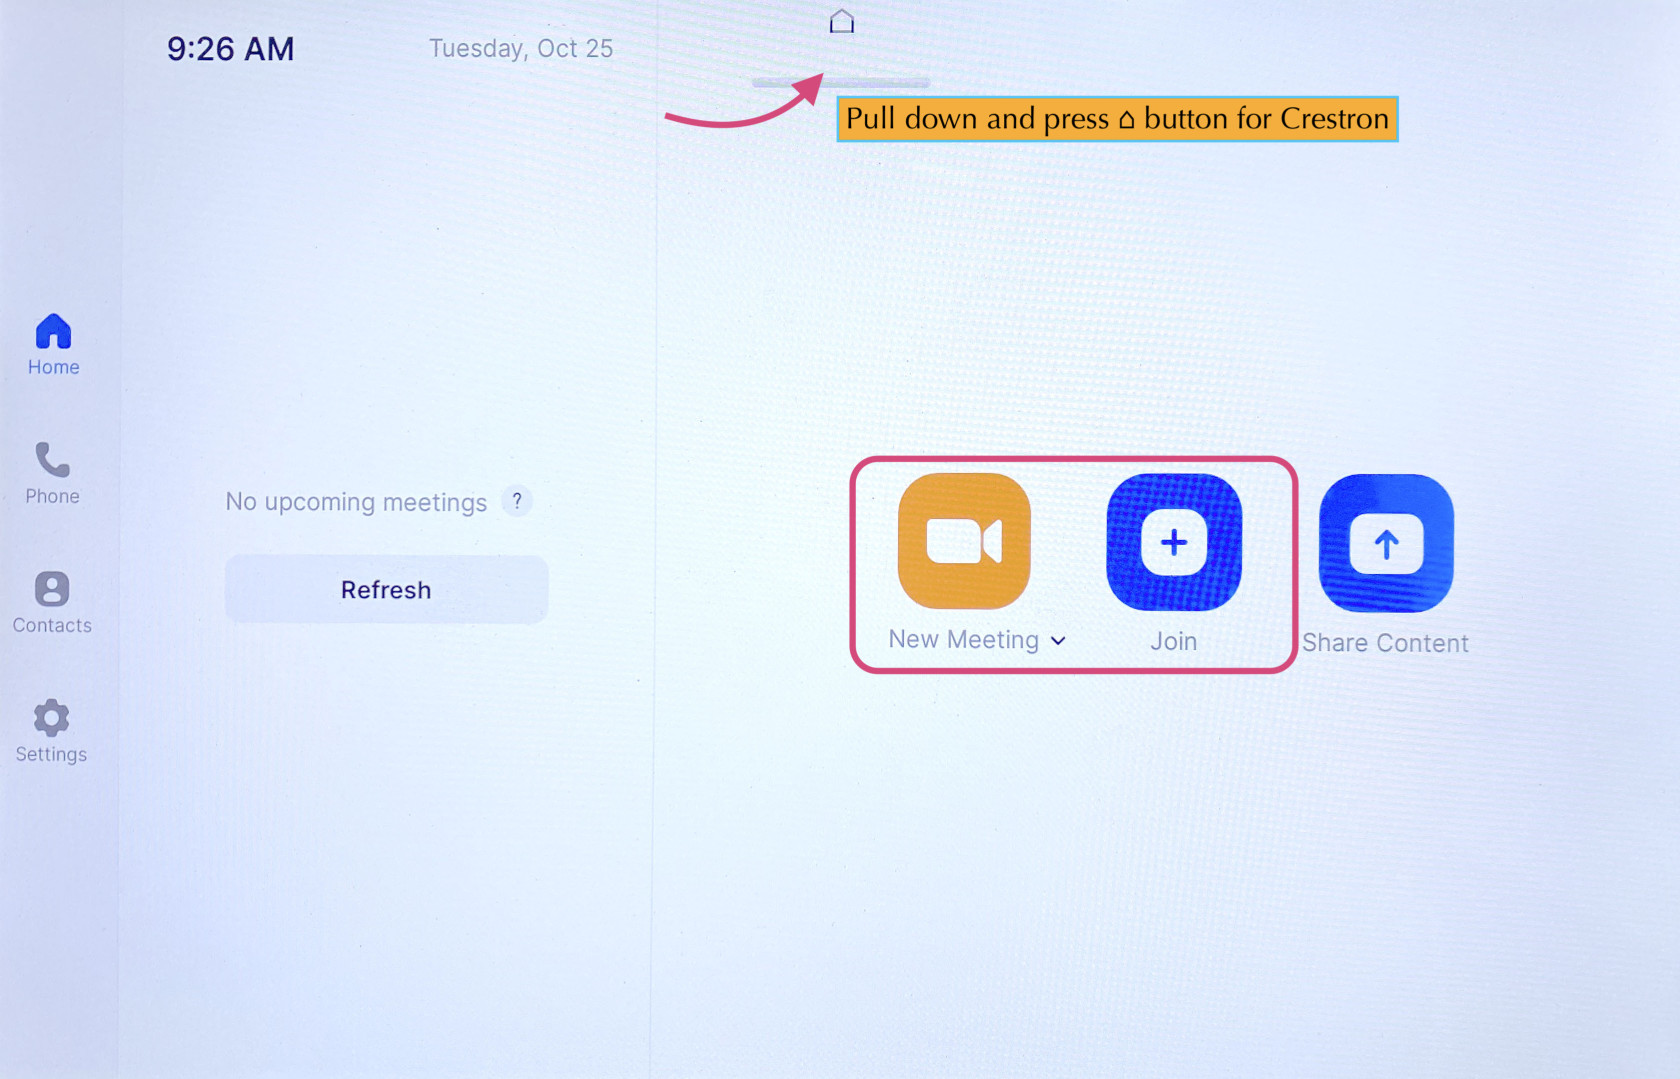
2. Pull down the tab at the top of the touchpad and click the **⌂** button to get to the Zoom panel.
3. Click the **Join** button and enter the code for an existing Zoom Meeting or click **New Meeting** to start a new Zoom Meeting.
4. Once joined you will have many options, start by clicking the **Start** **Video** button to share video from the room.
Then most all details can be adjusted in the Crestron panel. Toggle back to adjust the camera and volume levels.
[](https://docs.icerm.brown.edu/uploads/images/gallery/2022-10/hfw2.jpg)
**Note: **
Switching camera from front to rear - After you join a zoom, you will see a button called **Switch Camera**. Press is if you want zoom to use the camera in the front of the room rather than the back or vice versa. This is the only place you can do that.
Camera
Click **CAMERA** if the talk is going to be in-person and entirely done on the whiteboards.
Microphones
The lecture hall is equipped with six wireless microphone channels, labeled WX1 through WX6. Six lavalier and six handheld microphones are located in the lectern drawer, also labeled WX1 through WX6. Any combination of six microphones can be used during a presentation as long as only one microphone per channel is used.
\*\*\* Meaning only 6 mics can be used at any given time.
The room is also equipped with a ceiling-mounted microphone which will capture the sound of members of the audience. The ceiling mic is quite good and can be sufficient for teleconference events that are not being recorded or live-streamed.
##### To change the volume of the mics:
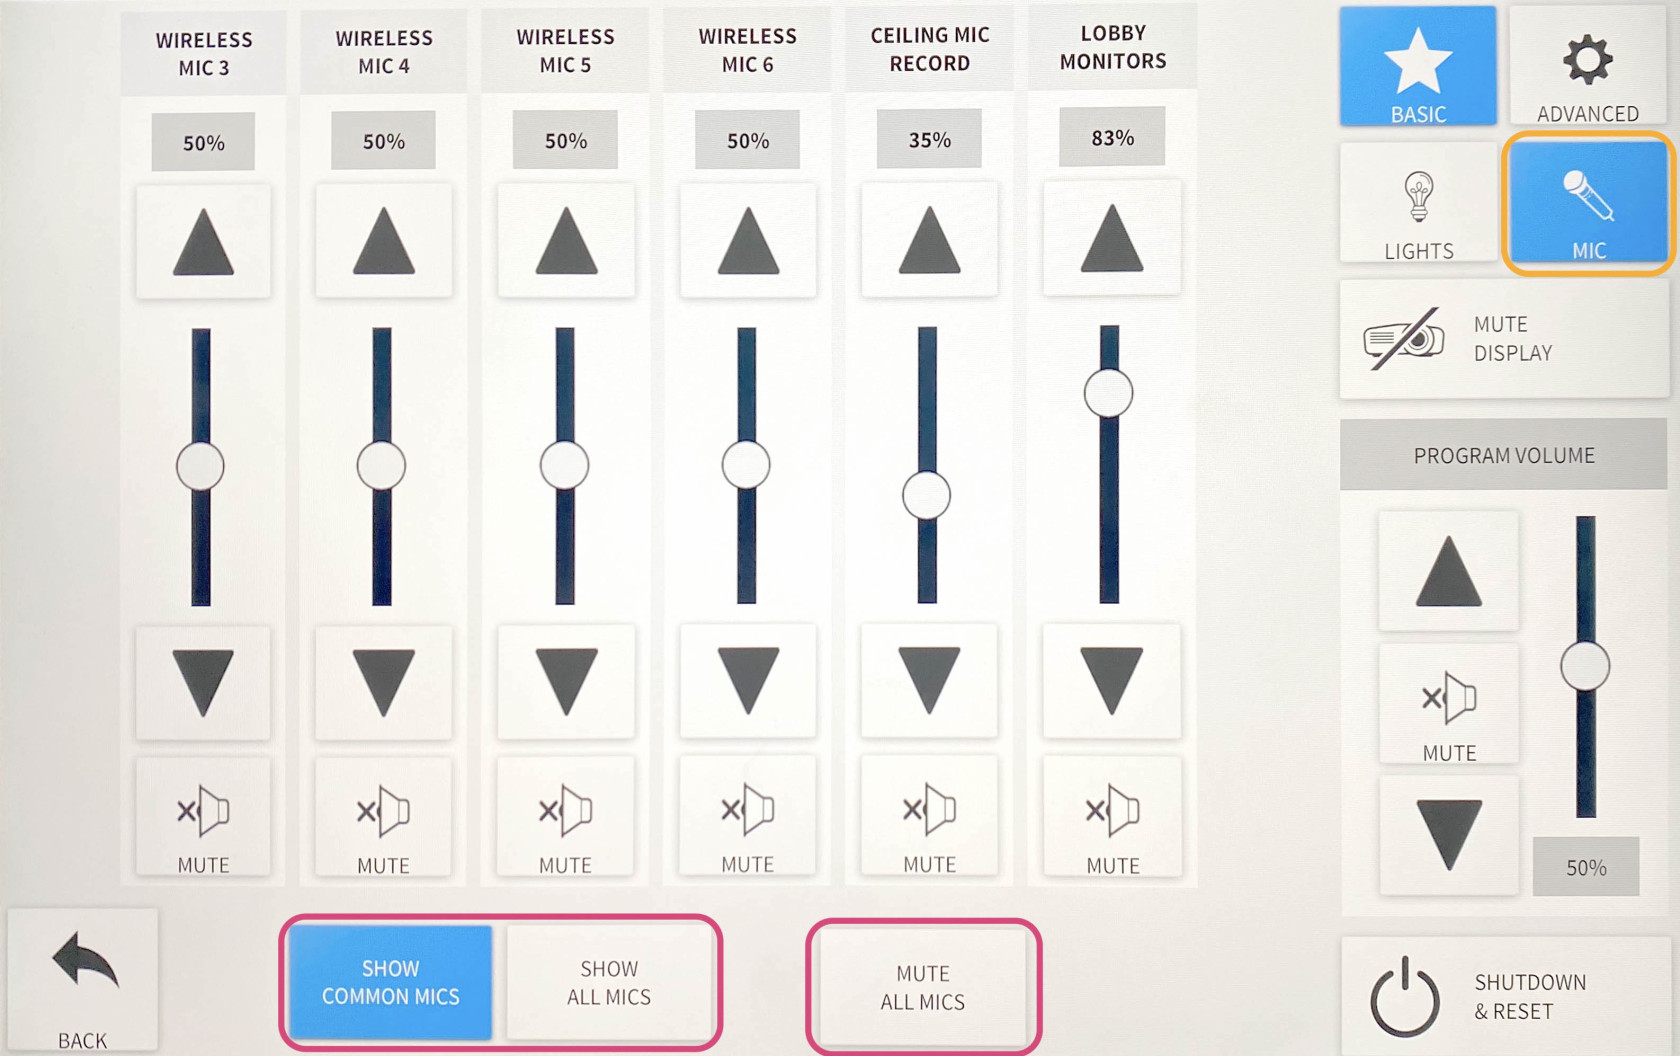
Click **MIC** on the right side, this will show you the common mics we use. Click **SHOW ALL MICS** to see more.
\*\*\* Best Practice before a lecture/talk is to **MUTE ALL MICS** then unmute the ones you want to use.
[](https://docs.icerm.brown.edu/uploads/images/gallery/2022-10/FhO2.jpg)
Camera Controls
The lecture hall has two cameras, one in the rear of the room and one in the front. By default, the system will use the rear camera with preset 1.
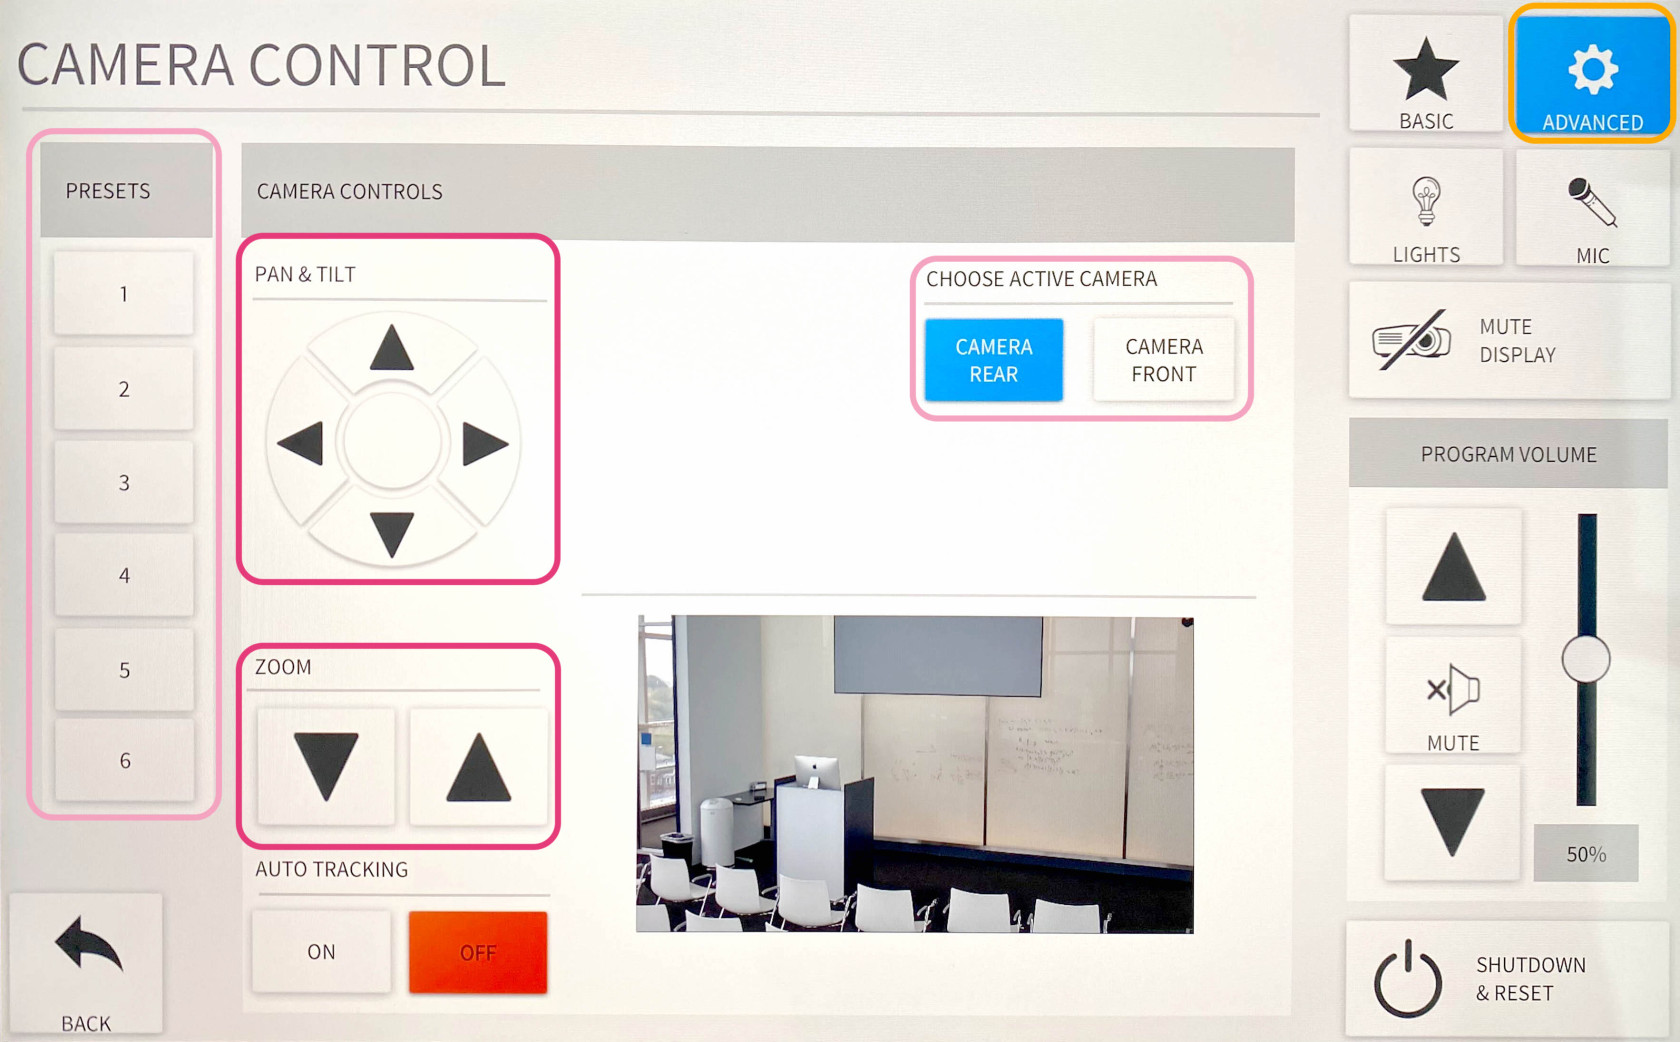
To use the camera controls, select **ADVANCED** then **CAMERA CONTROLS**.
Here you'll be able to control the camera with **PAN & TILT** and **ZOOM** functions. You'll also be able to switch between cameras by toggling between **CAMERA REAR** and **CAMERA FRONT**.
[](https://docs.icerm.brown.edu/uploads/images/gallery/2022-10/OI13.jpg)
Audio/Video Routing
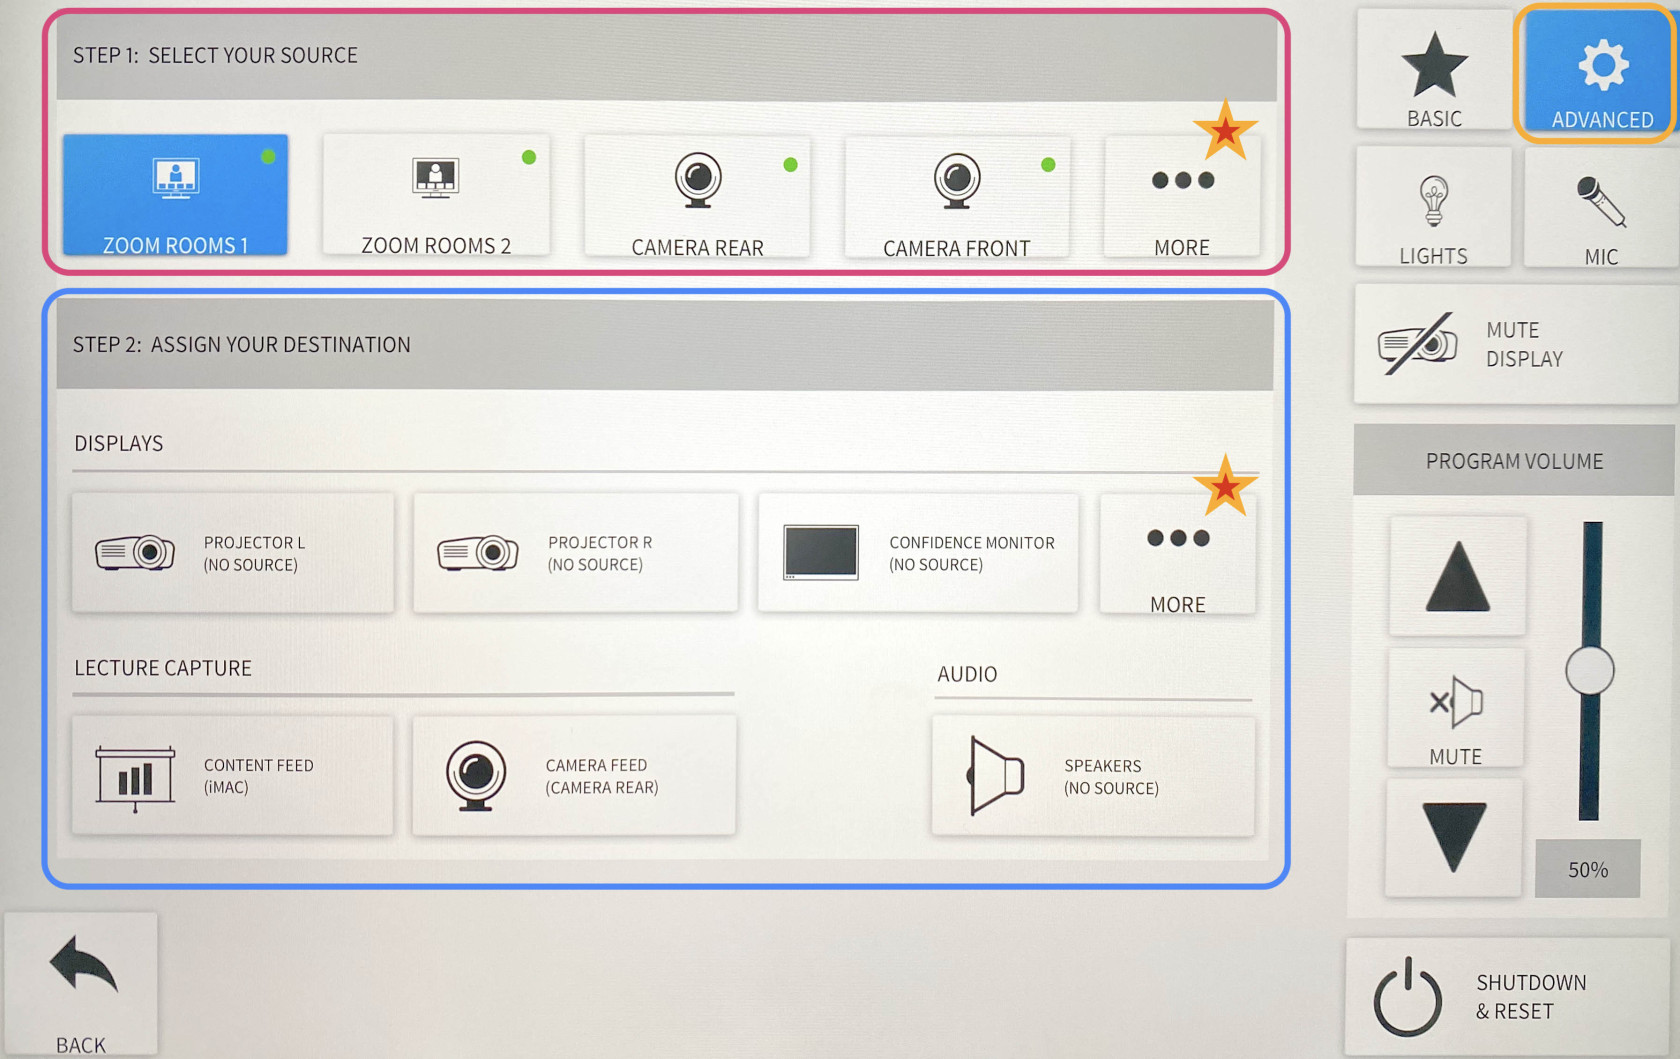
The Lecture hall has preset video/audio routing for the Laptop, iMac, Zoom, and Camera modes. These can all be changed manually to display whatever is desired.
Hit **ADVANCED**, then hit **AUDIO/VIDEO ROUTING**. Here you'll see two sections, **STEP 1: SELECT YOUR SOURCE** and **STEP 2: ASSIGN YOUR DESTINATION**.
This will allow you to change what's being projected on the displays, what is being captured for recordings/live streams, and where the sound output is coming from.
\*\*\* There are many unique options one can choose from, remember to click MORE in both sections 1 & 2 for more options.
[](https://docs.icerm.brown.edu/uploads/images/gallery/2022-10/ZCprouting.jpg)
Note:
Zoom rooms 1 - Presenter's shared screen/ Zoom participants sound
Zoom room 2 - Participant's camera feed/ No Zoom participant sound
Screen Display
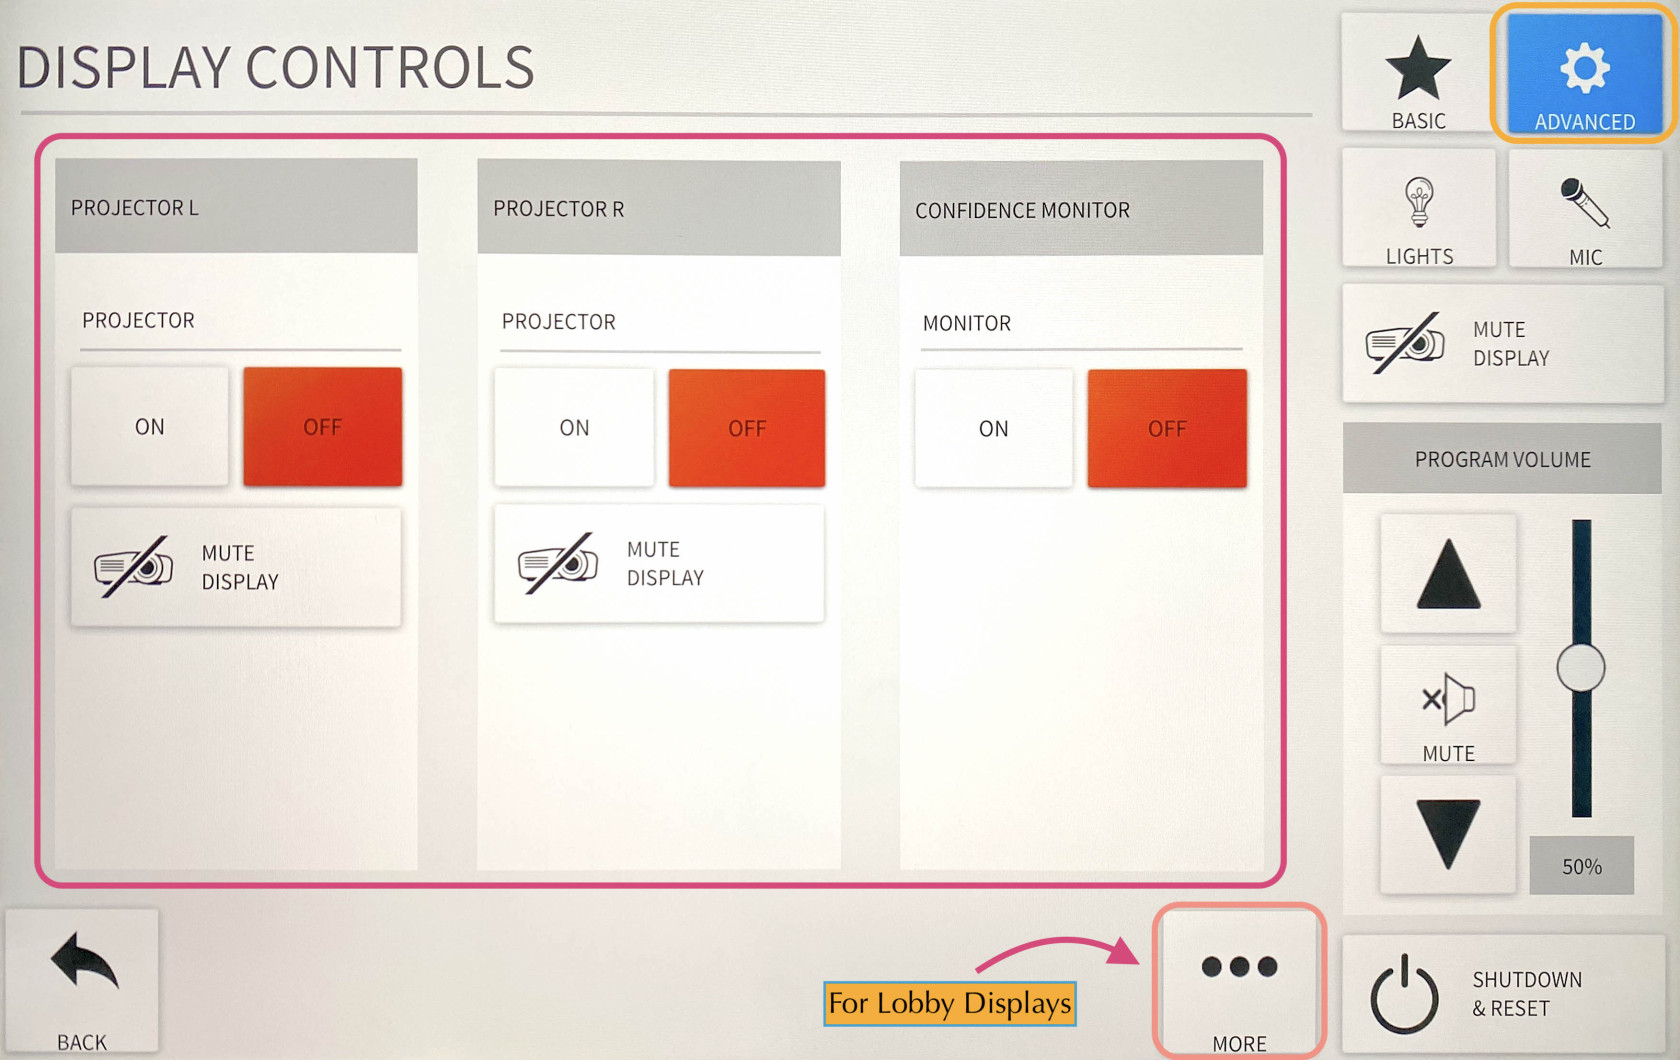
The Lecture Hall Crestron controls 5 displays. The left & right lobby monitors, the left & right projectors inside the room, and the confidence monitor located in the rear of the room.
To manually turn all of these off and on hit **ADVANCED**, then **DISPLAY CONTROLS**. Here you can toggle all 5 displays independently of each other. Hit **MORE** to see the two lobby displays.
[](https://docs.icerm.brown.edu/uploads/images/gallery/2022-10/display.jpg)
Lobby Monitors
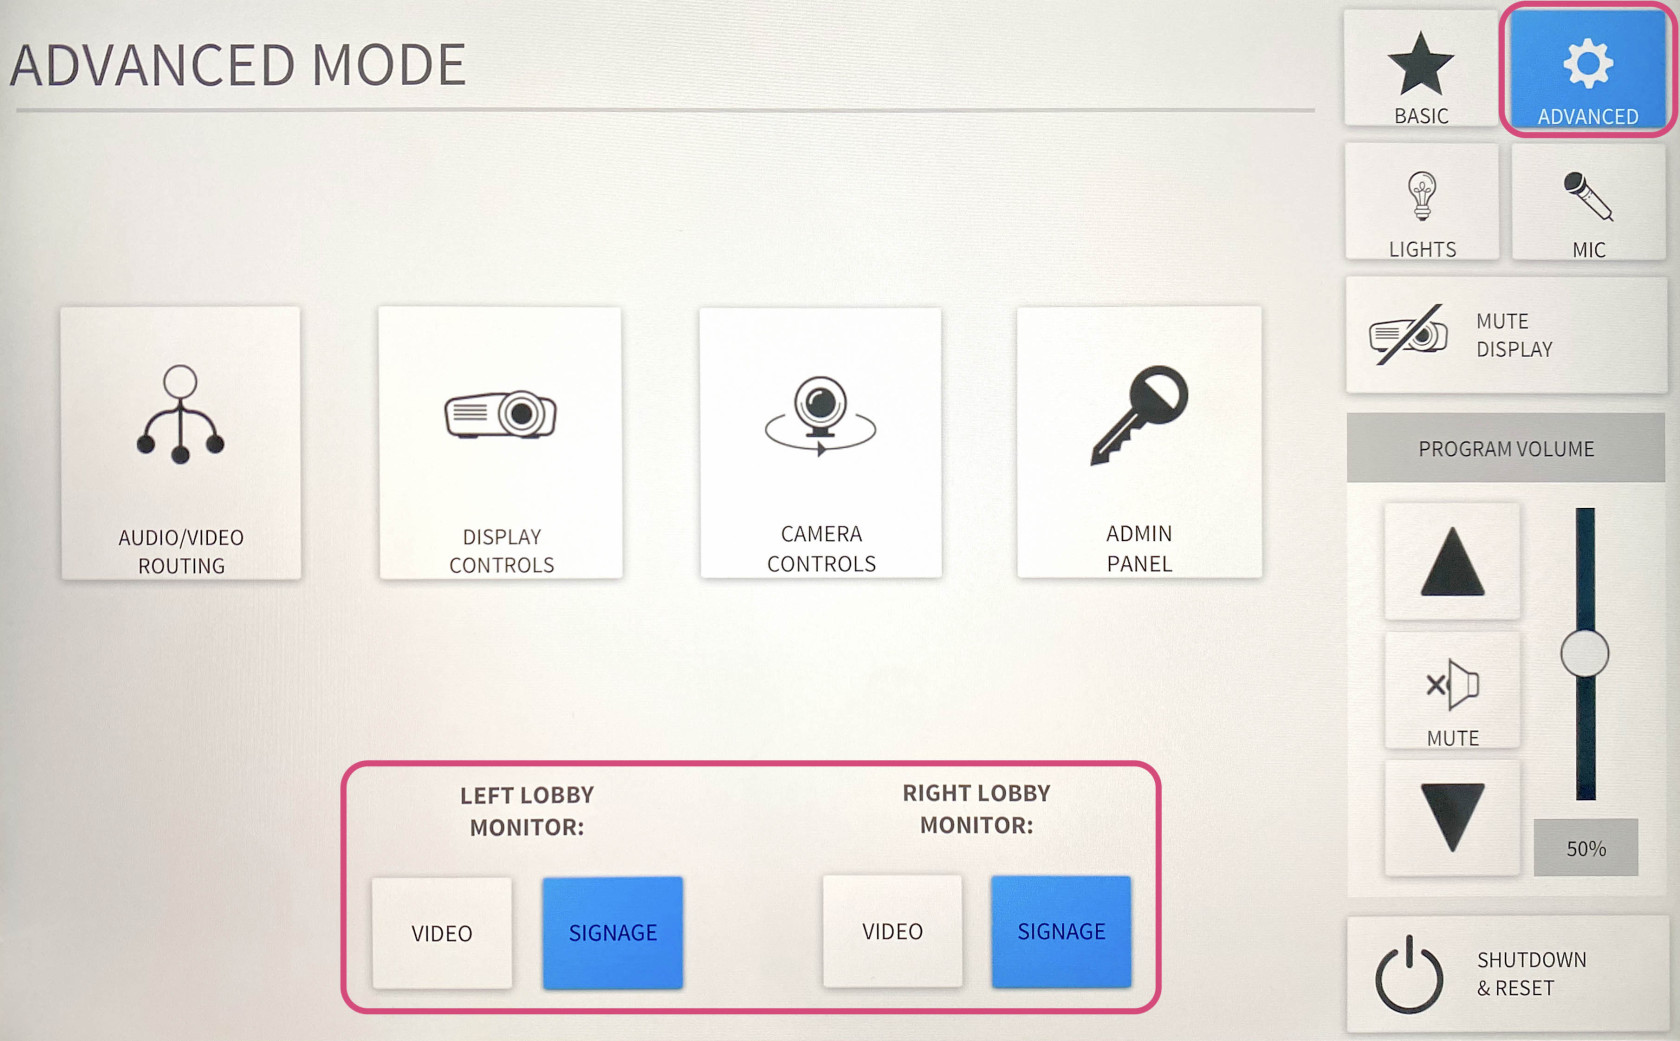
The lecture hall system is set up to stream the events to the two large monitors in the lobby area outside the lecture hall. By default, the monitors will automatically switch over when the lecture hall AV system is started and switch back to the signage when the AV system is shut down.
To manually turn the monitors from video -> signage or vice versa hit **ADVANCED**. Here you can toggle between **VIDEO** and **SIGNAGE** for both the left and right monitors.
[](https://docs.icerm.brown.edu/uploads/images/gallery/2022-10/b20lobby.jpg)
Note:
You can change the volume settings for the monitors under the **MIC** tab and adjust the **LOBBY MONITORS** volume slider.
Shades & Lights
#### Glass Wall Light
The glass wall light is controlled with a dimmer switch located in the front right of the room between the glass wall and the exit door.
#### Room Lights
There are two ways to control the room lights. The first is with the physical control panel located in the front right of the room between the glass wall and the exit door. The second is on the Crestron panel, in the top right corner under **LIGHTS**. For presentations/lectures make sure to turn the lights on as bright as they go.
#### Sun Shades and Room Darkening Shades
The room has two sets of shades: sun shades and room darkening shades. Both are controlled with switches located in the front right of the room between the glass wall and the exit door.
- The **sun shades** are the primary option to block out glare from the sun but still allow some light into the room. This is what ICERM normally uses during lectures.
- The **room darkening shades** are a much darker option that blocks out all of the light coming through the windows. These are used occasionally when watching video presentations in the room.
Laptop
1. Connect the laptop using the **HDMI/USB-c** cable in the middle of the conference table.
2. The projector should turn on, if not, press the **LAPTOP** button on the Creston control panel.
3. When you are all done with the room, please make sure to shut down the system. Go to the control panel, click **SHUTDOWN & RESET** in the bottom right corner, then hit **SHUTDOWN SYSTEM.**
iMac
1. Wake up the iMac in the back of the room using the wireless mouse/keyboard.
2. Press **iMAC** button on the Creston control panel
3. When you are all done with the room, please make sure to shut down the system. Go to the control panel, click **SHUTDOWN & RESET** in the bottom right corner, then hit **SHUTDOWN SYSTEM.**
**Note:**
If the mouse or keyboard is not responding, first check if they are turned on, then plug them in via lightning cable to charge.
Zoom
1. Click **Zoom** on Creston panel
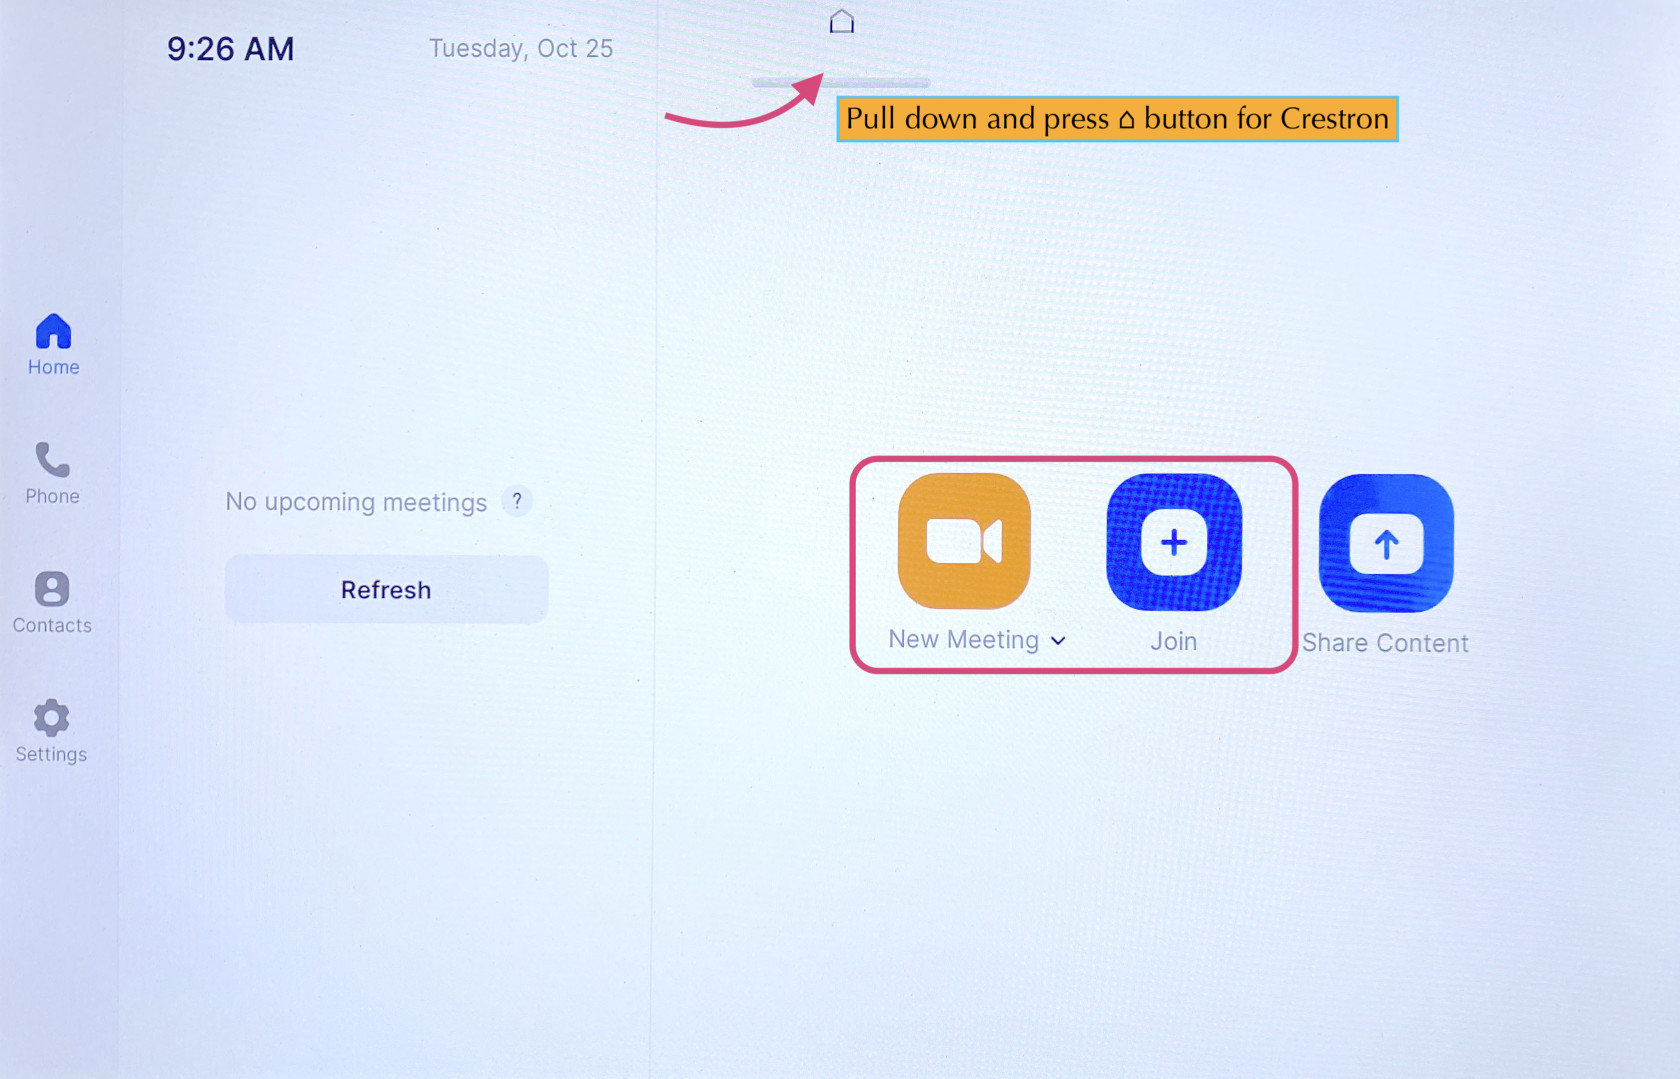
2. Pull down the tab at the top of the touchpad and click the **⌂** button to get to the Zoom panel.
3. Click the **Join** button and enter the code for an existing Zoom Meeting or click **New Meeting** to start a new Zoom Meeting.
[](https://docs.icerm.brown.edu/uploads/images/gallery/2022-10/HFw2.jpg)
Once in a Zoom meeting, to Share Content:
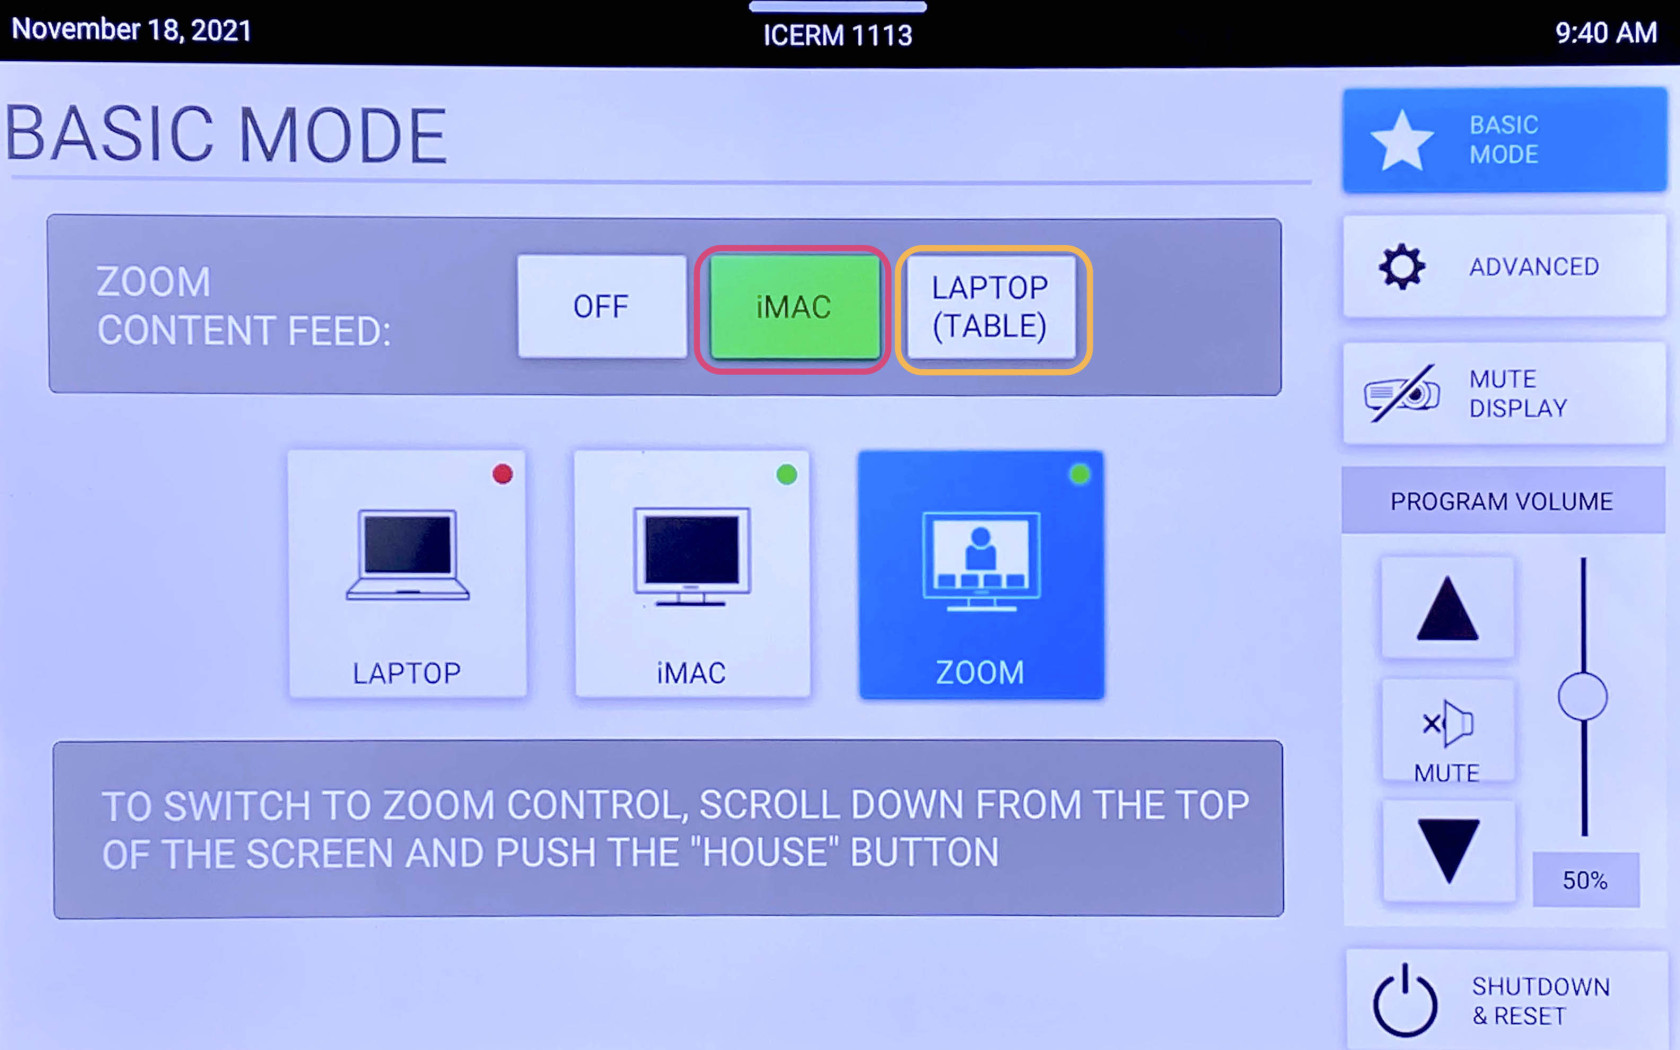
- From Laptop: plug the laptop in with the HDMI/USB-c cable in the center of the conference table. This should trigger content to start sharing from a laptop. If it doesn't - Press the **Share Content** button on the Zoom panel, then toggle back to the Crestron panel and chose **LAPTOP (TABLE)** for Zoom Content Feed.
- From IMac: Press **Share Content** on the Zoom panel. Toggle over to the Crestron panel and press **iMac** for Zoom Content Feed.
\*\*To stop sharing either unplug the laptop, press **OFF** for Zoom Content Feed, or press **Stop Share** on the Zoom panel.
**Note:**
To change the camera angle, toggle to the Creston panel, press **ADVANCED**, then **CAMERA CONTROLS**. Use the **PAN & TIL**T and **ZOOM** buttons to get the camera angle just right.
When finished with the Zoom meeting press **End**, then toggle back to the Crestron control panel click **SHUTDOWN & RESET** in the bottom right corner, then hit **SHUTDOWN SYSTEM.**
Blu-Ray
1. Locate the Blu-Ray player in the AV rack in the cabinet in the back of the room on the window side. Power on the Blu-Ray player and insert your Blu-Ray into the disc drive.
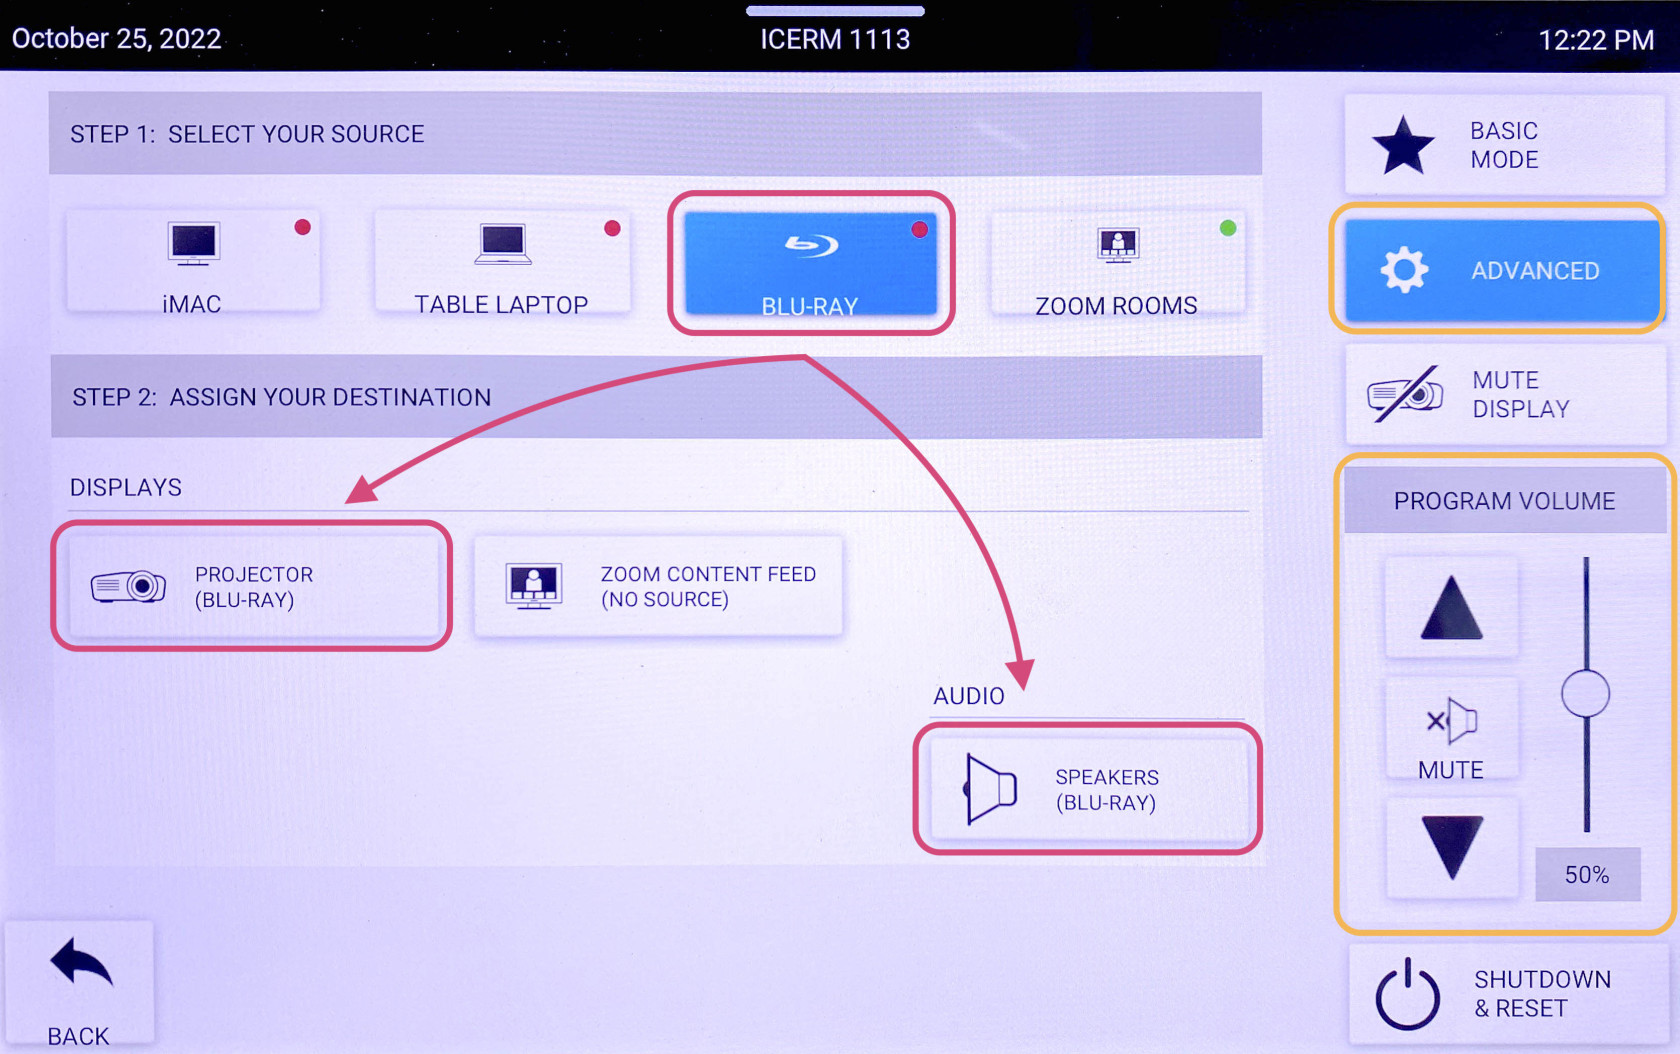
2. On the touchpad, within the Creston panel, click **ADVANCED**.
3. Click **AUDIO & VIDEO ROUTING**, tap **BLU-RAY** then hit the **Projector** button and **Audio** button so they both read (BLU-RAY). Then hit **BACK** or **ADVANCED**
[](https://docs.icerm.brown.edu/uploads/images/gallery/2022-10/jOlblu-ray.jpg)
4\. Click **BLU-RAY CONTROLS**, this will bring up a control panel that will allow you to navigate the player menu and control playback. Use the **PROGRAM VOLUME** to change to volume.
5\. When you are all done with the room, please make sure to shut down the system. Go to the control panel, click **SHUTDOWN & RESET** in the bottom right corner, then hit **SHUTDOWN SYSTEM.**
**\*\*Don't forget to eject your Blu-Ray disc from the player before leaving**
Laptop
To share the screen of your laptop or tablet,
1. Connect via the HDMI or USB-C cable located near the podium.
2. On the control panel, push the **LAPTOP** button.
\*\* Remember to click **Shutdown & Reset** in the bottom right corner, then hit **Shutdown System** when you are all finished with the room.
Room PC
Click **Room PC** to turn the projector on. This will display a mac mini located in the back of the classroom. Use the wireless mouse and keyboard on the podium to wake up the computer (if asleep). This will act like a normal computer.
**Note:**
Make sure to turn the mouse/keyboard on, more batteries for the keyboard are located on the bottom shelf of the podium.
Remember to click **Shutdown & Reset** in the bottom right corner, then hit **Shutdown System** when you are all finished with the room.
Zoom
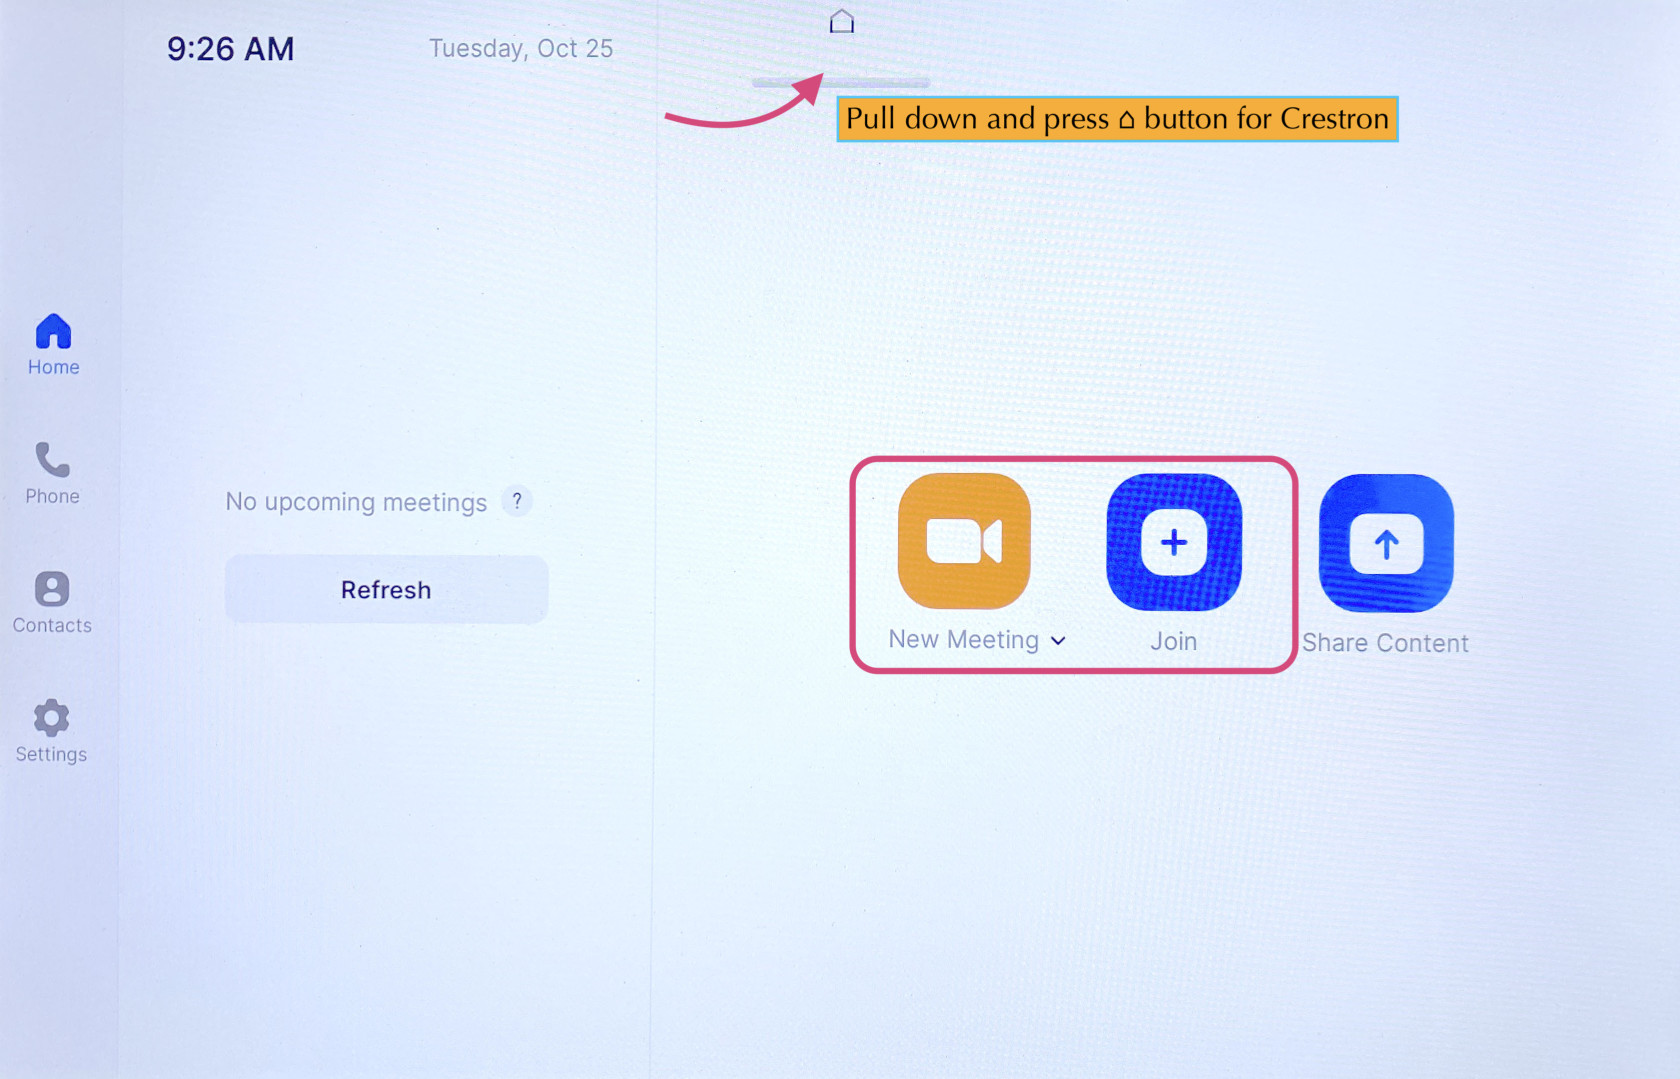
When **Zoom** is clicked the projector will turn on and display a 'Zoom Screen Saver', pull down the tab at the top of the panel and click the **⌂** button to get to the Zoom home page. Here you will be able to join a Zoom meeting.
[](https://docs.icerm.brown.edu/uploads/images/gallery/2022-10/1BQ2.jpg)
Click the **Join** button and enter the code for the Zoom Meeting. Once joined you will have many options, start by clicking the **Start** **Video** button to share video from the room.
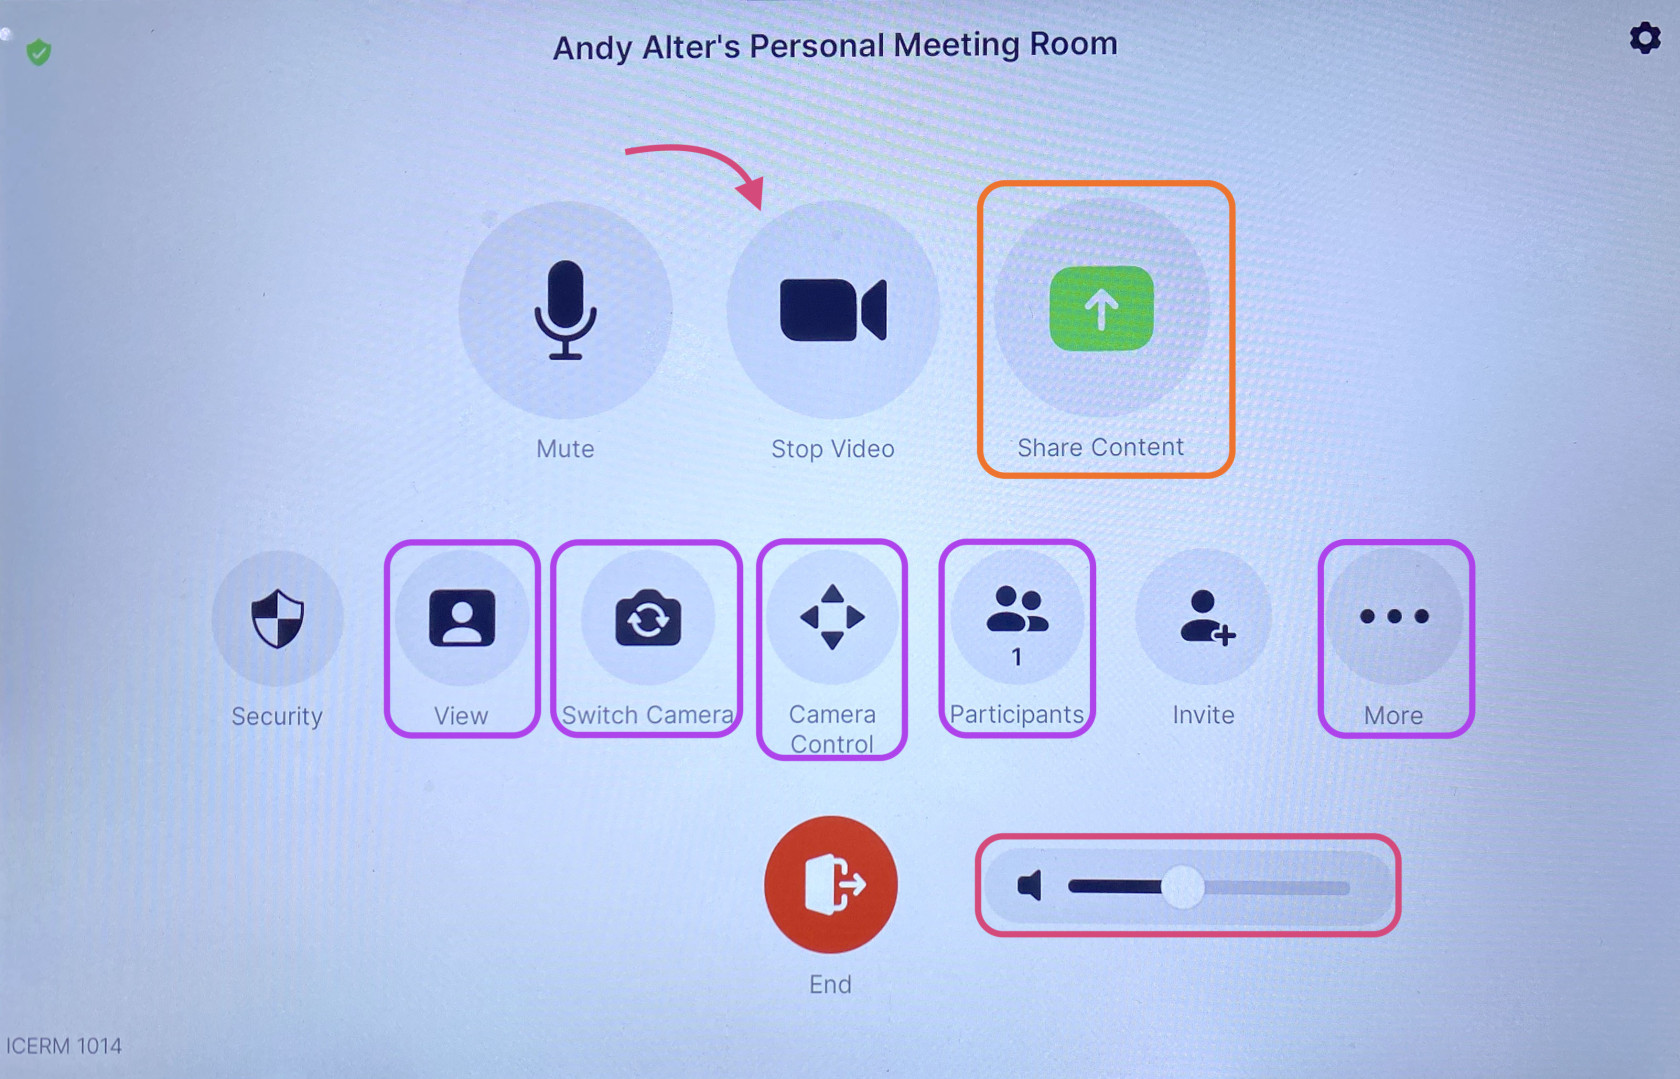
Some options you might use are:
- Share Content (from a laptop)- Once clicked a 'Share Content' pop-up will appear, make sure your laptop is plugged in via the HDMI cable, then click **Use HDMI** to share.
- View - This option will allow you to toggle between speaker, thumbnails, and gallery modes.
- Switch Camera - This button is to change the view of the room, once clicked a pop-up will appear. There you can toggle between the two 'AVer CAM520 Pro2' choices to see a view of the front or back of the room.
- Camera Control - Once clicked a pop-up will appear, use the arrow keys to position the camera however you'd like.
- Participants - Click this to see who/how many participants there are in the current Zoom meeting.
- More - Chat, Reactions, Breakout Rooms
- Volume - Controls the Output sound
When finished with the Zoom meeting press **End**, then toggle back to the main control panel to shut down the system.
\*\* Remember to toggle back to the Crestron panel and click **Shutdown & Reset** in the bottom right corner, then hit **Shutdown System** when you are all finished with the room.